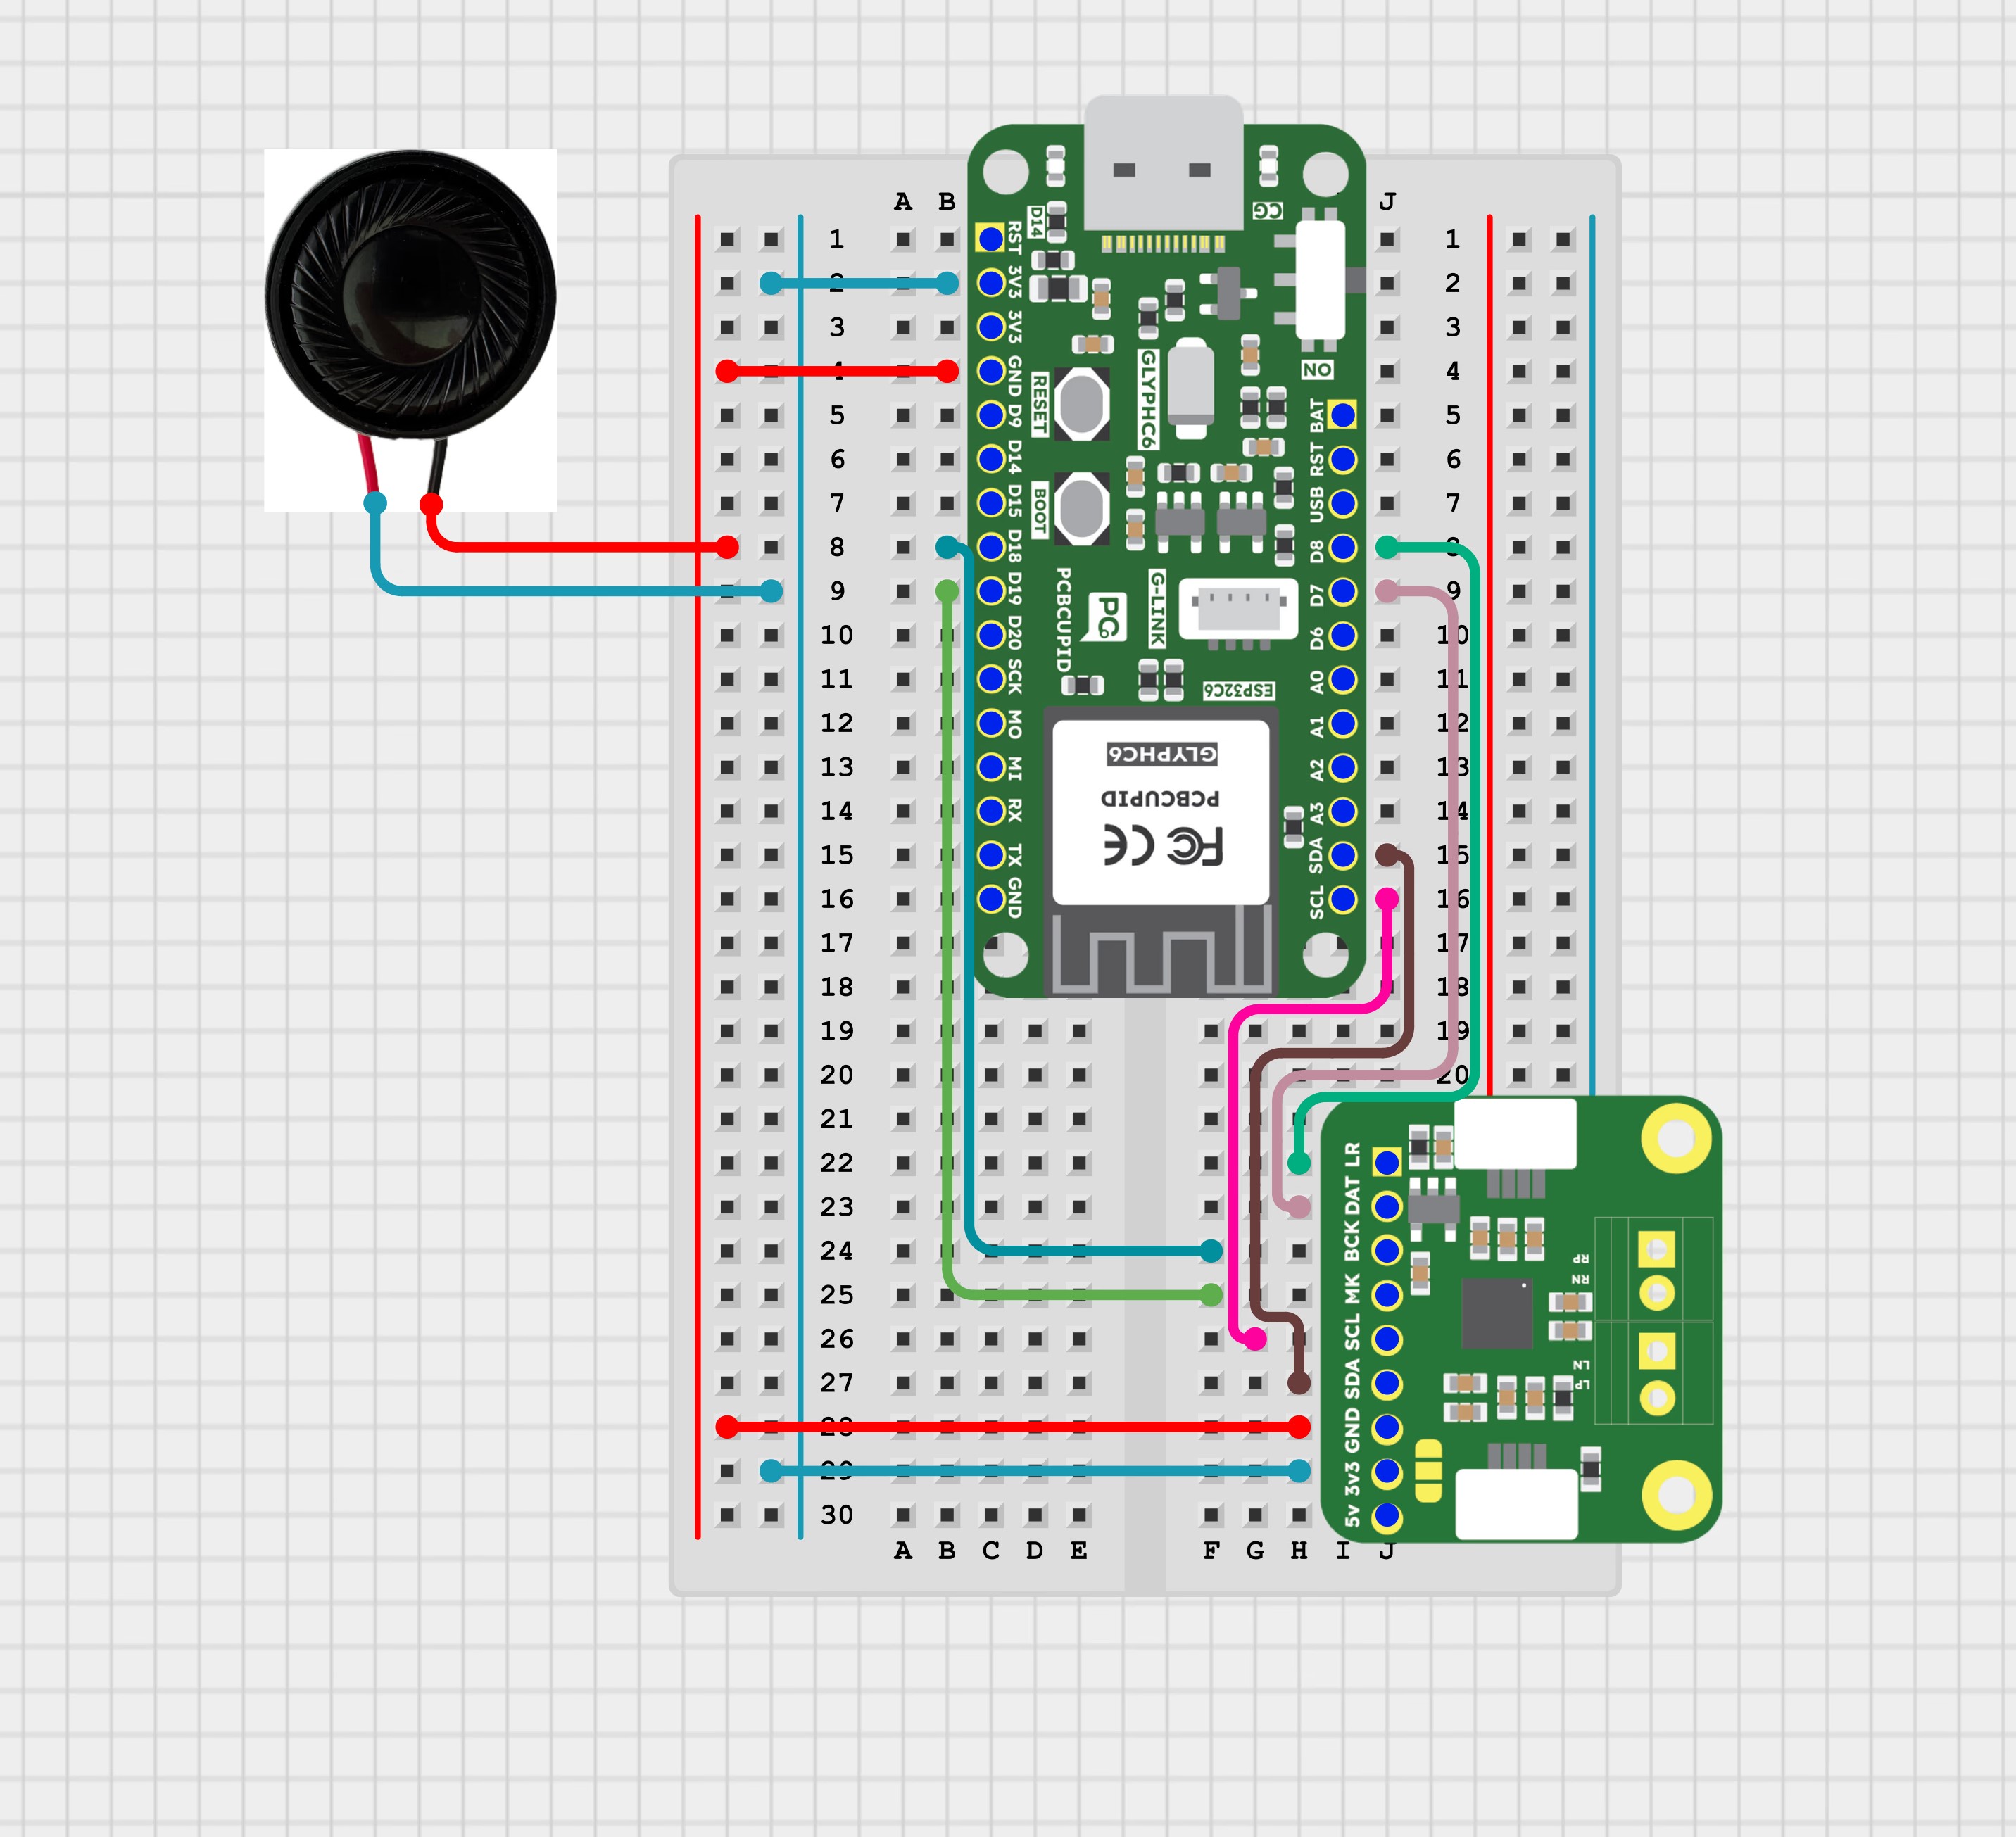
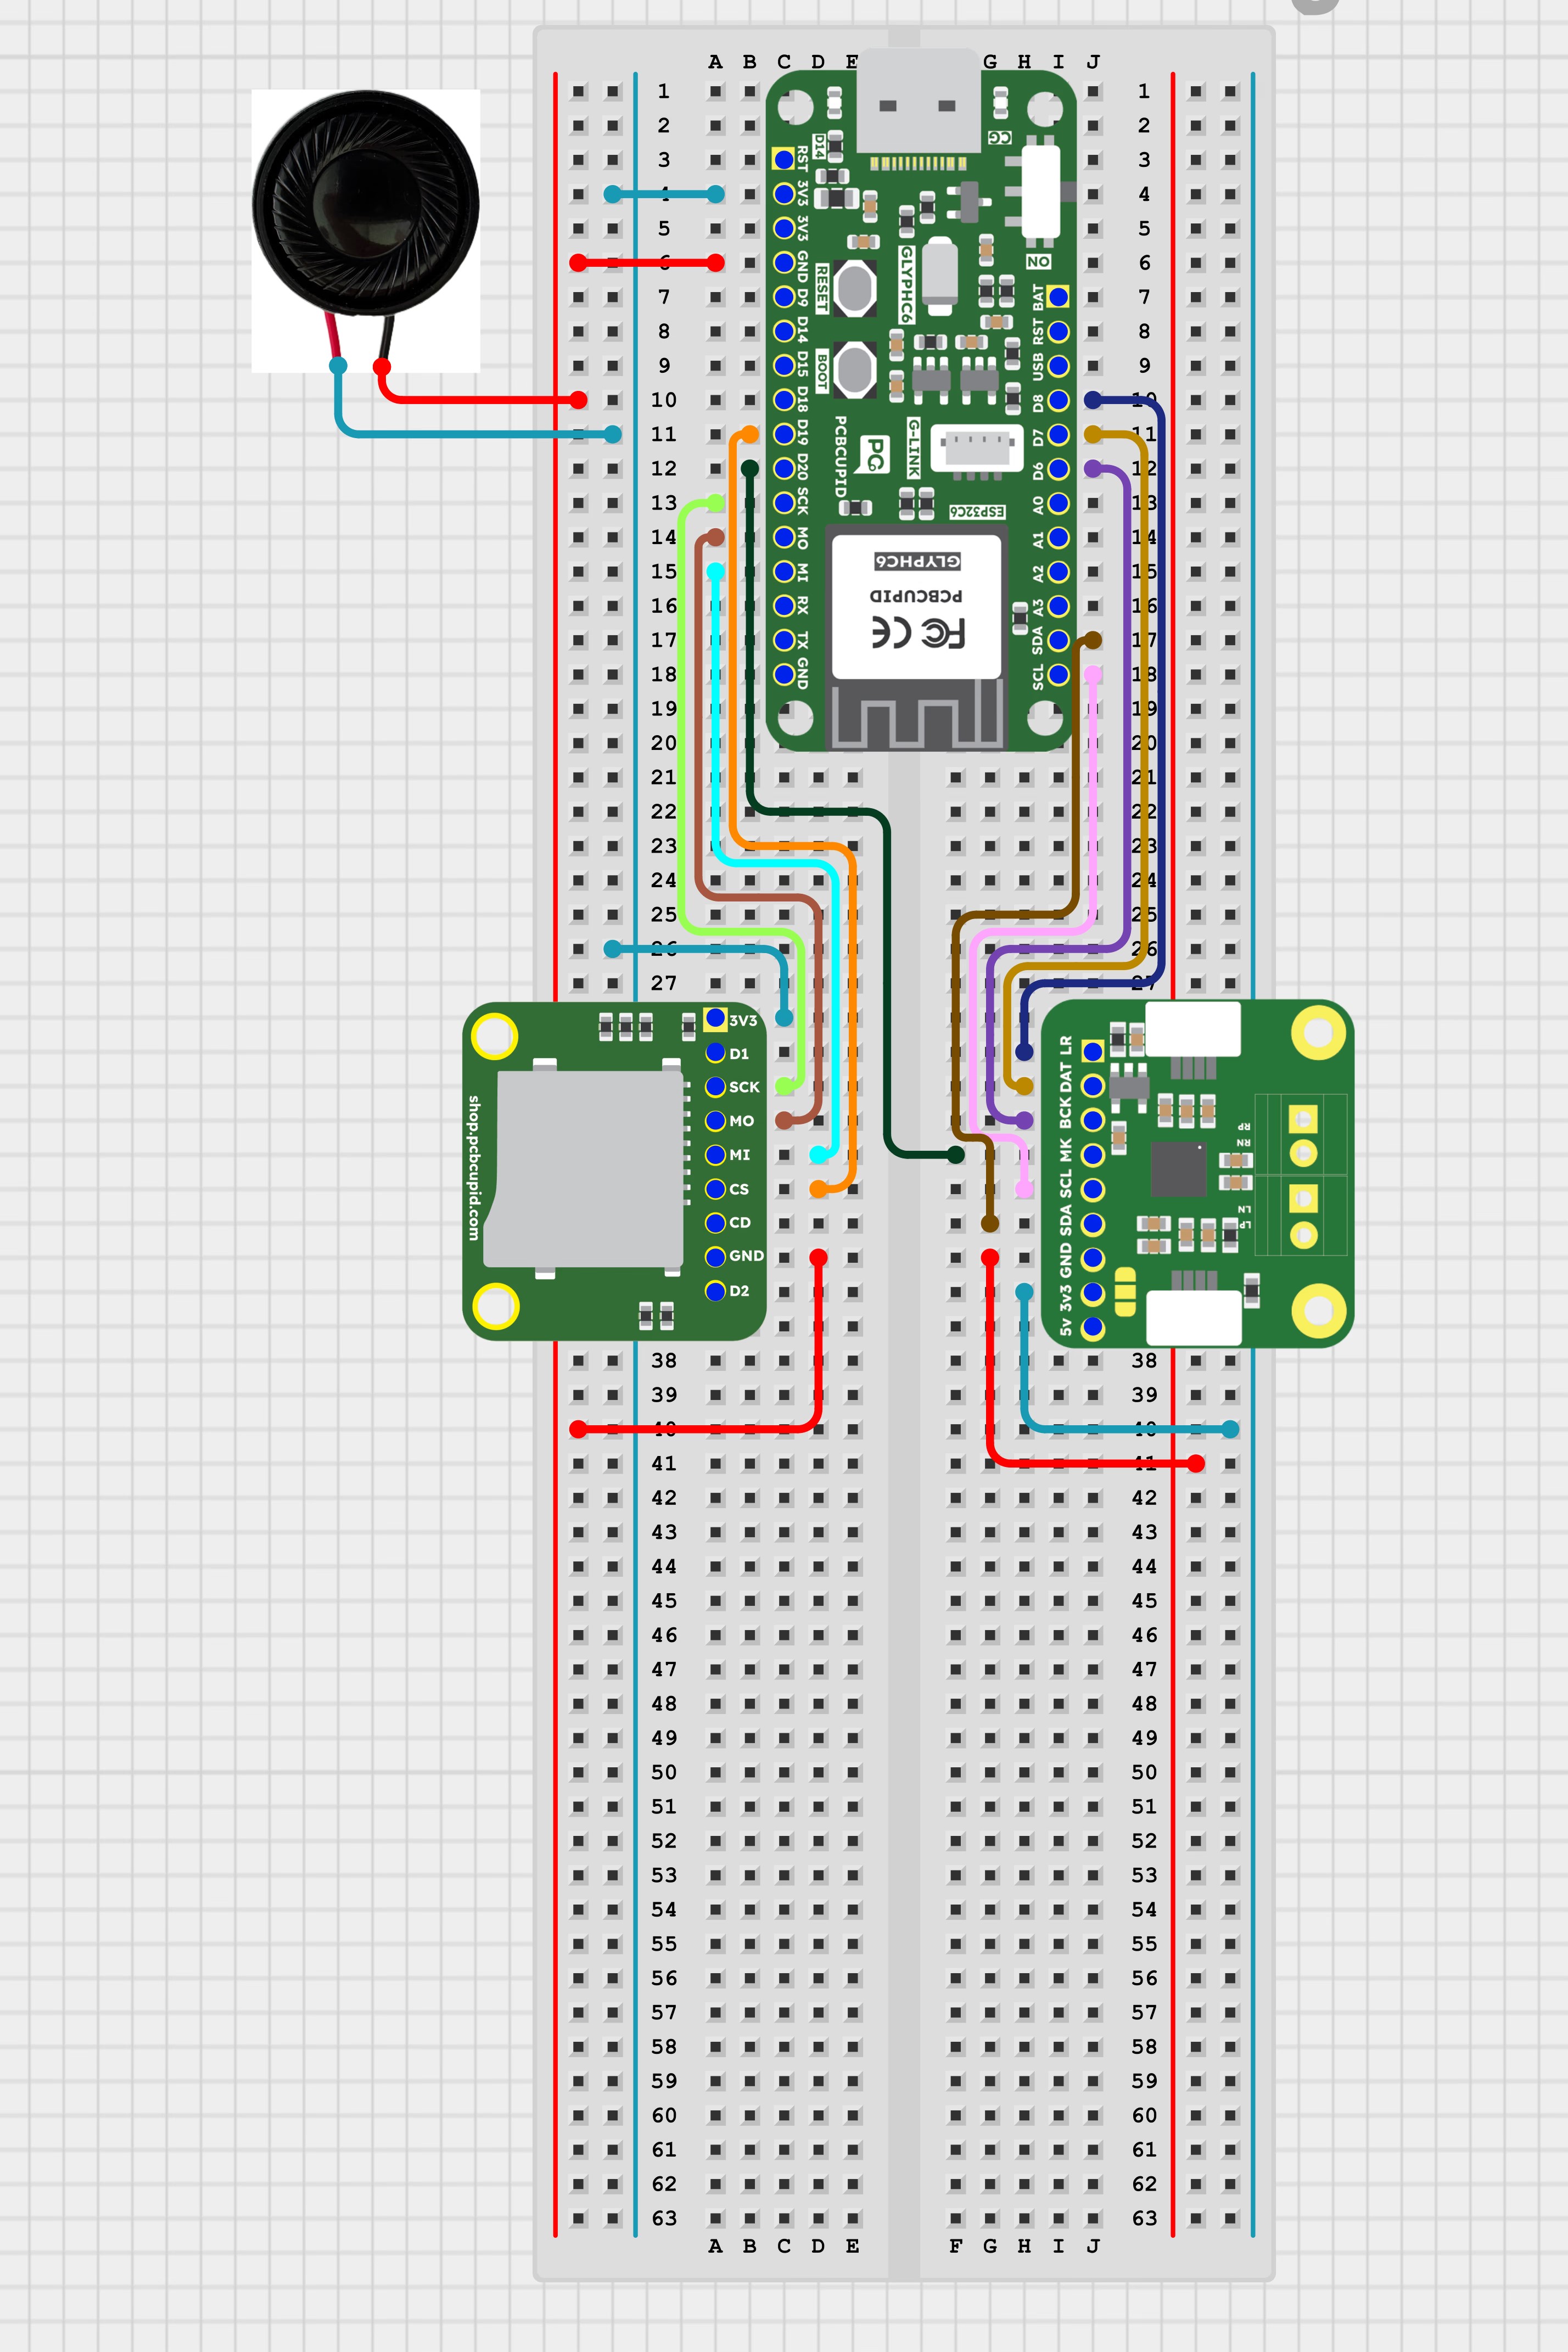
Interface the NAU8325 digital input Class-D audio amplifier and codec module with a Glyph ESP32 board over I²S to generate sine waves and stream SD card audio.
The NAU8325 is a highly efficient digital input Class-D audio amplifier designed by Nuvoton Technology Corporation. It is well-suited for compact and battery-powered devices, including portable speakers, IoT devices, tablets, and smart audio systems. It features integrated digital-to-analog conversion, eliminating the need for an external DAC and reducing system complexity.
The NAU8325 receives digital audio via the I²S (Inter-IC Sound) protocol, which transfers pulse-code modulated (PCM) data between the MCU and the amplifier.I²S Signals:
BCLK (Bit Clock): Synchronizes each individual bit of audio data.
LRCK / WS (Word Select): Indicates whether the data is for the left or right channel.
SD (Serial Data): The real-time, synchronized audio stream.
{"docsConfig":{"theme":"mint","$schema":"https://mintlify.com/docs.json","name":"PCB Cupid","colors":{"primary":"#0D9373"},"favicon":"https://mintcdn.com/pcbcupid-bae3761c/4dXNuJjZhqL5zqVd/images/favicon_PCBcupid.png?fit=max\u0026auto=format\u0026n=4dXNuJjZhqL5zqVd\u0026q=85\u0026s=697c4189e0a983e1722bddbedde79f61","appearance":{"strict":true},"background":{"decoration":"gradient"},"navbar":{"links":[{"href":"https://spell.pcbcupid.com","label":"Circuit Spell"},{"href":"https://shop.pcbcupid.com","label":"Shop"},{"href":"/","label":"Learn"},{"href":"https://events.pcbcupid.com","label":"Events"},{"href":"https://forum.pcbcupid.com","label":"Forum"},{"href":"https://pcbcupid.com/articles","label":"Articles"},{"href":"https://pcbcupid.com/tools","label":"Tools"}]},"seo":{"indexing":"all"},"fonts":{"family":"Space Grotesk","weight":400},"icons":{"library":"lucide"},"styling":{"eyebrows":"breadcrumbs","latex":true},"contextual":{"options":["copy","chatgpt","claude","cursor","vscode","mcp"],"display":"toc"},"thumbnails":{"appearance":"dark"},"navigation":{"pages":[]}},"deployment":{"deploymentMetadataValue":{"subdomain":"pcbcupid-bae3761c","hasAudioNarration":false,"actualSubdomain":"pcbcupid-bae3761c","customDomains":["learn.pcbcupid.com"],"gitSource":{"type":"github","owner":"pcbcupid","repo":"pcbcupid-docs","deployBranch":"main","contentDirectory":"","isPrivate":false,"mountPath":"","label":""},"chroma":{"liveDeploymentHistoryId":"6ad33b89f14718805ff37c0d","collectionId":"63bff0eb-3852-4247-8be1-e01354e58922","schemaVersion":"v3","latestBuiltDeploymentHistoryId":"6ad33b89f14718805ff37c0d"},"feedback":{"thumbs":true,"edits":true,"issues":true},"entitlements":{"AI_CHAT":{"status":"DISABLED"}},"buildId":"6ad33b89f14718805ff37c0d","clientVersion":"0.0.3964","searchFilterCounts":[{"language":"default","tag":"Documentation","count":62},{"language":"default","tag":"Modules","count":52},{"language":"default","tag":"PCB Design","count":45},{"language":"default","tag":"Examples","count":30},{"language":"default","tag":"G-Mod","count":17},{"language":"default","tag":"Glyph","count":17},{"language":"default","tag":"KiCad","count":16},{"language":"default","tag":"Basic","count":15},{"language":"default","tag":"Welcome","count":9},{"language":"default","tag":"G-Sense","count":8}]},"assistantConfig":{"enableAskAiButton":false,"enableStarterQuestions":false,"enableContextualStarterQuestions":false,"enableAskAiSearchBar":true},"hasChatPermissions":false,"hasWebMcpPermissions":false,"toggles":[{"name":"kill-isr","enabled":true,"variant":{"name":"disabled","enabled":false,"feature_enabled":true},"impressionData":false},{"name":"agent-mintlify-slack","enabled":true,"variant":{"name":"disabled","enabled":false,"feature_enabled":true},"impressionData":false},{"name":"editor-v7-file-tree","enabled":true,"variant":{"name":"disabled","enabled":false,"feature_enabled":true},"impressionData":false},{"name":"agent-integrations-settings","enabled":true,"variant":{"name":"disabled","enabled":false,"feature_enabled":true},"impressionData":false},{"name":"automations-pr-grouping","enabled":true,"variant":{"name":"disabled","enabled":false,"feature_enabled":true},"impressionData":false},{"name":"custom-prefix","enabled":true,"variant":{"name":"disabled","enabled":false,"feature_enabled":true},"impressionData":false},{"name":"analytics-v7","enabled":true,"variant":{"name":"disabled","enabled":false,"feature_enabled":true},"impressionData":false},{"name":"user-flows-analytics","enabled":true,"variant":{"name":"disabled","enabled":false,"feature_enabled":true},"impressionData":false},{"name":"no-publish-flow","enabled":true,"variant":{"name":"disabled","enabled":false,"feature_enabled":true},"impressionData":false},{"name":"workos-onboarding","enabled":true,"variant":{"name":"disabled","enabled":false,"feature_enabled":true},"impressionData":false},{"name":"llms-txt-v2","enabled":true,"variant":{"name":"disabled","enabled":false,"feature_enabled":true},"impressionData":false},{"name":"pause-universal-search-reconcile","enabled":true,"variant":{"name":"disabled","enabled":false,"feature_enabled":true},"impressionData":false},{"name":"snapshot-serving-live","enabled":true,"variant":{"name":"disabled","enabled":false,"feature_enabled":true},"impressionData":false},{"name":"stripTemperatureMiddleware","enabled":true,"variant":{"name":"disabled","enabled":false,"feature_enabled":true},"impressionData":false},{"name":"per-site-search-delta","enabled":true,"variant":{"name":"disabled","enabled":false,"feature_enabled":true},"impressionData":false},{"name":"support-platform-pylon-zendesk","enabled":true,"variant":{"name":"disabled","enabled":false,"feature_enabled":true},"impressionData":false},{"name":"snapshot-serving","enabled":true,"variant":{"name":"disabled","enabled":false,"feature_enabled":true},"impressionData":false},{"name":"instant-rollback","enabled":true,"variant":{"name":"disabled","enabled":false,"feature_enabled":true},"impressionData":false},{"name":"granular-notifications-server","enabled":true,"variant":{"name":"disabled","enabled":false,"feature_enabled":true},"impressionData":false},{"name":"granular-notifications","enabled":true,"variant":{"name":"disabled","enabled":false,"feature_enabled":true},"impressionData":false},{"name":"editor-private-page-search","enabled":true,"variant":{"name":"disabled","enabled":false,"feature_enabled":true},"impressionData":false},{"name":"automations-fable","enabled":true,"variant":{"name":"disabled","enabled":false,"feature_enabled":true},"impressionData":false},{"name":"fixed-ai-action-pricing","enabled":true,"variant":{"name":"disabled","enabled":false,"feature_enabled":true},"impressionData":false},{"name":"automation-resolve-merge-conflict","enabled":true,"variant":{"name":"disabled","enabled":false,"feature_enabled":true},"impressionData":false},{"name":"scoped-publishing","enabled":true,"variant":{"name":"disabled","enabled":false,"feature_enabled":true},"impressionData":false},{"name":"mintql","enabled":true,"variant":{"name":"disabled","enabled":false,"feature_enabled":true},"impressionData":false},{"name":"page-level-analytics","enabled":true,"variant":{"name":"disabled","enabled":false,"feature_enabled":true},"impressionData":false},{"name":"editor-version-history-v2","enabled":true,"variant":{"name":"disabled","enabled":false,"feature_enabled":true},"impressionData":false},{"name":"editor-nav-generations","enabled":true,"variant":{"name":"disabled","enabled":false,"feature_enabled":true},"impressionData":false},{"name":"billing-page-v2","enabled":true,"variant":{"name":"disabled","enabled":false,"feature_enabled":true},"impressionData":false},{"name":"workspace-projects","enabled":true,"variant":{"name":"disabled","enabled":false,"feature_enabled":true},"impressionData":false},{"name":"assistant-v5","enabled":true,"variant":{"name":"disabled","enabled":false,"feature_enabled":true},"impressionData":false},{"name":"byok-sep-25","enabled":true,"variant":{"name":"disabled","enabled":false,"feature_enabled":true},"impressionData":false},{"name":"fork-pr-previews","enabled":true,"variant":{"name":"disabled","enabled":false,"feature_enabled":true},"impressionData":false},{"name":"revalidation-jwt","enabled":true,"variant":{"name":"disabled","enabled":false,"feature_enabled":true},"impressionData":false},{"name":"vite-origin","enabled":true,"variant":{"name":"disabled","enabled":false,"feature_enabled":true},"impressionData":false},{"name":"editor-agent-model-picker","enabled":true,"variant":{"name":"disabled","enabled":false,"feature_enabled":true},"impressionData":false},{"name":"billing-updated-9-15","enabled":true,"variant":{"name":"disabled","enabled":false,"feature_enabled":true},"impressionData":false},{"name":"hobby-abuse-scan","enabled":true,"variant":{"name":"disabled","enabled":false,"feature_enabled":true},"impressionData":false},{"name":"dashboard-inbox","enabled":true,"variant":{"name":"disabled","enabled":false,"feature_enabled":true},"impressionData":false}],"isAtlas":false,"googleFontsInlined":true},"customCss":[],"page":{"pagePath":"documentation/modules/g-mod/audio-codec","slug":"/documentation/modules/g-mod/audio-codec","pageMetadata":{"description":"Interface the NAU8325 digital input Class-D audio amplifier and codec module with a Glyph ESP32 board over I²S to generate sine waves and stream SD card audio.","title":"Audio Codec","sidebarTitle":"Audio Codec","href":"/documentation/modules/g-mod/audio-codec"},"description":{"compiledSource":"\"use strict\";\nconst {jsx: _jsx} = arguments[0];\nconst {useMDXComponents: _provideComponents} = arguments[0];\nfunction _createMdxContent(props) {\n const _components = {\n p: \"p\",\n ..._provideComponents(),\n ...props.components\n };\n return _jsx(_components.p, {\n children: \"Interface the NAU8325 digital input Class-D audio amplifier and codec module with a Glyph ESP32 board over I²S to generate sine waves and stream SD card audio.\"\n });\n}\nfunction MDXContent(props = {}) {\n const {wrapper: MDXLayout} = {\n ..._provideComponents(),\n ...props.components\n };\n return MDXLayout ? _jsx(MDXLayout, {\n ...props,\n children: _jsx(_createMdxContent, {\n ...props\n })\n }) : _createMdxContent(props);\n}\nreturn {\n default: MDXContent\n};\n","frontmatter":{},"scope":{}},"pageType":"default","mdx":{"mdxSource":{"compiledSource":"\"use strict\";const{Fragment:_Fragment,jsx:_jsx,jsxs:_jsxs}=arguments[0];const{useMDXComponents:_provideComponents}=arguments[0];const ShopHeader=({title,url})=>{const _components={a:`a`,..._provideComponents()};return _jsx(`div`,{style:{display:`flex`,justifyContent:`flex-end`,alignItems:`center`,width:`100%`,marginBottom:`1rem`,gap:`20px`},children:_jsx(_components.a,{href:url,target:`_blank`,rel:`noopener noreferrer`,style:{display:`inline-flex`,alignItems:`center`,backgroundColor:`#00b894`,color:`#fff`,padding:`8px 18px`,borderRadius:`8px`,textDecoration:`none`,fontSize:`0.95rem`,fontWeight:600,whiteSpace:`nowrap`,flexShrink:0},children:`Shop now`})})};const ImgGallery=({images,modelUrl})=>{var[active,setActive]=useState(0);var[show3D,setShow3D]=useState(false);var[isFullscreen,setIsFullscreen]=useState(false);var[fullscreenDialog,setFullscreenDialog]=useState(null);useEffect(function(){if(show3D||isFullscreen||images.length\u003c=1)return;var t=setTimeout(function(){setActive(function(p){return(p+1)%images.length})},3500);return function(){clearTimeout(t)}});var img=images[active];function openFullscreen(){var dialog=fullscreenDialog;if(dialog\u0026\u0026!dialog.open)dialog.showModal();setIsFullscreen(true)}function closeFullscreen(){var dialog=fullscreenDialog;if(dialog\u0026\u0026dialog.open)dialog.close();else setIsFullscreen(false)}return _jsxs(`div`,{style:{position:`relative`,background:`linear-gradient(to bottom, #fff 0%, #fff 80%, #f8f8f8 100%)`,borderRadius:`32px`,border:`1px solid rgba(0,0,0,0.08)`,overflow:`hidden`,marginTop:`0.75rem`,marginBottom:`1.5rem`},children:[_jsx(`div`,{style:{position:`relative`,height:`450px`,display:`flex`,alignItems:`center`,justifyContent:`center`,background:`#fff`,padding:`1rem`},children:show3D\u0026\u0026modelUrl?_jsx(`div`,{ref:function(el){if(!el||el._mv)return;el._mv=true;function addMv(){var mv=document.createElement(`model-viewer`);mv.setAttribute(`src`,modelUrl);mv.setAttribute(`camera-controls`,``);mv.setAttribute(`auto-rotate`,``);mv.style.width=`100%`;mv.style.height=`100%`;mv.style.backgroundColor=`#f8f8f8`;el.innerHTML=``;el.appendChild(mv)}if(window.customElements\u0026\u0026window.customElements.get(`model-viewer`)){addMv()}else{var s=document.createElement(`script`);s.src=`https://ajax.googleapis.com/ajax/libs/model-viewer/4.2.0/model-viewer.min.js`;s.type=`module`;s.onload=addMv;document.head.appendChild(s)}},style:{width:`100%`,height:`100%`}}):_jsx(`img`,{src:img\u0026\u0026img.url,alt:img\u0026\u0026img.label,loading:`lazy`,noZoom:true,onClick:openFullscreen,role:`button`,tabIndex:0,onKeyDown:function(event){if(event.key===`Enter`||event.key===` `){event.preventDefault();openFullscreen()}},style:{maxWidth:`100%`,maxHeight:`100%`,objectFit:`contain`,borderRadius:`8px`,cursor:`zoom-in`}})}),_jsxs(`div`,{style:{display:`flex`,justifyContent:`center`,gap:`12px`,padding:`1rem`,background:`#eee`,borderTop:`1px solid rgba(0,0,0,0.08)`},children:[images.map(function(img,idx){return _jsx(`button`,{onClick:function(){setActive(idx);setShow3D(false)},style:{padding:`0.6rem 1.5rem`,borderRadius:`12px`,border:!show3D\u0026\u0026idx===active?`1px solid #00b894`:`1px solid rgba(0,184,148,0.4)`,background:!show3D\u0026\u0026idx===active?`#00b894`:`#fff`,color:!show3D\u0026\u0026idx===active?`#fff`:`#000`,cursor:`pointer`,fontSize:`0.75rem`,fontWeight:700,textTransform:`uppercase`,fontFamily:`inherit`},children:img.label},img.id||idx)}),modelUrl?_jsx(`button`,{onClick:function(){setShow3D(true)},style:{padding:`0.6rem 1.5rem`,borderRadius:`12px`,border:show3D?`1px solid #00b894`:`1px solid rgba(0,184,148,0.4)`,background:show3D?`#00b894`:`#fff`,color:show3D?`#fff`:`#000`,cursor:`pointer`,fontSize:`0.75rem`,fontWeight:700,textTransform:`uppercase`,fontFamily:`inherit`},children:`3D VIEW`}):null]}),_jsx(`dialog`,{ref:setFullscreenDialog,\"aria-label\":img\u0026\u0026img.label,onClose:function(){setIsFullscreen(false)},onClick:function(event){if(event.target===event.currentTarget)closeFullscreen()},style:{width:`100vw`,height:`100vh`,maxWidth:`none`,maxHeight:`none`,margin:0,padding:`2rem`,border:0,background:`rgba(0,0,0,0.88)`},children:_jsxs(`div`,{style:{position:`relative`,display:`flex`,width:`100%`,height:`100%`,alignItems:`center`,justifyContent:`center`},children:[_jsx(`button`,{type:`button`,\"aria-label\":`Close fullscreen image`,onClick:closeFullscreen,style:{position:`absolute`,top:0,right:0,zIndex:1,width:`2.5rem`,height:`2.5rem`,border:0,borderRadius:`999px`,background:`rgba(255,255,255,0.92)`,color:`#111`,cursor:`pointer`,fontSize:`1.5rem`,lineHeight:1},children:`×`}),_jsx(`img`,{src:img\u0026\u0026img.url,alt:img\u0026\u0026img.label,style:{maxWidth:`100%`,maxHeight:`100%`,objectFit:`contain`,borderRadius:`8px`}})]})})]})};function _createMdxContent(props){const _components={a:`a`,code:`code`,em:`em`,hr:`hr`,img:`img`,li:`li`,ol:`ol`,p:`p`,pre:`pre`,span:`span`,strong:`strong`,tbody:`tbody`,td:`td`,th:`th`,thead:`thead`,tr:`tr`,ul:`ul`,..._provideComponents(),...props.components},{CodeBlock,Heading,Table,Tip,Warning,_MdxComponentBoundary}=_components;if(!CodeBlock)_missingMdxReference(`CodeBlock`,true);if(!Heading)_missingMdxReference(`Heading`,true);if(!Table)_missingMdxReference(`Table`,true);if(!Tip)_missingMdxReference(`Tip`,true);if(!Warning)_missingMdxReference(`Warning`,true);if(!_MdxComponentBoundary)_missingMdxReference(`_MdxComponentBoundary`,true);return _jsxs(_Fragment,{children:[_jsx(_MdxComponentBoundary,{name:`ShopHeader`,children:_jsx(ShopHeader,{title:`Audio Codec \u0026 Amplifier`,url:`https://shop.pcbcupid.com/product/gm004/`})}),`\n`,_jsx(_MdxComponentBoundary,{name:`ImgGallery`,children:_jsx(ImgGallery,{modelUrl:`https://spell-files.pcbcupid.com/pc-module/3d-model/glb/GM004-AudioCODEC/GM004-AudioCODEC.glb`,images:[{url:`https://spell-files.pcbcupid.com/pc-module/images/GM004-AudioCODEC/GM004-AudioCODEC-FB-o.avif`,label:`ILLUSTRATION VIEW`,id:`illustration`},{url:`https://files.pcbcupid.com/Documentation/Boards/g-mod/nau8325/Nau83235-boardview.avif`,label:`BOARD VIEW`,id:`board`}]})}),`\n`,_jsxs(_components.p,{children:[`The `,_jsx(_components.strong,{children:`NAU8325`}),` is a highly efficient digital input Class-D audio amplifier designed by Nuvoton Technology Corporation. It is well-suited for compact and battery-powered devices, including portable speakers, IoT devices, tablets, and smart audio systems. It features integrated digital-to-analog conversion, eliminating the need for an external DAC and reducing system complexity.`]}),`\n`,_jsx(Heading,{level:`2`,id:`how-it-works`,children:`How it Works`}),`\n`,_jsxs(_components.p,{children:[`The NAU8325 receives digital audio via the `,_jsx(_components.strong,{children:`I²S (Inter-IC Sound)`}),` protocol, which transfers pulse-code modulated (PCM) data between the MCU and the amplifier.`]}),`\n`,_jsx(_components.p,{children:_jsx(_components.strong,{children:`I²S Signals:`})}),`\n`,_jsxs(_components.ul,{children:[`\n`,_jsxs(_components.li,{children:[_jsx(_components.strong,{children:`BCLK (Bit Clock):`}),` Synchronizes each individual bit of audio data.`]}),`\n`,_jsxs(_components.li,{children:[_jsx(_components.strong,{children:`LRCK / WS (Word Select):`}),` Indicates whether the data is for the left or right channel.`]}),`\n`,_jsxs(_components.li,{children:[_jsx(_components.strong,{children:`SD (Serial Data):`}),` The real-time, synchronized audio stream.`]}),`\n`,_jsxs(_components.li,{children:[_jsx(_components.strong,{children:`MCLK (Master Clock):`}),` Optional high-frequency clock for advanced timing (not always required).`]}),`\n`]}),`\n`,_jsx(Heading,{level:`2`,id:`recommended-audio-format`,children:`Recommended Audio Format`}),`\n`,_jsx(_components.p,{children:`To ensure compatibility with the NAU8325 and ESP32 hardware, use the following audio settings:`}),`\n`,_jsxs(Table,{children:[_jsx(_components.thead,{children:_jsxs(_components.tr,{children:[_jsx(_components.th,{style:{textAlign:`left`},children:`Feature`}),_jsx(_components.th,{style:{textAlign:`left`},children:`Recommended Setting`})]})}),_jsxs(_components.tbody,{children:[_jsxs(_components.tr,{children:[_jsx(_components.td,{style:{textAlign:`left`},children:_jsx(_components.strong,{children:`Format`})}),_jsx(_components.td,{style:{textAlign:`left`},children:`WAV or MP3`})]}),_jsxs(_components.tr,{children:[_jsx(_components.td,{style:{textAlign:`left`},children:_jsx(_components.strong,{children:`Sample Rate`})}),_jsx(_components.td,{style:{textAlign:`left`},children:`44,100 Hz (Standard)`})]}),_jsxs(_components.tr,{children:[_jsx(_components.td,{style:{textAlign:`left`},children:_jsx(_components.strong,{children:`Bit Depth`})}),_jsx(_components.td,{style:{textAlign:`left`},children:`16-bit`})]}),_jsxs(_components.tr,{children:[_jsx(_components.td,{style:{textAlign:`left`},children:_jsx(_components.strong,{children:`Channels`})}),_jsx(_components.td,{style:{textAlign:`left`},children:`Stereo or Mono`})]})]})]}),`\n`,_jsx(Tip,{children:_jsxs(_components.p,{children:[`Tools like `,_jsx(_components.a,{href:`https://www.audacityteam.org/`,children:`Audacity`}),` can be used to convert audio files to these formats before playback.`]})}),`\n`,_jsx(Heading,{level:`2`,id:`key-features-\u0026-applications`,children:`Key Features \u0026 Applications`}),`\n`,_jsx(Heading,{level:`3`,id:`key-features`,children:`Key Features`}),`\n`,_jsxs(_components.ul,{children:[`\n`,_jsxs(_components.li,{children:[_jsx(_components.strong,{children:`Efficiency`}),`: High-efficiency Class-D output with digital volume control.`]}),`\n`,_jsxs(_components.li,{children:[_jsx(_components.strong,{children:`Simplicity`}),`: Direct I²S input, reducing PCB space and system cost.`]}),`\n`,_jsxs(_components.li,{children:[_jsx(_components.strong,{children:`Streaming`}),`: Supports real-time streaming, sine wave generation, and SD card playback.`]}),`\n`,_jsxs(_components.li,{children:[_jsx(_components.strong,{children:`Versatility`}),`: Ideal for IoT audio, portable speakers, and digital amplifiers.`]}),`\n`]}),`\n`,_jsx(Heading,{level:`3`,id:`applications`,children:`Applications`}),`\n`,_jsxs(_components.ul,{children:[`\n`,_jsx(_components.li,{children:`IoT audio notification and voice prompts`}),`\n`,_jsx(_components.li,{children:`Portable Bluetooth / Wi-Fi smart speakers`}),`\n`,_jsx(_components.li,{children:`Embedded audio playback and music players`}),`\n`,_jsx(_components.li,{children:`Educational kits and sound synthesizers`}),`\n`]}),`\n`,_jsx(_components.hr,{}),`\n`,_jsx(Heading,{level:`2`,id:`example-1-sine-wave-generation`,children:`Example 1: Sine Wave Generation`}),`\n`,_jsx(Heading,{level:`3`,id:`pin-configuration`,children:`Pin Configuration`}),`\n`,_jsxs(Table,{children:[_jsx(_components.thead,{children:_jsxs(_components.tr,{children:[_jsx(_components.th,{style:{textAlign:`left`},children:`Pin (NAU8325)`}),_jsx(_components.th,{style:{textAlign:`left`},children:`Glyph Board`}),_jsx(_components.th,{style:{textAlign:`left`},children:`Description`})]})}),_jsxs(_components.tbody,{children:[_jsxs(_components.tr,{children:[_jsx(_components.td,{style:{textAlign:`left`},children:_jsx(_components.strong,{children:`WS`})}),_jsx(_components.td,{style:{textAlign:`left`},children:`GPIO 8`}),_jsx(_components.td,{style:{textAlign:`left`},children:`I2S Word Select (LRCK)`})]}),_jsxs(_components.tr,{children:[_jsx(_components.td,{style:{textAlign:`left`},children:_jsx(_components.strong,{children:`BCK`})}),_jsx(_components.td,{style:{textAlign:`left`},children:`GPIO 18`}),_jsx(_components.td,{style:{textAlign:`left`},children:`I2S Bit Clock`})]}),_jsxs(_components.tr,{children:[_jsx(_components.td,{style:{textAlign:`left`},children:_jsx(_components.strong,{children:`DATA`})}),_jsx(_components.td,{style:{textAlign:`left`},children:`GPIO 7`}),_jsx(_components.td,{style:{textAlign:`left`},children:`I2S Serial Data`})]}),_jsxs(_components.tr,{children:[_jsx(_components.td,{style:{textAlign:`left`},children:_jsx(_components.strong,{children:`MCK`})}),_jsx(_components.td,{style:{textAlign:`left`},children:`GPIO 19`}),_jsx(_components.td,{style:{textAlign:`left`},children:`I2S Master Clock`})]}),_jsxs(_components.tr,{children:[_jsx(_components.td,{style:{textAlign:`left`},children:_jsx(_components.strong,{children:`SCL`})}),_jsx(_components.td,{style:{textAlign:`left`},children:`GPIO 4`}),_jsx(_components.td,{style:{textAlign:`left`},children:`I2C Clock`})]}),_jsxs(_components.tr,{children:[_jsx(_components.td,{style:{textAlign:`left`},children:_jsx(_components.strong,{children:`SDA`})}),_jsx(_components.td,{style:{textAlign:`left`},children:`GPIO 5`}),_jsx(_components.td,{style:{textAlign:`left`},children:`I2C Data`})]})]})]}),`\n`,_jsx(Heading,{level:`3`,id:`step-1-hardware-required`,children:`Step 1: Hardware Required`}),`\n`,_jsxs(_components.ol,{children:[`\n`,_jsx(_components.li,{children:`GLYPH Board`}),`\n`,_jsx(_components.li,{children:`NAU8325 Module`}),`\n`,_jsx(_components.li,{children:`Speaker`}),`\n`]}),`\n`,_jsx(Heading,{level:`3`,id:`step-2-circuit-diagram`,children:`Step 2: Circuit Diagram`}),`\n`,_jsx(_components.p,{children:_jsx(_components.img,{src:`https://files.pcbcupid.com/Documentation/Boards/g-mod/nau8325/nau%20circuit%20daigram/pcbcupid_nau.jpg`,alt:`nau8325_circuit_diagram`})}),`\n`,_jsx(Heading,{level:`3`,id:`step-3-code-setup`,children:`Step 3: Code Setup`}),`\n`,_jsxs(_components.ol,{children:[`\n`,_jsx(_components.li,{children:_jsx(_components.strong,{children:`Open Arduino IDE.`})}),`\n`,_jsxs(_components.li,{children:[_jsx(_components.strong,{children:`Install the required libraries:`}),`\n`,_jsxs(_components.ul,{children:[`\n`,_jsxs(_components.li,{children:[`Install `,_jsx(_components.strong,{children:_jsx(_components.a,{href:`https://github.com/pschatzmann/arduino-audio-tools`,children:`AudioTools`})})]}),`\n`,_jsxs(_components.li,{children:[`Install `,_jsx(_components.strong,{children:_jsx(_components.a,{href:`https://github.com/pcbcupid/PCBCUPID-NAU8325`,children:`PCBCUPID_NAU8325`})})]}),`\n`]}),`\n`]}),`\n`,_jsx(_components.li,{children:_jsx(_components.strong,{children:`Copy and paste the following code into the Arduino IDE:`})}),`\n`]}),`\n`,_jsx(CodeBlock,{filename:``,numberOfLines:`64`,language:`cpp`,children:_jsx(_components.pre,{className:`shiki shiki-themes github-light-default dark-plus`,style:{backgroundColor:`#ffffff`,\"--shiki-dark-bg\":`#0B0C0E`,color:`#1f2328`,\"--shiki-dark\":`#D4D4D4`},language:`cpp`,children:_jsxs(_components.code,{language:`cpp`,numberOfLines:`64`,children:[_jsx(_components.span,{className:`line`,children:_jsx(_components.span,{style:{color:`#6E7781`,\"--shiki-dark\":`#6A9955`},children:`/**`})}),`\n`,_jsxs(_components.span,{className:`line`,children:[_jsx(_components.span,{style:{color:`#6E7781`,\"--shiki-dark\":`#6A9955`},children:` * `}),_jsx(_components.span,{style:{color:`#CF222E`,\"--shiki-dark\":`#569CD6`},children:`@file`}),_jsx(_components.span,{style:{color:`#6E7781`,\"--shiki-dark\":`#6A9955`},children:` streams-generator-i2s.ino`})]}),`\n`,_jsxs(_components.span,{className:`line`,children:[_jsx(_components.span,{style:{color:`#6E7781`,\"--shiki-dark\":`#6A9955`},children:` * `}),_jsx(_components.span,{style:{color:`#CF222E`,\"--shiki-dark\":`#569CD6`},children:`@author`}),_jsx(_components.span,{style:{color:`#6E7781`,\"--shiki-dark\":`#6A9955`},children:` Phil Schatzmann`})]}),`\n`,_jsx(_components.span,{className:`line`,children:_jsx(_components.span,{style:{color:`#6E7781`,\"--shiki-dark\":`#6A9955`},children:` * @modified by Karthik E`})}),`\n`,_jsxs(_components.span,{className:`line`,children:[_jsx(_components.span,{style:{color:`#6E7781`,\"--shiki-dark\":`#6A9955`},children:` * `}),_jsx(_components.span,{style:{color:`#CF222E`,\"--shiki-dark\":`#569CD6`},children:`@brief`}),_jsx(_components.span,{style:{color:`#6E7781`,\"--shiki-dark\":`#6A9955`},children:` see https://github.com/pschatzmann/arduino-audio-tools/blob/main/examples/examples-stream/streams-generator-i2s/README.md `})]}),`\n`,_jsxs(_components.span,{className:`line`,children:[_jsx(_components.span,{style:{color:`#6E7781`,\"--shiki-dark\":`#6A9955`},children:` * `}),_jsx(_components.span,{style:{color:`#CF222E`,\"--shiki-dark\":`#569CD6`},children:`@copyright`}),_jsx(_components.span,{style:{color:`#6E7781`,\"--shiki-dark\":`#6A9955`},children:` GPLv3`})]}),`\n`,_jsx(_components.span,{className:`line`,children:_jsx(_components.span,{style:{color:`#6E7781`,\"--shiki-dark\":`#6A9955`},children:` */`})}),`\n`,_jsx(_components.span,{className:`line`,children:_jsx(_components.span,{style:{color:`#1F2328`,\"--shiki-dark\":`#D4D4D4`},children:` `})}),`\n`,_jsxs(_components.span,{className:`line`,children:[_jsx(_components.span,{style:{color:`#CF222E`,\"--shiki-dark\":`#C586C0`},children:`#include`}),_jsx(_components.span,{style:{color:`#0A3069`,\"--shiki-dark\":`#CE9178`},children:` \u003cWire.h>`})]}),`\n`,_jsxs(_components.span,{className:`line`,children:[_jsx(_components.span,{style:{color:`#CF222E`,\"--shiki-dark\":`#C586C0`},children:`#include`}),_jsx(_components.span,{style:{color:`#0A3069`,\"--shiki-dark\":`#CE9178`},children:` \"AudioTools.h\"`})]}),`\n`,_jsxs(_components.span,{className:`line`,children:[_jsx(_components.span,{style:{color:`#CF222E`,\"--shiki-dark\":`#C586C0`},children:`#include`}),_jsx(_components.span,{style:{color:`#0A3069`,\"--shiki-dark\":`#CE9178`},children:` \"PCBCUPID_NAU8325.h\"`}),_jsx(_components.span,{style:{color:`#6E7781`,\"--shiki-dark\":`#6A9955`},children:` // install https://github.com/pcbcupid/PCBCUPID-NAU8325.git`})]}),`\n`,_jsx(_components.span,{className:`line`}),`\n`,_jsxs(_components.span,{className:`line`,children:[_jsx(_components.span,{style:{color:`#953800`,\"--shiki-dark\":`#4EC9B0`},children:`AudioInfo`}),_jsx(_components.span,{style:{color:`#8250DF`,\"--shiki-dark\":`#DCDCAA`},children:` info`}),_jsx(_components.span,{style:{color:`#1F2328`,\"--shiki-dark\":`#D4D4D4`},children:`(`}),_jsx(_components.span,{style:{color:`#0550AE`,\"--shiki-dark\":`#B5CEA8`},children:`44100`}),_jsx(_components.span,{style:{color:`#1F2328`,\"--shiki-dark\":`#D4D4D4`},children:`, `}),_jsx(_components.span,{style:{color:`#0550AE`,\"--shiki-dark\":`#B5CEA8`},children:`2`}),_jsx(_components.span,{style:{color:`#1F2328`,\"--shiki-dark\":`#D4D4D4`},children:`, `}),_jsx(_components.span,{style:{color:`#0550AE`,\"--shiki-dark\":`#B5CEA8`},children:`16`}),_jsx(_components.span,{style:{color:`#1F2328`,\"--shiki-dark\":`#D4D4D4`},children:`);`})]}),`\n`,_jsxs(_components.span,{className:`line`,children:[_jsx(_components.span,{style:{color:`#953800`,\"--shiki-dark\":`#4EC9B0`},children:`SineWaveGenerator`}),_jsx(_components.span,{style:{color:`#1F2328`,\"--shiki-dark\":`#D4D4D4`},children:`\u003c`}),_jsx(_components.span,{style:{color:`#CF222E`,\"--shiki-dark\":`#569CD6`},children:`int16_t`}),_jsx(_components.span,{style:{color:`#1F2328`,\"--shiki-dark\":`#D4D4D4`},children:`> `}),_jsx(_components.span,{style:{color:`#8250DF`,\"--shiki-dark\":`#DCDCAA`},children:`sineWave`}),_jsx(_components.span,{style:{color:`#1F2328`,\"--shiki-dark\":`#D4D4D4`},children:`(`}),_jsx(_components.span,{style:{color:`#0550AE`,\"--shiki-dark\":`#B5CEA8`},children:`32000`}),_jsx(_components.span,{style:{color:`#1F2328`,\"--shiki-dark\":`#D4D4D4`},children:`);`}),_jsx(_components.span,{style:{color:`#6E7781`,\"--shiki-dark\":`#6A9955`},children:` // subclass of SoundGenerator with max amplitude of 32000`})]}),`\n`,_jsxs(_components.span,{className:`line`,children:[_jsx(_components.span,{style:{color:`#953800`,\"--shiki-dark\":`#4EC9B0`},children:`GeneratedSoundStream`}),_jsx(_components.span,{style:{color:`#1F2328`,\"--shiki-dark\":`#D4D4D4`},children:`\u003c`}),_jsx(_components.span,{style:{color:`#CF222E`,\"--shiki-dark\":`#569CD6`},children:`int16_t`}),_jsx(_components.span,{style:{color:`#1F2328`,\"--shiki-dark\":`#D4D4D4`},children:`> `}),_jsx(_components.span,{style:{color:`#8250DF`,\"--shiki-dark\":`#DCDCAA`},children:`sound`}),_jsx(_components.span,{style:{color:`#1F2328`,\"--shiki-dark\":`#D4D4D4`},children:`(`}),_jsx(_components.span,{style:{color:`#953800`,\"--shiki-dark\":`#4EC9B0`},children:`sineWave`}),_jsx(_components.span,{style:{color:`#1F2328`,\"--shiki-dark\":`#D4D4D4`},children:`);`}),_jsx(_components.span,{style:{color:`#6E7781`,\"--shiki-dark\":`#6A9955`},children:` // Stream generated from sine wave`})]}),`\n`,_jsx(_components.span,{className:`line`,children:_jsx(_components.span,{style:{color:`#1F2328`,\"--shiki-dark\":`#D4D4D4`},children:`I2SStream i2s;`})}),`\n`,_jsxs(_components.span,{className:`line`,children:[_jsx(_components.span,{style:{color:`#953800`,\"--shiki-dark\":`#4EC9B0`},children:`StreamCopy`}),_jsx(_components.span,{style:{color:`#8250DF`,\"--shiki-dark\":`#DCDCAA`},children:` copier`}),_jsx(_components.span,{style:{color:`#1F2328`,\"--shiki-dark\":`#D4D4D4`},children:`(`}),_jsx(_components.span,{style:{color:`#953800`,\"--shiki-dark\":`#4EC9B0`},children:`i2s`}),_jsx(_components.span,{style:{color:`#1F2328`,\"--shiki-dark\":`#D4D4D4`},children:`, `}),_jsx(_components.span,{style:{color:`#953800`,\"--shiki-dark\":`#4EC9B0`},children:`sound`}),_jsx(_components.span,{style:{color:`#1F2328`,\"--shiki-dark\":`#D4D4D4`},children:`);`}),_jsx(_components.span,{style:{color:`#6E7781`,\"--shiki-dark\":`#6A9955`},children:` // copies sound into i2s`})]}),`\n`,_jsx(_components.span,{className:`line`}),`\n`,_jsx(_components.span,{className:`line`,children:_jsx(_components.span,{style:{color:`#6E7781`,\"--shiki-dark\":`#6A9955`},children:`// Use our NAU8325 codec configuration`})}),`\n`,_jsxs(_components.span,{className:`line`,children:[_jsx(_components.span,{style:{color:`#953800`,\"--shiki-dark\":`#4EC9B0`},children:`TwoWire`}),_jsx(_components.span,{style:{color:`#8250DF`,\"--shiki-dark\":`#DCDCAA`},children:` I2Cbus`}),_jsx(_components.span,{style:{color:`#1F2328`,\"--shiki-dark\":`#D4D4D4`},children:`(`}),_jsx(_components.span,{style:{color:`#0550AE`,\"--shiki-dark\":`#B5CEA8`},children:`0`}),_jsx(_components.span,{style:{color:`#1F2328`,\"--shiki-dark\":`#D4D4D4`},children:`);`})]}),`\n`,_jsxs(_components.span,{className:`line`,children:[_jsx(_components.span,{style:{color:`#953800`,\"--shiki-dark\":`#4EC9B0`},children:`PCBCUPID_NAU8325`}),_jsx(_components.span,{style:{color:`#8250DF`,\"--shiki-dark\":`#DCDCAA`},children:` nau8325`}),_jsx(_components.span,{style:{color:`#1F2328`,\"--shiki-dark\":`#D4D4D4`},children:`(`}),_jsx(_components.span,{style:{color:`#953800`,\"--shiki-dark\":`#4EC9B0`},children:`I2Cbus`}),_jsx(_components.span,{style:{color:`#1F2328`,\"--shiki-dark\":`#D4D4D4`},children:`);`})]}),`\n`,_jsx(_components.span,{className:`line`}),`\n`,_jsxs(_components.span,{className:`line`,children:[_jsx(_components.span,{style:{color:`#CF222E`,\"--shiki-dark\":`#569CD6`},children:`void`}),_jsx(_components.span,{style:{color:`#8250DF`,\"--shiki-dark\":`#DCDCAA`},children:` setup`}),_jsx(_components.span,{style:{color:`#1F2328`,\"--shiki-dark\":`#D4D4D4`},children:`(`}),_jsx(_components.span,{style:{color:`#CF222E`,\"--shiki-dark\":`#569CD6`},children:`void`}),_jsx(_components.span,{style:{color:`#1F2328`,\"--shiki-dark\":`#D4D4D4`},children:`) { `})]}),`\n`,_jsx(_components.span,{className:`line`,children:_jsx(_components.span,{style:{color:`#6E7781`,\"--shiki-dark\":`#6A9955`},children:` // Open Serial `})}),`\n`,_jsxs(_components.span,{className:`line`,children:[_jsx(_components.span,{style:{color:`#1F2328`,\"--shiki-dark\":`#9CDCFE`},children:` Serial`}),_jsx(_components.span,{style:{color:`#1F2328`,\"--shiki-dark\":`#D4D4D4`},children:`.`}),_jsx(_components.span,{style:{color:`#8250DF`,\"--shiki-dark\":`#DCDCAA`},children:`begin`}),_jsx(_components.span,{style:{color:`#1F2328`,\"--shiki-dark\":`#D4D4D4`},children:`(`}),_jsx(_components.span,{style:{color:`#0550AE`,\"--shiki-dark\":`#B5CEA8`},children:`115200`}),_jsx(_components.span,{style:{color:`#1F2328`,\"--shiki-dark\":`#D4D4D4`},children:`);`})]}),`\n`,_jsxs(_components.span,{className:`line`,children:[_jsx(_components.span,{style:{color:`#CF222E`,\"--shiki-dark\":`#C586C0`},children:` while`}),_jsx(_components.span,{style:{color:`#1F2328`,\"--shiki-dark\":`#D4D4D4`},children:`(`}),_jsx(_components.span,{style:{color:`#CF222E`,\"--shiki-dark\":`#D4D4D4`},children:`!`}),_jsx(_components.span,{style:{color:`#1F2328`,\"--shiki-dark\":`#D4D4D4`},children:`Serial);`})]}),`\n`,_jsxs(_components.span,{className:`line`,children:[_jsx(_components.span,{style:{color:`#1F2328`,\"--shiki-dark\":`#9CDCFE`},children:` AudioToolsLogger`}),_jsx(_components.span,{style:{color:`#1F2328`,\"--shiki-dark\":`#D4D4D4`},children:`.`}),_jsx(_components.span,{style:{color:`#8250DF`,\"--shiki-dark\":`#DCDCAA`},children:`begin`}),_jsx(_components.span,{style:{color:`#1F2328`,\"--shiki-dark\":`#D4D4D4`},children:`(Serial, `}),_jsx(_components.span,{style:{color:`#953800`,\"--shiki-dark\":`#4EC9B0`},children:`AudioToolsLogLevel`}),_jsx(_components.span,{style:{color:`#1F2328`,\"--shiki-dark\":`#D4D4D4`},children:`::Info);`})]}),`\n`,_jsx(_components.span,{className:`line`}),`\n`,_jsx(_components.span,{className:`line`,children:_jsx(_components.span,{style:{color:`#6E7781`,\"--shiki-dark\":`#6A9955`},children:` // Initialize I2C for NAU8325`})}),`\n`,_jsxs(_components.span,{className:`line`,children:[_jsx(_components.span,{style:{color:`#1F2328`,\"--shiki-dark\":`#9CDCFE`},children:` Serial`}),_jsx(_components.span,{style:{color:`#1F2328`,\"--shiki-dark\":`#D4D4D4`},children:`.`}),_jsx(_components.span,{style:{color:`#8250DF`,\"--shiki-dark\":`#DCDCAA`},children:`println`}),_jsx(_components.span,{style:{color:`#1F2328`,\"--shiki-dark\":`#D4D4D4`},children:`(`}),_jsx(_components.span,{style:{color:`#0A3069`,\"--shiki-dark\":`#CE9178`},children:`\"Checking I2C...\"`}),_jsx(_components.span,{style:{color:`#1F2328`,\"--shiki-dark\":`#D4D4D4`},children:`);`})]}),`\n`,_jsxs(_components.span,{className:`line`,children:[_jsx(_components.span,{style:{color:`#1F2328`,\"--shiki-dark\":`#9CDCFE`},children:` I2Cbus`}),_jsx(_components.span,{style:{color:`#1F2328`,\"--shiki-dark\":`#D4D4D4`},children:`.`}),_jsx(_components.span,{style:{color:`#8250DF`,\"--shiki-dark\":`#DCDCAA`},children:`begin`}),_jsx(_components.span,{style:{color:`#1F2328`,\"--shiki-dark\":`#D4D4D4`},children:`(`}),_jsx(_components.span,{style:{color:`#0550AE`,\"--shiki-dark\":`#B5CEA8`},children:`4`}),_jsx(_components.span,{style:{color:`#1F2328`,\"--shiki-dark\":`#D4D4D4`},children:`, `}),_jsx(_components.span,{style:{color:`#0550AE`,\"--shiki-dark\":`#B5CEA8`},children:`5`}),_jsx(_components.span,{style:{color:`#1F2328`,\"--shiki-dark\":`#D4D4D4`},children:`);`})]}),`\n`,_jsx(_components.span,{className:`line`}),`\n`,_jsxs(_components.span,{className:`line`,children:[_jsx(_components.span,{style:{color:`#8250DF`,\"--shiki-dark\":`#DCDCAA`},children:` delay`}),_jsx(_components.span,{style:{color:`#1F2328`,\"--shiki-dark\":`#D4D4D4`},children:`(`}),_jsx(_components.span,{style:{color:`#0550AE`,\"--shiki-dark\":`#B5CEA8`},children:`10`}),_jsx(_components.span,{style:{color:`#1F2328`,\"--shiki-dark\":`#D4D4D4`},children:`);`})]}),`\n`,_jsx(_components.span,{className:`line`}),`\n`,_jsx(_components.span,{className:`line`,children:_jsx(_components.span,{style:{color:`#6E7781`,\"--shiki-dark\":`#6A9955`},children:` // Initialize NAU8325 codec`})}),`\n`,_jsxs(_components.span,{className:`line`,children:[_jsx(_components.span,{style:{color:`#CF222E`,\"--shiki-dark\":`#C586C0`},children:` if`}),_jsx(_components.span,{style:{color:`#1F2328`,\"--shiki-dark\":`#D4D4D4`},children:` (`}),_jsx(_components.span,{style:{color:`#CF222E`,\"--shiki-dark\":`#D4D4D4`},children:`!`}),_jsx(_components.span,{style:{color:`#1F2328`,\"--shiki-dark\":`#9CDCFE`},children:`nau8325`}),_jsx(_components.span,{style:{color:`#1F2328`,\"--shiki-dark\":`#D4D4D4`},children:`.`}),_jsx(_components.span,{style:{color:`#8250DF`,\"--shiki-dark\":`#DCDCAA`},children:`begin`}),_jsx(_components.span,{style:{color:`#1F2328`,\"--shiki-dark\":`#D4D4D4`},children:`()) {`})]}),`\n`,_jsxs(_components.span,{className:`line`,children:[_jsx(_components.span,{style:{color:`#1F2328`,\"--shiki-dark\":`#9CDCFE`},children:` Serial`}),_jsx(_components.span,{style:{color:`#1F2328`,\"--shiki-dark\":`#D4D4D4`},children:`.`}),_jsx(_components.span,{style:{color:`#8250DF`,\"--shiki-dark\":`#DCDCAA`},children:`println`}),_jsx(_components.span,{style:{color:`#1F2328`,\"--shiki-dark\":`#D4D4D4`},children:`(`}),_jsx(_components.span,{style:{color:`#0A3069`,\"--shiki-dark\":`#CE9178`},children:`\"NAU8325 init failed\"`}),_jsx(_components.span,{style:{color:`#1F2328`,\"--shiki-dark\":`#D4D4D4`},children:`);`})]}),`\n`,_jsxs(_components.span,{className:`line`,children:[_jsx(_components.span,{style:{color:`#CF222E`,\"--shiki-dark\":`#C586C0`},children:` while`}),_jsx(_components.span,{style:{color:`#1F2328`,\"--shiki-dark\":`#D4D4D4`},children:` (`}),_jsx(_components.span,{style:{color:`#0550AE`,\"--shiki-dark\":`#B5CEA8`},children:`1`}),_jsx(_components.span,{style:{color:`#1F2328`,\"--shiki-dark\":`#D4D4D4`},children:`);`})]}),`\n`,_jsx(_components.span,{className:`line`,children:_jsx(_components.span,{style:{color:`#1F2328`,\"--shiki-dark\":`#D4D4D4`},children:` }`})}),`\n`,_jsxs(_components.span,{className:`line`,children:[_jsx(_components.span,{style:{color:`#1F2328`,\"--shiki-dark\":`#9CDCFE`},children:` nau8325`}),_jsx(_components.span,{style:{color:`#1F2328`,\"--shiki-dark\":`#D4D4D4`},children:`.`}),_jsx(_components.span,{style:{color:`#8250DF`,\"--shiki-dark\":`#DCDCAA`},children:`setVolume`}),_jsx(_components.span,{style:{color:`#1F2328`,\"--shiki-dark\":`#D4D4D4`},children:`(`}),_jsx(_components.span,{style:{color:`#CF222E`,\"--shiki-dark\":`#B5CEA8`},children:`0x`}),_jsx(_components.span,{style:{color:`#0550AE`,\"--shiki-dark\":`#B5CEA8`},children:`FF`}),_jsx(_components.span,{style:{color:`#1F2328`,\"--shiki-dark\":`#D4D4D4`},children:`, `}),_jsx(_components.span,{style:{color:`#CF222E`,\"--shiki-dark\":`#B5CEA8`},children:`0x`}),_jsx(_components.span,{style:{color:`#0550AE`,\"--shiki-dark\":`#B5CEA8`},children:`FF`}),_jsx(_components.span,{style:{color:`#1F2328`,\"--shiki-dark\":`#D4D4D4`},children:`);`}),_jsx(_components.span,{style:{color:`#6E7781`,\"--shiki-dark\":`#6A9955`},children:` // Set max volume`})]}),`\n`,_jsxs(_components.span,{className:`line`,children:[_jsx(_components.span,{style:{color:`#1F2328`,\"--shiki-dark\":`#9CDCFE`},children:` Serial`}),_jsx(_components.span,{style:{color:`#1F2328`,\"--shiki-dark\":`#D4D4D4`},children:`.`}),_jsx(_components.span,{style:{color:`#8250DF`,\"--shiki-dark\":`#DCDCAA`},children:`println`}),_jsx(_components.span,{style:{color:`#1F2328`,\"--shiki-dark\":`#D4D4D4`},children:`(`}),_jsx(_components.span,{style:{color:`#0A3069`,\"--shiki-dark\":`#CE9178`},children:`\"NAU8325 detected and configured!\"`}),_jsx(_components.span,{style:{color:`#1F2328`,\"--shiki-dark\":`#D4D4D4`},children:`);`})]}),`\n`,_jsx(_components.span,{className:`line`}),`\n`,_jsx(_components.span,{className:`line`,children:_jsx(_components.span,{style:{color:`#6E7781`,\"--shiki-dark\":`#6A9955`},children:` // Start I2S`})}),`\n`,_jsxs(_components.span,{className:`line`,children:[_jsx(_components.span,{style:{color:`#1F2328`,\"--shiki-dark\":`#9CDCFE`},children:` Serial`}),_jsx(_components.span,{style:{color:`#1F2328`,\"--shiki-dark\":`#D4D4D4`},children:`.`}),_jsx(_components.span,{style:{color:`#8250DF`,\"--shiki-dark\":`#DCDCAA`},children:`println`}),_jsx(_components.span,{style:{color:`#1F2328`,\"--shiki-dark\":`#D4D4D4`},children:`(`}),_jsx(_components.span,{style:{color:`#0A3069`,\"--shiki-dark\":`#CE9178`},children:`\"starting I2S...\"`}),_jsx(_components.span,{style:{color:`#1F2328`,\"--shiki-dark\":`#D4D4D4`},children:`);`})]}),`\n`,_jsxs(_components.span,{className:`line`,children:[_jsx(_components.span,{style:{color:`#CF222E`,\"--shiki-dark\":`#569CD6`},children:` auto`}),_jsx(_components.span,{style:{color:`#1F2328`,\"--shiki-dark\":`#D4D4D4`},children:` config `}),_jsx(_components.span,{style:{color:`#CF222E`,\"--shiki-dark\":`#D4D4D4`},children:`=`}),_jsx(_components.span,{style:{color:`#1F2328`,\"--shiki-dark\":`#9CDCFE`},children:` i2s`}),_jsx(_components.span,{style:{color:`#1F2328`,\"--shiki-dark\":`#D4D4D4`},children:`.`}),_jsx(_components.span,{style:{color:`#8250DF`,\"--shiki-dark\":`#DCDCAA`},children:`defaultConfig`}),_jsx(_components.span,{style:{color:`#1F2328`,\"--shiki-dark\":`#D4D4D4`},children:`(TX_MODE);`})]}),`\n`,_jsxs(_components.span,{className:`line`,children:[_jsx(_components.span,{style:{color:`#1F2328`,\"--shiki-dark\":`#9CDCFE`},children:` config`}),_jsx(_components.span,{style:{color:`#1F2328`,\"--shiki-dark\":`#D4D4D4`},children:`.`}),_jsx(_components.span,{style:{color:`#1F2328`,\"--shiki-dark\":`#9CDCFE`},children:`pin_ws`}),_jsx(_components.span,{style:{color:`#CF222E`,\"--shiki-dark\":`#D4D4D4`},children:` =`}),_jsx(_components.span,{style:{color:`#0550AE`,\"--shiki-dark\":`#B5CEA8`},children:` 8`}),_jsx(_components.span,{style:{color:`#1F2328`,\"--shiki-dark\":`#D4D4D4`},children:`;`})]}),`\n`,_jsxs(_components.span,{className:`line`,children:[_jsx(_components.span,{style:{color:`#1F2328`,\"--shiki-dark\":`#9CDCFE`},children:` config`}),_jsx(_components.span,{style:{color:`#1F2328`,\"--shiki-dark\":`#D4D4D4`},children:`.`}),_jsx(_components.span,{style:{color:`#1F2328`,\"--shiki-dark\":`#9CDCFE`},children:`pin_bck`}),_jsx(_components.span,{style:{color:`#CF222E`,\"--shiki-dark\":`#D4D4D4`},children:` =`}),_jsx(_components.span,{style:{color:`#0550AE`,\"--shiki-dark\":`#B5CEA8`},children:` 18`}),_jsx(_components.span,{style:{color:`#1F2328`,\"--shiki-dark\":`#D4D4D4`},children:`;`})]}),`\n`,_jsxs(_components.span,{className:`line`,children:[_jsx(_components.span,{style:{color:`#1F2328`,\"--shiki-dark\":`#9CDCFE`},children:` config`}),_jsx(_components.span,{style:{color:`#1F2328`,\"--shiki-dark\":`#D4D4D4`},children:`.`}),_jsx(_components.span,{style:{color:`#1F2328`,\"--shiki-dark\":`#9CDCFE`},children:`pin_data`}),_jsx(_components.span,{style:{color:`#CF222E`,\"--shiki-dark\":`#D4D4D4`},children:` =`}),_jsx(_components.span,{style:{color:`#0550AE`,\"--shiki-dark\":`#B5CEA8`},children:` 7`}),_jsx(_components.span,{style:{color:`#1F2328`,\"--shiki-dark\":`#D4D4D4`},children:`;`})]}),`\n`,_jsxs(_components.span,{className:`line`,children:[_jsx(_components.span,{style:{color:`#1F2328`,\"--shiki-dark\":`#9CDCFE`},children:` config`}),_jsx(_components.span,{style:{color:`#1F2328`,\"--shiki-dark\":`#D4D4D4`},children:`.`}),_jsx(_components.span,{style:{color:`#1F2328`,\"--shiki-dark\":`#9CDCFE`},children:`pin_mck`}),_jsx(_components.span,{style:{color:`#CF222E`,\"--shiki-dark\":`#D4D4D4`},children:` =`}),_jsx(_components.span,{style:{color:`#0550AE`,\"--shiki-dark\":`#B5CEA8`},children:` 19`}),_jsx(_components.span,{style:{color:`#1F2328`,\"--shiki-dark\":`#D4D4D4`},children:`;`})]}),`\n`,_jsxs(_components.span,{className:`line`,children:[_jsx(_components.span,{style:{color:`#1F2328`,\"--shiki-dark\":`#9CDCFE`},children:` config`}),_jsx(_components.span,{style:{color:`#1F2328`,\"--shiki-dark\":`#D4D4D4`},children:`.`}),_jsx(_components.span,{style:{color:`#1F2328`,\"--shiki-dark\":`#9CDCFE`},children:`is_master`}),_jsx(_components.span,{style:{color:`#CF222E`,\"--shiki-dark\":`#D4D4D4`},children:` =`}),_jsx(_components.span,{style:{color:`#0550AE`,\"--shiki-dark\":`#569CD6`},children:` true`}),_jsx(_components.span,{style:{color:`#1F2328`,\"--shiki-dark\":`#D4D4D4`},children:`;`})]}),`\n`,_jsxs(_components.span,{className:`line`,children:[_jsx(_components.span,{style:{color:`#1F2328`,\"--shiki-dark\":`#9CDCFE`},children:` config`}),_jsx(_components.span,{style:{color:`#1F2328`,\"--shiki-dark\":`#D4D4D4`},children:`.`}),_jsx(_components.span,{style:{color:`#1F2328`,\"--shiki-dark\":`#9CDCFE`},children:`use_apll`}),_jsx(_components.span,{style:{color:`#CF222E`,\"--shiki-dark\":`#D4D4D4`},children:` =`}),_jsx(_components.span,{style:{color:`#0550AE`,\"--shiki-dark\":`#569CD6`},children:` false`}),_jsx(_components.span,{style:{color:`#1F2328`,\"--shiki-dark\":`#D4D4D4`},children:`;`})]}),`\n`,_jsxs(_components.span,{className:`line`,children:[_jsx(_components.span,{style:{color:`#1F2328`,\"--shiki-dark\":`#9CDCFE`},children:` config`}),_jsx(_components.span,{style:{color:`#1F2328`,\"--shiki-dark\":`#D4D4D4`},children:`.`}),_jsx(_components.span,{style:{color:`#1F2328`,\"--shiki-dark\":`#9CDCFE`},children:`i2s_format`}),_jsx(_components.span,{style:{color:`#CF222E`,\"--shiki-dark\":`#D4D4D4`},children:` =`}),_jsx(_components.span,{style:{color:`#1F2328`,\"--shiki-dark\":`#D4D4D4`},children:` I2S_STD_FORMAT;`})]}),`\n`,_jsxs(_components.span,{className:`line`,children:[_jsx(_components.span,{style:{color:`#1F2328`,\"--shiki-dark\":`#9CDCFE`},children:` config`}),_jsx(_components.span,{style:{color:`#1F2328`,\"--shiki-dark\":`#D4D4D4`},children:`.`}),_jsx(_components.span,{style:{color:`#8250DF`,\"--shiki-dark\":`#DCDCAA`},children:`copyFrom`}),_jsx(_components.span,{style:{color:`#1F2328`,\"--shiki-dark\":`#D4D4D4`},children:`(info); `})]}),`\n`,_jsxs(_components.span,{className:`line`,children:[_jsx(_components.span,{style:{color:`#1F2328`,\"--shiki-dark\":`#9CDCFE`},children:` i2s`}),_jsx(_components.span,{style:{color:`#1F2328`,\"--shiki-dark\":`#D4D4D4`},children:`.`}),_jsx(_components.span,{style:{color:`#8250DF`,\"--shiki-dark\":`#DCDCAA`},children:`begin`}),_jsx(_components.span,{style:{color:`#1F2328`,\"--shiki-dark\":`#D4D4D4`},children:`(config);`})]}),`\n`,_jsx(_components.span,{className:`line`}),`\n`,_jsx(_components.span,{className:`line`,children:_jsx(_components.span,{style:{color:`#6E7781`,\"--shiki-dark\":`#6A9955`},children:` // Setup sine wave`})}),`\n`,_jsxs(_components.span,{className:`line`,children:[_jsx(_components.span,{style:{color:`#1F2328`,\"--shiki-dark\":`#9CDCFE`},children:` sineWave`}),_jsx(_components.span,{style:{color:`#1F2328`,\"--shiki-dark\":`#D4D4D4`},children:`.`}),_jsx(_components.span,{style:{color:`#8250DF`,\"--shiki-dark\":`#DCDCAA`},children:`begin`}),_jsx(_components.span,{style:{color:`#1F2328`,\"--shiki-dark\":`#D4D4D4`},children:`(info, N_B4);`})]}),`\n`,_jsxs(_components.span,{className:`line`,children:[_jsx(_components.span,{style:{color:`#1F2328`,\"--shiki-dark\":`#9CDCFE`},children:` Serial`}),_jsx(_components.span,{style:{color:`#1F2328`,\"--shiki-dark\":`#D4D4D4`},children:`.`}),_jsx(_components.span,{style:{color:`#8250DF`,\"--shiki-dark\":`#DCDCAA`},children:`println`}),_jsx(_components.span,{style:{color:`#1F2328`,\"--shiki-dark\":`#D4D4D4`},children:`(`}),_jsx(_components.span,{style:{color:`#0A3069`,\"--shiki-dark\":`#CE9178`},children:`\"started...\"`}),_jsx(_components.span,{style:{color:`#1F2328`,\"--shiki-dark\":`#D4D4D4`},children:`);`})]}),`\n`,_jsx(_components.span,{className:`line`,children:_jsx(_components.span,{style:{color:`#1F2328`,\"--shiki-dark\":`#D4D4D4`},children:`}`})}),`\n`,_jsx(_components.span,{className:`line`}),`\n`,_jsx(_components.span,{className:`line`,children:_jsx(_components.span,{style:{color:`#6E7781`,\"--shiki-dark\":`#6A9955`},children:`// Arduino loop - copy sound to out `})}),`\n`,_jsxs(_components.span,{className:`line`,children:[_jsx(_components.span,{style:{color:`#CF222E`,\"--shiki-dark\":`#569CD6`},children:`void`}),_jsx(_components.span,{style:{color:`#8250DF`,\"--shiki-dark\":`#DCDCAA`},children:` loop`}),_jsx(_components.span,{style:{color:`#1F2328`,\"--shiki-dark\":`#D4D4D4`},children:`() {`})]}),`\n`,_jsxs(_components.span,{className:`line`,children:[_jsx(_components.span,{style:{color:`#1F2328`,\"--shiki-dark\":`#9CDCFE`},children:` copier`}),_jsx(_components.span,{style:{color:`#1F2328`,\"--shiki-dark\":`#D4D4D4`},children:`.`}),_jsx(_components.span,{style:{color:`#8250DF`,\"--shiki-dark\":`#DCDCAA`},children:`copy`}),_jsx(_components.span,{style:{color:`#1F2328`,\"--shiki-dark\":`#D4D4D4`},children:`();`})]}),`\n`,_jsx(_components.span,{className:`line`,children:_jsx(_components.span,{style:{color:`#1F2328`,\"--shiki-dark\":`#D4D4D4`},children:`}`})}),`\n`]})})}),`\n`,_jsx(Heading,{level:`3`,id:`step-4-upload-the-code`,children:`Step 4: Upload the Code`}),`\n`,_jsxs(_components.ol,{children:[`\n`,_jsxs(_components.li,{children:[`\n`,_jsx(_components.p,{children:_jsx(_components.strong,{children:`Connect the Board`})}),`\n`,_jsxs(_components.ul,{children:[`\n`,_jsx(_components.li,{children:`Connect your GLYPH board to your computer.`}),`\n`]}),`\n`]}),`\n`,_jsxs(_components.li,{children:[`\n`,_jsxs(_components.p,{children:[_jsx(_components.strong,{children:`Select the Board and Port`}),`\nDo the following settings in your Arduino IDE:`]}),`\n`,_jsxs(_components.ul,{children:[`\n`,_jsx(_components.li,{children:_jsx(_components.code,{children:`Tools > Board > esp32 > Pcbcupid GLYPH`})}),`\n`,_jsxs(_components.li,{children:[_jsx(_components.code,{children:`Tools > Port`}),` and select the port connected to your GLYPH.`]}),`\n`,_jsxs(_components.li,{children:[_jsx(_components.code,{children:`Tools > USB CDC on Boot >`}),` `,_jsx(_components.em,{children:_jsx(_components.strong,{children:`Enabled`})})]}),`\n`]}),`\n`]}),`\n`]}),`\n`,_jsx(Warning,{children:_jsxs(_components.p,{children:[`If `,_jsx(_components.code,{children:`USB CDC on Boot`}),` is not enabled, you won’t see any serial output in the Serial Monitor.`]})}),`\n`,_jsxs(_components.ol,{start:`3`,children:[`\n`,_jsxs(_components.li,{children:[_jsx(_components.strong,{children:`Upload the Code`}),`\n`,_jsxs(_components.ul,{children:[`\n`,_jsxs(_components.li,{children:[`Click the upload button (➡️ icon) or use the shortcut `,_jsx(_components.code,{children:`Ctrl + U`}),` in Arduino IDE to upload the code to the board.`]}),`\n`]}),`\n`]}),`\n`]}),`\n`,_jsx(Heading,{level:`3`,id:`step-5-observe-the-output`,children:`Step 5: Observe the Output`}),`\n`,_jsxs(_components.ul,{children:[`\n`,_jsx(_components.li,{children:`You should hear a continuous sine wave tone from the speaker connected to the NAU8325 module.`}),`\n`]}),`\n`,_jsx(_components.hr,{}),`\n`,_jsx(Heading,{level:`2`,id:`example-2-sd-card-audio-playback`,children:`Example 2: SD Card Audio Playback`}),`\n`,_jsx(Heading,{level:`3`,id:`pin-configuration-2`,children:`Pin Configuration`}),`\n`,_jsxs(Table,{children:[_jsx(_components.thead,{children:_jsxs(_components.tr,{children:[_jsx(_components.th,{style:{textAlign:`left`},children:`Peripheral`}),_jsx(_components.th,{style:{textAlign:`left`},children:`Signal`}),_jsx(_components.th,{style:{textAlign:`left`},children:`ESP32 GPIO Pin`}),_jsx(_components.th,{style:{textAlign:`left`},children:`Description`})]})}),_jsxs(_components.tbody,{children:[_jsxs(_components.tr,{children:[_jsx(_components.td,{style:{textAlign:`left`},children:_jsx(_components.strong,{children:`SD Card`})}),_jsx(_components.td,{style:{textAlign:`left`},children:`SCK`}),_jsx(_components.td,{style:{textAlign:`left`},children:`GPIO 21`}),_jsx(_components.td,{style:{textAlign:`left`},children:`SPI Clock`})]}),_jsxs(_components.tr,{children:[_jsx(_components.td,{style:{textAlign:`left`}}),_jsx(_components.td,{style:{textAlign:`left`},children:`MISO`}),_jsx(_components.td,{style:{textAlign:`left`},children:`GPIO 23`}),_jsx(_components.td,{style:{textAlign:`left`},children:`SPI MISO`})]}),_jsxs(_components.tr,{children:[_jsx(_components.td,{style:{textAlign:`left`}}),_jsx(_components.td,{style:{textAlign:`left`},children:`MOSI`}),_jsx(_components.td,{style:{textAlign:`left`},children:`GPIO 22`}),_jsx(_components.td,{style:{textAlign:`left`},children:`SPI MOSI`})]}),_jsxs(_components.tr,{children:[_jsx(_components.td,{style:{textAlign:`left`}}),_jsx(_components.td,{style:{textAlign:`left`},children:`CS`}),_jsx(_components.td,{style:{textAlign:`left`},children:`GPIO 19`}),_jsx(_components.td,{style:{textAlign:`left`},children:`SPI Chip Select`})]}),_jsxs(_components.tr,{children:[_jsx(_components.td,{style:{textAlign:`left`},children:_jsx(_components.strong,{children:`NAU8325`})}),_jsx(_components.td,{style:{textAlign:`left`},children:`SDA`}),_jsx(_components.td,{style:{textAlign:`left`},children:`GPIO 4`}),_jsx(_components.td,{style:{textAlign:`left`},children:`I2C Data`})]}),_jsxs(_components.tr,{children:[_jsx(_components.td,{style:{textAlign:`left`}}),_jsx(_components.td,{style:{textAlign:`left`},children:`SCL`}),_jsx(_components.td,{style:{textAlign:`left`},children:`GPIO 5`}),_jsx(_components.td,{style:{textAlign:`left`},children:`I2C Clock`})]}),_jsxs(_components.tr,{children:[_jsx(_components.td,{style:{textAlign:`left`},children:_jsx(_components.strong,{children:`I2S Audio`})}),_jsx(_components.td,{style:{textAlign:`left`},children:`BCK`}),_jsx(_components.td,{style:{textAlign:`left`},children:`GPIO 6`}),_jsx(_components.td,{style:{textAlign:`left`},children:`I2S Bit Clock`})]}),_jsxs(_components.tr,{children:[_jsx(_components.td,{style:{textAlign:`left`}}),_jsx(_components.td,{style:{textAlign:`left`},children:`WS`}),_jsx(_components.td,{style:{textAlign:`left`},children:`GPIO 8`}),_jsx(_components.td,{style:{textAlign:`left`},children:`I2S Word Select`})]}),_jsxs(_components.tr,{children:[_jsx(_components.td,{style:{textAlign:`left`}}),_jsx(_components.td,{style:{textAlign:`left`},children:`DATA`}),_jsx(_components.td,{style:{textAlign:`left`},children:`GPIO 7`}),_jsx(_components.td,{style:{textAlign:`left`},children:`I2S Serial Data`})]}),_jsxs(_components.tr,{children:[_jsx(_components.td,{style:{textAlign:`left`}}),_jsx(_components.td,{style:{textAlign:`left`},children:`MCLK`}),_jsx(_components.td,{style:{textAlign:`left`},children:`GPIO 20`}),_jsx(_components.td,{style:{textAlign:`left`},children:`I2S Master Clock`})]})]})]}),`\n`,_jsx(Heading,{level:`3`,id:`step-1-hardware-required-2`,children:`Step 1: Hardware Required`}),`\n`,_jsxs(_components.ol,{children:[`\n`,_jsx(_components.li,{children:`GLYPH Board`}),`\n`,_jsx(_components.li,{children:`NAU8325 Module`}),`\n`,_jsx(_components.li,{children:`Speaker`}),`\n`,_jsx(_components.li,{children:`SD Card Module`}),`\n`]}),`\n`,_jsx(Heading,{level:`3`,id:`step-2-circuit-diagram-2`,children:`Step 2: Circuit Diagram`}),`\n`,_jsx(_components.p,{children:_jsx(_components.img,{src:`https://files.pcbcupid.com/Documentation/Boards/g-mod/nau8325/nau%20circuit%20daigram/nau%20with%20sdcard/pcbcupid_nau8325_with_sdcard.jpg`,alt:`nau8325_with_sdcard`})}),`\n`,_jsx(Heading,{level:`3`,id:`step-3-code-setup-2`,children:`Step 3: Code Setup`}),`\n`,_jsxs(_components.ol,{children:[`\n`,_jsx(_components.li,{children:_jsx(_components.strong,{children:`Open Arduino IDE.`})}),`\n`,_jsxs(_components.li,{children:[_jsx(_components.strong,{children:`Install the required libraries:`}),`\n`,_jsxs(_components.ul,{children:[`\n`,_jsxs(_components.li,{children:[`Install `,_jsx(_components.strong,{children:_jsx(_components.a,{href:`https://github.com/pschatzmann/arduino-audio-tools`,children:`AudioTools`})})]}),`\n`,_jsxs(_components.li,{children:[`Install `,_jsx(_components.strong,{children:_jsx(_components.a,{href:`https://github.com/pcbcupid/PCBCUPID-NAU8325`,children:`PCBCUPID_NAU8325`})})]}),`\n`]}),`\n`]}),`\n`,_jsx(_components.li,{children:_jsx(_components.strong,{children:`Copy and paste the following code into the Arduino IDE:`})}),`\n`]}),`\n`,_jsx(CodeBlock,{filename:``,numberOfLines:`125`,language:`cpp`,children:_jsx(_components.pre,{className:`shiki shiki-themes github-light-default dark-plus`,style:{backgroundColor:`#ffffff`,\"--shiki-dark-bg\":`#0B0C0E`,color:`#1f2328`,\"--shiki-dark\":`#D4D4D4`},language:`cpp`,children:_jsxs(_components.code,{language:`cpp`,numberOfLines:`125`,children:[_jsxs(_components.span,{className:`line`,children:[_jsx(_components.span,{style:{color:`#CF222E`,\"--shiki-dark\":`#C586C0`},children:`#include`}),_jsx(_components.span,{style:{color:`#0A3069`,\"--shiki-dark\":`#CE9178`},children:` \u003cSPI.h>`})]}),`\n`,_jsxs(_components.span,{className:`line`,children:[_jsx(_components.span,{style:{color:`#CF222E`,\"--shiki-dark\":`#C586C0`},children:`#include`}),_jsx(_components.span,{style:{color:`#0A3069`,\"--shiki-dark\":`#CE9178`},children:` \u003cSD.h>`})]}),`\n`,_jsxs(_components.span,{className:`line`,children:[_jsx(_components.span,{style:{color:`#CF222E`,\"--shiki-dark\":`#C586C0`},children:`#include`}),_jsx(_components.span,{style:{color:`#0A3069`,\"--shiki-dark\":`#CE9178`},children:` \u003cWire.h>`})]}),`\n`,_jsxs(_components.span,{className:`line`,children:[_jsx(_components.span,{style:{color:`#CF222E`,\"--shiki-dark\":`#C586C0`},children:`#include`}),_jsx(_components.span,{style:{color:`#0A3069`,\"--shiki-dark\":`#CE9178`},children:` \"AudioTools.h\"`})]}),`\n`,_jsxs(_components.span,{className:`line`,children:[_jsx(_components.span,{style:{color:`#CF222E`,\"--shiki-dark\":`#C586C0`},children:`#include`}),_jsx(_components.span,{style:{color:`#0A3069`,\"--shiki-dark\":`#CE9178`},children:` \"AudioTools/AudioCodecs/CodecMP3Helix.h\"`})]}),`\n`,_jsxs(_components.span,{className:`line`,children:[_jsx(_components.span,{style:{color:`#CF222E`,\"--shiki-dark\":`#C586C0`},children:`#include`}),_jsx(_components.span,{style:{color:`#0A3069`,\"--shiki-dark\":`#CE9178`},children:` \"PCBCUPID_NAU8325.h\"`}),_jsx(_components.span,{style:{color:`#6E7781`,\"--shiki-dark\":`#6A9955`},children:` // install https://github.com/pcbcupid/PCBCUPID-NAU8325.git`})]}),`\n`,_jsx(_components.span,{className:`line`}),`\n`,_jsx(_components.span,{className:`line`,children:_jsx(_components.span,{style:{color:`#6E7781`,\"--shiki-dark\":`#6A9955`},children:`/* === Pin configuration === */`})}),`\n`,_jsx(_components.span,{className:`line`}),`\n`,_jsx(_components.span,{className:`line`,children:_jsx(_components.span,{style:{color:`#6E7781`,\"--shiki-dark\":`#6A9955`},children:`// SD Card configuration`})}),`\n`,_jsxs(_components.span,{className:`line`,children:[_jsx(_components.span,{style:{color:`#CF222E`,\"--shiki-dark\":`#C586C0`},children:`#define`}),_jsx(_components.span,{style:{color:`#8250DF`,\"--shiki-dark\":`#569CD6`},children:` MY_SCK`}),_jsx(_components.span,{style:{color:`#0550AE`,\"--shiki-dark\":`#B5CEA8`},children:` 11`})]}),`\n`,_jsxs(_components.span,{className:`line`,children:[_jsx(_components.span,{style:{color:`#CF222E`,\"--shiki-dark\":`#C586C0`},children:`#define`}),_jsx(_components.span,{style:{color:`#8250DF`,\"--shiki-dark\":`#569CD6`},children:` MY_MISO`}),_jsx(_components.span,{style:{color:`#0550AE`,\"--shiki-dark\":`#B5CEA8`},children:` 3`})]}),`\n`,_jsxs(_components.span,{className:`line`,children:[_jsx(_components.span,{style:{color:`#CF222E`,\"--shiki-dark\":`#C586C0`},children:`#define`}),_jsx(_components.span,{style:{color:`#8250DF`,\"--shiki-dark\":`#569CD6`},children:` MY_MOSI`}),_jsx(_components.span,{style:{color:`#0550AE`,\"--shiki-dark\":`#B5CEA8`},children:` 2`})]}),`\n`,_jsxs(_components.span,{className:`line`,children:[_jsx(_components.span,{style:{color:`#CF222E`,\"--shiki-dark\":`#C586C0`},children:`#define`}),_jsx(_components.span,{style:{color:`#8250DF`,\"--shiki-dark\":`#569CD6`},children:` MY_CS`}),_jsx(_components.span,{style:{color:`#0550AE`,\"--shiki-dark\":`#B5CEA8`},children:` 1`})]}),`\n`,_jsx(_components.span,{className:`line`}),`\n`,_jsx(_components.span,{className:`line`,children:_jsx(_components.span,{style:{color:`#6E7781`,\"--shiki-dark\":`#6A9955`},children:`// I2S (NAU8325) configuration`})}),`\n`,_jsxs(_components.span,{className:`line`,children:[_jsx(_components.span,{style:{color:`#CF222E`,\"--shiki-dark\":`#C586C0`},children:`#define`}),_jsx(_components.span,{style:{color:`#8250DF`,\"--shiki-dark\":`#569CD6`},children:` I2S_WS`}),_jsx(_components.span,{style:{color:`#0550AE`,\"--shiki-dark\":`#B5CEA8`},children:` 24`})]}),`\n`,_jsxs(_components.span,{className:`line`,children:[_jsx(_components.span,{style:{color:`#CF222E`,\"--shiki-dark\":`#C586C0`},children:`#define`}),_jsx(_components.span,{style:{color:`#8250DF`,\"--shiki-dark\":`#569CD6`},children:` I2S_BCK`}),_jsx(_components.span,{style:{color:`#0550AE`,\"--shiki-dark\":`#B5CEA8`},children:` 25`})]}),`\n`,_jsxs(_components.span,{className:`line`,children:[_jsx(_components.span,{style:{color:`#CF222E`,\"--shiki-dark\":`#C586C0`},children:`#define`}),_jsx(_components.span,{style:{color:`#8250DF`,\"--shiki-dark\":`#569CD6`},children:` I2S_DATA`}),_jsx(_components.span,{style:{color:`#0550AE`,\"--shiki-dark\":`#B5CEA8`},children:` 23`})]}),`\n`,_jsxs(_components.span,{className:`line`,children:[_jsx(_components.span,{style:{color:`#CF222E`,\"--shiki-dark\":`#C586C0`},children:`#define`}),_jsx(_components.span,{style:{color:`#8250DF`,\"--shiki-dark\":`#569CD6`},children:` I2S_MCLK`}),_jsx(_components.span,{style:{color:`#0550AE`,\"--shiki-dark\":`#B5CEA8`},children:` 22`})]}),`\n`,_jsx(_components.span,{className:`line`}),`\n`,_jsx(_components.span,{className:`line`,children:_jsx(_components.span,{style:{color:`#6E7781`,\"--shiki-dark\":`#6A9955`},children:`// === Audio settings ===`})}),`\n`,_jsxs(_components.span,{className:`line`,children:[_jsx(_components.span,{style:{color:`#CF222E`,\"--shiki-dark\":`#569CD6`},children:`const`}),_jsx(_components.span,{style:{color:`#CF222E`,\"--shiki-dark\":`#569CD6`},children:` uint32_t`}),_jsx(_components.span,{style:{color:`#1F2328`,\"--shiki-dark\":`#D4D4D4`},children:` sample_rate `}),_jsx(_components.span,{style:{color:`#CF222E`,\"--shiki-dark\":`#D4D4D4`},children:`=`}),_jsx(_components.span,{style:{color:`#0550AE`,\"--shiki-dark\":`#B5CEA8`},children:` 44100`}),_jsx(_components.span,{style:{color:`#1F2328`,\"--shiki-dark\":`#D4D4D4`},children:`;`}),_jsx(_components.span,{style:{color:`#6E7781`,\"--shiki-dark\":`#6A9955`},children:` // sample_rate can be changed as per the song frequency (e.g. 48000, 32000, 16000, 8000, 96000, 12000, 64000)`})]}),`\n`,_jsxs(_components.span,{className:`line`,children:[_jsx(_components.span,{style:{color:`#CF222E`,\"--shiki-dark\":`#569CD6`},children:`const`}),_jsx(_components.span,{style:{color:`#CF222E`,\"--shiki-dark\":`#569CD6`},children:` uint16_t`}),_jsx(_components.span,{style:{color:`#1F2328`,\"--shiki-dark\":`#D4D4D4`},children:` ratio `}),_jsx(_components.span,{style:{color:`#CF222E`,\"--shiki-dark\":`#D4D4D4`},children:`=`}),_jsx(_components.span,{style:{color:`#0550AE`,\"--shiki-dark\":`#B5CEA8`},children:` 256`}),_jsx(_components.span,{style:{color:`#1F2328`,\"--shiki-dark\":`#D4D4D4`},children:`;`}),_jsx(_components.span,{style:{color:`#6E7781`,\"--shiki-dark\":`#6A9955`},children:` // ratio supported by NAU8325 (e.g. 256, 400, 500)`})]}),`\n`,_jsxs(_components.span,{className:`line`,children:[_jsx(_components.span,{style:{color:`#CF222E`,\"--shiki-dark\":`#569CD6`},children:`const`}),_jsx(_components.span,{style:{color:`#CF222E`,\"--shiki-dark\":`#569CD6`},children:` uint8_t`}),_jsx(_components.span,{style:{color:`#1F2328`,\"--shiki-dark\":`#D4D4D4`},children:` bits `}),_jsx(_components.span,{style:{color:`#CF222E`,\"--shiki-dark\":`#D4D4D4`},children:`=`}),_jsx(_components.span,{style:{color:`#0550AE`,\"--shiki-dark\":`#B5CEA8`},children:` 16`}),_jsx(_components.span,{style:{color:`#1F2328`,\"--shiki-dark\":`#D4D4D4`},children:`;`}),_jsx(_components.span,{style:{color:`#6E7781`,\"--shiki-dark\":`#6A9955`},children:` // bit depth (e.g. 16, 24, 32)`})]}),`\n`,_jsx(_components.span,{className:`line`}),`\n`,_jsx(_components.span,{className:`line`,children:_jsx(_components.span,{style:{color:`#6E7781`,\"--shiki-dark\":`#6A9955`},children:`// === Objects ===`})}),`\n`,_jsxs(_components.span,{className:`line`,children:[_jsx(_components.span,{style:{color:`#953800`,\"--shiki-dark\":`#4EC9B0`},children:`TwoWire`}),_jsx(_components.span,{style:{color:`#8250DF`,\"--shiki-dark\":`#DCDCAA`},children:` I2Cbus`}),_jsx(_components.span,{style:{color:`#1F2328`,\"--shiki-dark\":`#D4D4D4`},children:`(`}),_jsx(_components.span,{style:{color:`#0550AE`,\"--shiki-dark\":`#B5CEA8`},children:`0`}),_jsx(_components.span,{style:{color:`#1F2328`,\"--shiki-dark\":`#D4D4D4`},children:`);`})]}),`\n`,_jsxs(_components.span,{className:`line`,children:[_jsx(_components.span,{style:{color:`#953800`,\"--shiki-dark\":`#4EC9B0`},children:`PCBCUPID_NAU8325`}),_jsx(_components.span,{style:{color:`#8250DF`,\"--shiki-dark\":`#DCDCAA`},children:` nau8325`}),_jsx(_components.span,{style:{color:`#1F2328`,\"--shiki-dark\":`#D4D4D4`},children:`(`}),_jsx(_components.span,{style:{color:`#953800`,\"--shiki-dark\":`#4EC9B0`},children:`I2Cbus`}),_jsx(_components.span,{style:{color:`#1F2328`,\"--shiki-dark\":`#D4D4D4`},children:`); `})]}),`\n`,_jsx(_components.span,{className:`line`}),`\n`,_jsx(_components.span,{className:`line`,children:_jsx(_components.span,{style:{color:`#6E7781`,\"--shiki-dark\":`#6A9955`},children:`// Audio Stream Configuration `})}),`\n`,_jsx(_components.span,{className:`line`,children:_jsx(_components.span,{style:{color:`#1F2328`,\"--shiki-dark\":`#D4D4D4`},children:`I2SStream i2s;`})}),`\n`,_jsx(_components.span,{className:`line`,children:_jsx(_components.span,{style:{color:`#1F2328`,\"--shiki-dark\":`#D4D4D4`},children:`MP3DecoderHelix decoder;`})}),`\n`,_jsxs(_components.span,{className:`line`,children:[_jsx(_components.span,{style:{color:`#953800`,\"--shiki-dark\":`#4EC9B0`},children:`EncodedAudioStream`}),_jsx(_components.span,{style:{color:`#8250DF`,\"--shiki-dark\":`#DCDCAA`},children:` encodedStream`}),_jsx(_components.span,{style:{color:`#1F2328`,\"--shiki-dark\":`#D4D4D4`},children:`(`}),_jsx(_components.span,{style:{color:`#CF222E`,\"--shiki-dark\":`#D4D4D4`},children:`\u0026`}),_jsx(_components.span,{style:{color:`#953800`,\"--shiki-dark\":`#9CDCFE`},children:`i2s`}),_jsx(_components.span,{style:{color:`#1F2328`,\"--shiki-dark\":`#D4D4D4`},children:`, `}),_jsx(_components.span,{style:{color:`#CF222E`,\"--shiki-dark\":`#D4D4D4`},children:`\u0026`}),_jsx(_components.span,{style:{color:`#953800`,\"--shiki-dark\":`#9CDCFE`},children:`decoder`}),_jsx(_components.span,{style:{color:`#1F2328`,\"--shiki-dark\":`#D4D4D4`},children:`);`})]}),`\n`,_jsx(_components.span,{className:`line`,children:_jsx(_components.span,{style:{color:`#1F2328`,\"--shiki-dark\":`#D4D4D4`},children:`StreamCopy copier;`})}),`\n`,_jsx(_components.span,{className:`line`,children:_jsx(_components.span,{style:{color:`#1F2328`,\"--shiki-dark\":`#D4D4D4`},children:`File audioFile;`})}),`\n`,_jsx(_components.span,{className:`line`}),`\n`,_jsxs(_components.span,{className:`line`,children:[_jsx(_components.span,{style:{color:`#CF222E`,\"--shiki-dark\":`#569CD6`},children:`void`}),_jsx(_components.span,{style:{color:`#8250DF`,\"--shiki-dark\":`#DCDCAA`},children:` setup`}),_jsx(_components.span,{style:{color:`#1F2328`,\"--shiki-dark\":`#D4D4D4`},children:`() {`})]}),`\n`,_jsxs(_components.span,{className:`line`,children:[_jsx(_components.span,{style:{color:`#1F2328`,\"--shiki-dark\":`#9CDCFE`},children:` Serial`}),_jsx(_components.span,{style:{color:`#1F2328`,\"--shiki-dark\":`#D4D4D4`},children:`.`}),_jsx(_components.span,{style:{color:`#8250DF`,\"--shiki-dark\":`#DCDCAA`},children:`begin`}),_jsx(_components.span,{style:{color:`#1F2328`,\"--shiki-dark\":`#D4D4D4`},children:`(`}),_jsx(_components.span,{style:{color:`#0550AE`,\"--shiki-dark\":`#B5CEA8`},children:`115200`}),_jsx(_components.span,{style:{color:`#1F2328`,\"--shiki-dark\":`#D4D4D4`},children:`);`})]}),`\n`,_jsxs(_components.span,{className:`line`,children:[_jsx(_components.span,{style:{color:`#8250DF`,\"--shiki-dark\":`#DCDCAA`},children:` delay`}),_jsx(_components.span,{style:{color:`#1F2328`,\"--shiki-dark\":`#D4D4D4`},children:`(`}),_jsx(_components.span,{style:{color:`#0550AE`,\"--shiki-dark\":`#B5CEA8`},children:`10`}),_jsx(_components.span,{style:{color:`#1F2328`,\"--shiki-dark\":`#D4D4D4`},children:`);`})]}),`\n`,_jsxs(_components.span,{className:`line`,children:[_jsx(_components.span,{style:{color:`#1F2328`,\"--shiki-dark\":`#9CDCFE`},children:` Serial`}),_jsx(_components.span,{style:{color:`#1F2328`,\"--shiki-dark\":`#D4D4D4`},children:`.`}),_jsx(_components.span,{style:{color:`#8250DF`,\"--shiki-dark\":`#DCDCAA`},children:`println`}),_jsx(_components.span,{style:{color:`#1F2328`,\"--shiki-dark\":`#D4D4D4`},children:`(`}),_jsx(_components.span,{style:{color:`#0A3069`,\"--shiki-dark\":`#CE9178`},children:`\"=== NAU8325 SD EXAMPLE ===\"`}),_jsx(_components.span,{style:{color:`#1F2328`,\"--shiki-dark\":`#D4D4D4`},children:`);`})]}),`\n`,_jsx(_components.span,{className:`line`}),`\n`,_jsxs(_components.span,{className:`line`,children:[_jsx(_components.span,{style:{color:`#1F2328`,\"--shiki-dark\":`#9CDCFE`},children:` I2Cbus`}),_jsx(_components.span,{style:{color:`#1F2328`,\"--shiki-dark\":`#D4D4D4`},children:`.`}),_jsx(_components.span,{style:{color:`#8250DF`,\"--shiki-dark\":`#DCDCAA`},children:`begin`}),_jsx(_components.span,{style:{color:`#1F2328`,\"--shiki-dark\":`#D4D4D4`},children:`(`}),_jsx(_components.span,{style:{color:`#0550AE`,\"--shiki-dark\":`#B5CEA8`},children:`4`}),_jsx(_components.span,{style:{color:`#1F2328`,\"--shiki-dark\":`#D4D4D4`},children:`, `}),_jsx(_components.span,{style:{color:`#0550AE`,\"--shiki-dark\":`#B5CEA8`},children:`5`}),_jsx(_components.span,{style:{color:`#1F2328`,\"--shiki-dark\":`#D4D4D4`},children:`);`})]}),`\n`,_jsx(_components.span,{className:`line`}),`\n`,_jsxs(_components.span,{className:`line`,children:[_jsx(_components.span,{style:{color:`#CF222E`,\"--shiki-dark\":`#C586C0`},children:` if`}),_jsx(_components.span,{style:{color:`#1F2328`,\"--shiki-dark\":`#D4D4D4`},children:` (`}),_jsx(_components.span,{style:{color:`#CF222E`,\"--shiki-dark\":`#D4D4D4`},children:`!`}),_jsx(_components.span,{style:{color:`#1F2328`,\"--shiki-dark\":`#9CDCFE`},children:`nau8325`}),_jsx(_components.span,{style:{color:`#1F2328`,\"--shiki-dark\":`#D4D4D4`},children:`.`}),_jsx(_components.span,{style:{color:`#8250DF`,\"--shiki-dark\":`#DCDCAA`},children:`begin`}),_jsx(_components.span,{style:{color:`#1F2328`,\"--shiki-dark\":`#D4D4D4`},children:`()) {`})]}),`\n`,_jsxs(_components.span,{className:`line`,children:[_jsx(_components.span,{style:{color:`#1F2328`,\"--shiki-dark\":`#9CDCFE`},children:` Serial`}),_jsx(_components.span,{style:{color:`#1F2328`,\"--shiki-dark\":`#D4D4D4`},children:`.`}),_jsx(_components.span,{style:{color:`#8250DF`,\"--shiki-dark\":`#DCDCAA`},children:`println`}),_jsx(_components.span,{style:{color:`#1F2328`,\"--shiki-dark\":`#D4D4D4`},children:`(`}),_jsx(_components.span,{style:{color:`#0A3069`,\"--shiki-dark\":`#CE9178`},children:`\"NAU8325 init failed\"`}),_jsx(_components.span,{style:{color:`#1F2328`,\"--shiki-dark\":`#D4D4D4`},children:`);`})]}),`\n`,_jsxs(_components.span,{className:`line`,children:[_jsx(_components.span,{style:{color:`#CF222E`,\"--shiki-dark\":`#C586C0`},children:` while`}),_jsx(_components.span,{style:{color:`#1F2328`,\"--shiki-dark\":`#D4D4D4`},children:` (`}),_jsx(_components.span,{style:{color:`#0550AE`,\"--shiki-dark\":`#B5CEA8`},children:`1`}),_jsx(_components.span,{style:{color:`#1F2328`,\"--shiki-dark\":`#D4D4D4`},children:`)`})]}),`\n`,_jsx(_components.span,{className:`line`,children:_jsx(_components.span,{style:{color:`#1F2328`,\"--shiki-dark\":`#D4D4D4`},children:` ;`})}),`\n`,_jsx(_components.span,{className:`line`,children:_jsx(_components.span,{style:{color:`#1F2328`,\"--shiki-dark\":`#D4D4D4`},children:` }`})}),`\n`,_jsx(_components.span,{className:`line`}),`\n`,_jsxs(_components.span,{className:`line`,children:[_jsx(_components.span,{style:{color:`#1F2328`,\"--shiki-dark\":`#9CDCFE`},children:` nau8325`}),_jsx(_components.span,{style:{color:`#1F2328`,\"--shiki-dark\":`#D4D4D4`},children:`.`}),_jsx(_components.span,{style:{color:`#8250DF`,\"--shiki-dark\":`#DCDCAA`},children:`setVolume`}),_jsx(_components.span,{style:{color:`#1F2328`,\"--shiki-dark\":`#D4D4D4`},children:`(`}),_jsx(_components.span,{style:{color:`#CF222E`,\"--shiki-dark\":`#B5CEA8`},children:`0x`}),_jsx(_components.span,{style:{color:`#0550AE`,\"--shiki-dark\":`#B5CEA8`},children:`FF`}),_jsx(_components.span,{style:{color:`#1F2328`,\"--shiki-dark\":`#D4D4D4`},children:`, `}),_jsx(_components.span,{style:{color:`#CF222E`,\"--shiki-dark\":`#B5CEA8`},children:`0x`}),_jsx(_components.span,{style:{color:`#0550AE`,\"--shiki-dark\":`#B5CEA8`},children:`FF`}),_jsx(_components.span,{style:{color:`#1F2328`,\"--shiki-dark\":`#D4D4D4`},children:`);`}),_jsx(_components.span,{style:{color:`#6E7781`,\"--shiki-dark\":`#6A9955`},children:` // Setting NAU8325 at maximum volume`})]}),`\n`,_jsxs(_components.span,{className:`line`,children:[_jsx(_components.span,{style:{color:`#1F2328`,\"--shiki-dark\":`#9CDCFE`},children:` Serial`}),_jsx(_components.span,{style:{color:`#1F2328`,\"--shiki-dark\":`#D4D4D4`},children:`.`}),_jsx(_components.span,{style:{color:`#8250DF`,\"--shiki-dark\":`#DCDCAA`},children:`println`}),_jsx(_components.span,{style:{color:`#1F2328`,\"--shiki-dark\":`#D4D4D4`},children:`(`}),_jsx(_components.span,{style:{color:`#0A3069`,\"--shiki-dark\":`#CE9178`},children:`\"NAU8325 Turned ON\"`}),_jsx(_components.span,{style:{color:`#1F2328`,\"--shiki-dark\":`#D4D4D4`},children:`);`})]}),`\n`,_jsx(_components.span,{className:`line`}),`\n`,_jsx(_components.span,{className:`line`,children:_jsx(_components.span,{style:{color:`#6E7781`,\"--shiki-dark\":`#6A9955`},children:` // SD card initialization`})}),`\n`,_jsxs(_components.span,{className:`line`,children:[_jsx(_components.span,{style:{color:`#1F2328`,\"--shiki-dark\":`#9CDCFE`},children:` SPI`}),_jsx(_components.span,{style:{color:`#1F2328`,\"--shiki-dark\":`#D4D4D4`},children:`.`}),_jsx(_components.span,{style:{color:`#8250DF`,\"--shiki-dark\":`#DCDCAA`},children:`begin`}),_jsx(_components.span,{style:{color:`#1F2328`,\"--shiki-dark\":`#D4D4D4`},children:`(MY_SCK, MY_MISO, MY_MOSI, MY_CS);`})]}),`\n`,_jsxs(_components.span,{className:`line`,children:[_jsx(_components.span,{style:{color:`#CF222E`,\"--shiki-dark\":`#C586C0`},children:` if`}),_jsx(_components.span,{style:{color:`#1F2328`,\"--shiki-dark\":`#D4D4D4`},children:` (`}),_jsx(_components.span,{style:{color:`#CF222E`,\"--shiki-dark\":`#D4D4D4`},children:`!`}),_jsx(_components.span,{style:{color:`#1F2328`,\"--shiki-dark\":`#9CDCFE`},children:`SD`}),_jsx(_components.span,{style:{color:`#1F2328`,\"--shiki-dark\":`#D4D4D4`},children:`.`}),_jsx(_components.span,{style:{color:`#8250DF`,\"--shiki-dark\":`#DCDCAA`},children:`begin`}),_jsx(_components.span,{style:{color:`#1F2328`,\"--shiki-dark\":`#D4D4D4`},children:`(MY_CS)) {`})]}),`\n`,_jsxs(_components.span,{className:`line`,children:[_jsx(_components.span,{style:{color:`#1F2328`,\"--shiki-dark\":`#9CDCFE`},children:` Serial`}),_jsx(_components.span,{style:{color:`#1F2328`,\"--shiki-dark\":`#D4D4D4`},children:`.`}),_jsx(_components.span,{style:{color:`#8250DF`,\"--shiki-dark\":`#DCDCAA`},children:`println`}),_jsx(_components.span,{style:{color:`#1F2328`,\"--shiki-dark\":`#D4D4D4`},children:`(`}),_jsx(_components.span,{style:{color:`#0A3069`,\"--shiki-dark\":`#CE9178`},children:`\"SD card init failed\"`}),_jsx(_components.span,{style:{color:`#1F2328`,\"--shiki-dark\":`#D4D4D4`},children:`);`})]}),`\n`,_jsxs(_components.span,{className:`line`,children:[_jsx(_components.span,{style:{color:`#CF222E`,\"--shiki-dark\":`#C586C0`},children:` while`}),_jsx(_components.span,{style:{color:`#1F2328`,\"--shiki-dark\":`#D4D4D4`},children:` (`}),_jsx(_components.span,{style:{color:`#0550AE`,\"--shiki-dark\":`#B5CEA8`},children:`1`}),_jsx(_components.span,{style:{color:`#1F2328`,\"--shiki-dark\":`#D4D4D4`},children:`)`})]}),`\n`,_jsx(_components.span,{className:`line`,children:_jsx(_components.span,{style:{color:`#1F2328`,\"--shiki-dark\":`#D4D4D4`},children:` ;`})}),`\n`,_jsx(_components.span,{className:`line`,children:_jsx(_components.span,{style:{color:`#1F2328`,\"--shiki-dark\":`#D4D4D4`},children:` }`})}),`\n`,_jsx(_components.span,{className:`line`}),`\n`,_jsxs(_components.span,{className:`line`,children:[_jsx(_components.span,{style:{color:`#1F2328`,\"--shiki-dark\":`#D4D4D4`},children:` audioFile `}),_jsx(_components.span,{style:{color:`#CF222E`,\"--shiki-dark\":`#D4D4D4`},children:`=`}),_jsx(_components.span,{style:{color:`#1F2328`,\"--shiki-dark\":`#9CDCFE`},children:` SD`}),_jsx(_components.span,{style:{color:`#1F2328`,\"--shiki-dark\":`#D4D4D4`},children:`.`}),_jsx(_components.span,{style:{color:`#8250DF`,\"--shiki-dark\":`#DCDCAA`},children:`open`}),_jsx(_components.span,{style:{color:`#1F2328`,\"--shiki-dark\":`#D4D4D4`},children:`(`}),_jsx(_components.span,{style:{color:`#0A3069`,\"--shiki-dark\":`#CE9178`},children:`\"/Dwapara.mp3\"`}),_jsx(_components.span,{style:{color:`#1F2328`,\"--shiki-dark\":`#D4D4D4`},children:`);`}),_jsx(_components.span,{style:{color:`#6E7781`,\"--shiki-dark\":`#6A9955`},children:` // Enter the MP3 song name from your SD card followed by \"/\" e.g.: \"/music.mp3\"`})]}),`\n`,_jsxs(_components.span,{className:`line`,children:[_jsx(_components.span,{style:{color:`#CF222E`,\"--shiki-dark\":`#C586C0`},children:` if`}),_jsx(_components.span,{style:{color:`#1F2328`,\"--shiki-dark\":`#D4D4D4`},children:` (`}),_jsx(_components.span,{style:{color:`#CF222E`,\"--shiki-dark\":`#D4D4D4`},children:`!`}),_jsx(_components.span,{style:{color:`#1F2328`,\"--shiki-dark\":`#D4D4D4`},children:`audioFile `}),_jsx(_components.span,{style:{color:`#CF222E`,\"--shiki-dark\":`#D4D4D4`},children:`||`}),_jsx(_components.span,{style:{color:`#1F2328`,\"--shiki-dark\":`#9CDCFE`},children:` audioFile`}),_jsx(_components.span,{style:{color:`#1F2328`,\"--shiki-dark\":`#D4D4D4`},children:`.`}),_jsx(_components.span,{style:{color:`#8250DF`,\"--shiki-dark\":`#DCDCAA`},children:`isDirectory`}),_jsx(_components.span,{style:{color:`#1F2328`,\"--shiki-dark\":`#D4D4D4`},children:`()) {`})]}),`\n`,_jsxs(_components.span,{className:`line`,children:[_jsx(_components.span,{style:{color:`#1F2328`,\"--shiki-dark\":`#9CDCFE`},children:` Serial`}),_jsx(_components.span,{style:{color:`#1F2328`,\"--shiki-dark\":`#D4D4D4`},children:`.`}),_jsx(_components.span,{style:{color:`#8250DF`,\"--shiki-dark\":`#DCDCAA`},children:`println`}),_jsx(_components.span,{style:{color:`#1F2328`,\"--shiki-dark\":`#D4D4D4`},children:`(`}),_jsx(_components.span,{style:{color:`#0A3069`,\"--shiki-dark\":`#CE9178`},children:`\"MP3 file not found\"`}),_jsx(_components.span,{style:{color:`#1F2328`,\"--shiki-dark\":`#D4D4D4`},children:`);`})]}),`\n`,_jsxs(_components.span,{className:`line`,children:[_jsx(_components.span,{style:{color:`#CF222E`,\"--shiki-dark\":`#C586C0`},children:` while`}),_jsx(_components.span,{style:{color:`#1F2328`,\"--shiki-dark\":`#D4D4D4`},children:` (`}),_jsx(_components.span,{style:{color:`#0550AE`,\"--shiki-dark\":`#B5CEA8`},children:`1`}),_jsx(_components.span,{style:{color:`#1F2328`,\"--shiki-dark\":`#D4D4D4`},children:`)`})]}),`\n`,_jsx(_components.span,{className:`line`,children:_jsx(_components.span,{style:{color:`#1F2328`,\"--shiki-dark\":`#D4D4D4`},children:` ;`})}),`\n`,_jsx(_components.span,{className:`line`,children:_jsx(_components.span,{style:{color:`#1F2328`,\"--shiki-dark\":`#D4D4D4`},children:` }`})}),`\n`,_jsx(_components.span,{className:`line`}),`\n`,_jsx(_components.span,{className:`line`,children:_jsx(_components.span,{style:{color:`#6E7781`,\"--shiki-dark\":`#6A9955`},children:` // I2S Config`})}),`\n`,_jsxs(_components.span,{className:`line`,children:[_jsx(_components.span,{style:{color:`#CF222E`,\"--shiki-dark\":`#569CD6`},children:` auto`}),_jsx(_components.span,{style:{color:`#1F2328`,\"--shiki-dark\":`#D4D4D4`},children:` config `}),_jsx(_components.span,{style:{color:`#CF222E`,\"--shiki-dark\":`#D4D4D4`},children:`=`}),_jsx(_components.span,{style:{color:`#1F2328`,\"--shiki-dark\":`#9CDCFE`},children:` i2s`}),_jsx(_components.span,{style:{color:`#1F2328`,\"--shiki-dark\":`#D4D4D4`},children:`.`}),_jsx(_components.span,{style:{color:`#8250DF`,\"--shiki-dark\":`#DCDCAA`},children:`defaultConfig`}),_jsx(_components.span,{style:{color:`#1F2328`,\"--shiki-dark\":`#D4D4D4`},children:`(TX_MODE);`})]}),`\n`,_jsxs(_components.span,{className:`line`,children:[_jsx(_components.span,{style:{color:`#1F2328`,\"--shiki-dark\":`#9CDCFE`},children:` config`}),_jsx(_components.span,{style:{color:`#1F2328`,\"--shiki-dark\":`#D4D4D4`},children:`.`}),_jsx(_components.span,{style:{color:`#1F2328`,\"--shiki-dark\":`#9CDCFE`},children:`sample_rate`}),_jsx(_components.span,{style:{color:`#CF222E`,\"--shiki-dark\":`#D4D4D4`},children:` =`}),_jsx(_components.span,{style:{color:`#1F2328`,\"--shiki-dark\":`#D4D4D4`},children:` sample_rate;`})]}),`\n`,_jsxs(_components.span,{className:`line`,children:[_jsx(_components.span,{style:{color:`#1F2328`,\"--shiki-dark\":`#9CDCFE`},children:` config`}),_jsx(_components.span,{style:{color:`#1F2328`,\"--shiki-dark\":`#D4D4D4`},children:`.`}),_jsx(_components.span,{style:{color:`#1F2328`,\"--shiki-dark\":`#9CDCFE`},children:`bits_per_sample`}),_jsx(_components.span,{style:{color:`#CF222E`,\"--shiki-dark\":`#D4D4D4`},children:` =`}),_jsx(_components.span,{style:{color:`#1F2328`,\"--shiki-dark\":`#D4D4D4`},children:` bits;`})]}),`\n`,_jsxs(_components.span,{className:`line`,children:[_jsx(_components.span,{style:{color:`#1F2328`,\"--shiki-dark\":`#9CDCFE`},children:` config`}),_jsx(_components.span,{style:{color:`#1F2328`,\"--shiki-dark\":`#D4D4D4`},children:`.`}),_jsx(_components.span,{style:{color:`#1F2328`,\"--shiki-dark\":`#9CDCFE`},children:`channels`}),_jsx(_components.span,{style:{color:`#CF222E`,\"--shiki-dark\":`#D4D4D4`},children:` =`}),_jsx(_components.span,{style:{color:`#0550AE`,\"--shiki-dark\":`#B5CEA8`},children:` 2`}),_jsx(_components.span,{style:{color:`#1F2328`,\"--shiki-dark\":`#D4D4D4`},children:`;`})]}),`\n`,_jsxs(_components.span,{className:`line`,children:[_jsx(_components.span,{style:{color:`#1F2328`,\"--shiki-dark\":`#9CDCFE`},children:` config`}),_jsx(_components.span,{style:{color:`#1F2328`,\"--shiki-dark\":`#D4D4D4`},children:`.`}),_jsx(_components.span,{style:{color:`#1F2328`,\"--shiki-dark\":`#9CDCFE`},children:`pin_bck`}),_jsx(_components.span,{style:{color:`#CF222E`,\"--shiki-dark\":`#D4D4D4`},children:` =`}),_jsx(_components.span,{style:{color:`#1F2328`,\"--shiki-dark\":`#D4D4D4`},children:` I2S_BCK;`})]}),`\n`,_jsxs(_components.span,{className:`line`,children:[_jsx(_components.span,{style:{color:`#1F2328`,\"--shiki-dark\":`#9CDCFE`},children:` config`}),_jsx(_components.span,{style:{color:`#1F2328`,\"--shiki-dark\":`#D4D4D4`},children:`.`}),_jsx(_components.span,{style:{color:`#1F2328`,\"--shiki-dark\":`#9CDCFE`},children:`pin_ws`}),_jsx(_components.span,{style:{color:`#CF222E`,\"--shiki-dark\":`#D4D4D4`},children:` =`}),_jsx(_components.span,{style:{color:`#1F2328`,\"--shiki-dark\":`#D4D4D4`},children:` I2S_WS;`})]}),`\n`,_jsxs(_components.span,{className:`line`,children:[_jsx(_components.span,{style:{color:`#1F2328`,\"--shiki-dark\":`#9CDCFE`},children:` config`}),_jsx(_components.span,{style:{color:`#1F2328`,\"--shiki-dark\":`#D4D4D4`},children:`.`}),_jsx(_components.span,{style:{color:`#1F2328`,\"--shiki-dark\":`#9CDCFE`},children:`pin_data`}),_jsx(_components.span,{style:{color:`#CF222E`,\"--shiki-dark\":`#D4D4D4`},children:` =`}),_jsx(_components.span,{style:{color:`#1F2328`,\"--shiki-dark\":`#D4D4D4`},children:` I2S_DATA;`})]}),`\n`,_jsxs(_components.span,{className:`line`,children:[_jsx(_components.span,{style:{color:`#1F2328`,\"--shiki-dark\":`#9CDCFE`},children:` config`}),_jsx(_components.span,{style:{color:`#1F2328`,\"--shiki-dark\":`#D4D4D4`},children:`.`}),_jsx(_components.span,{style:{color:`#1F2328`,\"--shiki-dark\":`#9CDCFE`},children:`pin_mck`}),_jsx(_components.span,{style:{color:`#CF222E`,\"--shiki-dark\":`#D4D4D4`},children:` =`}),_jsx(_components.span,{style:{color:`#1F2328`,\"--shiki-dark\":`#D4D4D4`},children:` I2S_MCLK;`})]}),`\n`,_jsxs(_components.span,{className:`line`,children:[_jsx(_components.span,{style:{color:`#1F2328`,\"--shiki-dark\":`#9CDCFE`},children:` config`}),_jsx(_components.span,{style:{color:`#1F2328`,\"--shiki-dark\":`#D4D4D4`},children:`.`}),_jsx(_components.span,{style:{color:`#1F2328`,\"--shiki-dark\":`#9CDCFE`},children:`i2s_format`}),_jsx(_components.span,{style:{color:`#CF222E`,\"--shiki-dark\":`#D4D4D4`},children:` =`}),_jsx(_components.span,{style:{color:`#1F2328`,\"--shiki-dark\":`#D4D4D4`},children:` I2S_STD_FORMAT;`})]}),`\n`,_jsxs(_components.span,{className:`line`,children:[_jsx(_components.span,{style:{color:`#1F2328`,\"--shiki-dark\":`#9CDCFE`},children:` config`}),_jsx(_components.span,{style:{color:`#1F2328`,\"--shiki-dark\":`#D4D4D4`},children:`.`}),_jsx(_components.span,{style:{color:`#1F2328`,\"--shiki-dark\":`#9CDCFE`},children:`use_apll`}),_jsx(_components.span,{style:{color:`#CF222E`,\"--shiki-dark\":`#D4D4D4`},children:` =`}),_jsx(_components.span,{style:{color:`#0550AE`,\"--shiki-dark\":`#569CD6`},children:` false`}),_jsx(_components.span,{style:{color:`#1F2328`,\"--shiki-dark\":`#D4D4D4`},children:`;`})]}),`\n`,_jsx(_components.span,{className:`line`}),`\n`,_jsxs(_components.span,{className:`line`,children:[_jsx(_components.span,{style:{color:`#1F2328`,\"--shiki-dark\":`#9CDCFE`},children:` i2s`}),_jsx(_components.span,{style:{color:`#1F2328`,\"--shiki-dark\":`#D4D4D4`},children:`.`}),_jsx(_components.span,{style:{color:`#8250DF`,\"--shiki-dark\":`#DCDCAA`},children:`begin`}),_jsx(_components.span,{style:{color:`#1F2328`,\"--shiki-dark\":`#D4D4D4`},children:`(config);`})]}),`\n`,_jsxs(_components.span,{className:`line`,children:[_jsx(_components.span,{style:{color:`#1F2328`,\"--shiki-dark\":`#9CDCFE`},children:` AudioToolsLogger`}),_jsx(_components.span,{style:{color:`#1F2328`,\"--shiki-dark\":`#D4D4D4`},children:`.`}),_jsx(_components.span,{style:{color:`#8250DF`,\"--shiki-dark\":`#DCDCAA`},children:`begin`}),_jsx(_components.span,{style:{color:`#1F2328`,\"--shiki-dark\":`#D4D4D4`},children:`(Serial, `}),_jsx(_components.span,{style:{color:`#953800`,\"--shiki-dark\":`#4EC9B0`},children:`AudioToolsLogLevel`}),_jsx(_components.span,{style:{color:`#1F2328`,\"--shiki-dark\":`#D4D4D4`},children:`::Info);`})]}),`\n`,_jsxs(_components.span,{className:`line`,children:[_jsx(_components.span,{style:{color:`#1F2328`,\"--shiki-dark\":`#9CDCFE`},children:` decoder`}),_jsx(_components.span,{style:{color:`#1F2328`,\"--shiki-dark\":`#D4D4D4`},children:`.`}),_jsx(_components.span,{style:{color:`#8250DF`,\"--shiki-dark\":`#DCDCAA`},children:`begin`}),_jsx(_components.span,{style:{color:`#1F2328`,\"--shiki-dark\":`#D4D4D4`},children:`();`})]}),`\n`,_jsxs(_components.span,{className:`line`,children:[_jsx(_components.span,{style:{color:`#1F2328`,\"--shiki-dark\":`#9CDCFE`},children:` copier`}),_jsx(_components.span,{style:{color:`#1F2328`,\"--shiki-dark\":`#D4D4D4`},children:`.`}),_jsx(_components.span,{style:{color:`#8250DF`,\"--shiki-dark\":`#DCDCAA`},children:`begin`}),_jsx(_components.span,{style:{color:`#1F2328`,\"--shiki-dark\":`#D4D4D4`},children:`(encodedStream, audioFile);`})]}),`\n`,_jsx(_components.span,{className:`line`}),`\n`,_jsxs(_components.span,{className:`line`,children:[_jsx(_components.span,{style:{color:`#1F2328`,\"--shiki-dark\":`#9CDCFE`},children:` Serial`}),_jsx(_components.span,{style:{color:`#1F2328`,\"--shiki-dark\":`#D4D4D4`},children:`.`}),_jsx(_components.span,{style:{color:`#8250DF`,\"--shiki-dark\":`#DCDCAA`},children:`println`}),_jsx(_components.span,{style:{color:`#1F2328`,\"--shiki-dark\":`#D4D4D4`},children:`(`}),_jsx(_components.span,{style:{color:`#0A3069`,\"--shiki-dark\":`#CE9178`},children:`\"Playback started!\"`}),_jsx(_components.span,{style:{color:`#1F2328`,\"--shiki-dark\":`#D4D4D4`},children:`);`})]}),`\n`,_jsx(_components.span,{className:`line`,children:_jsx(_components.span,{style:{color:`#1F2328`,\"--shiki-dark\":`#D4D4D4`},children:`}`})}),`\n`,_jsx(_components.span,{className:`line`}),`\n`,_jsxs(_components.span,{className:`line`,children:[_jsx(_components.span,{style:{color:`#CF222E`,\"--shiki-dark\":`#569CD6`},children:`void`}),_jsx(_components.span,{style:{color:`#8250DF`,\"--shiki-dark\":`#DCDCAA`},children:` loop`}),_jsx(_components.span,{style:{color:`#1F2328`,\"--shiki-dark\":`#D4D4D4`},children:`() {`})]}),`\n`,_jsxs(_components.span,{className:`line`,children:[_jsx(_components.span,{style:{color:`#CF222E`,\"--shiki-dark\":`#C586C0`},children:` if`}),_jsx(_components.span,{style:{color:`#1F2328`,\"--shiki-dark\":`#D4D4D4`},children:` (`}),_jsx(_components.span,{style:{color:`#CF222E`,\"--shiki-dark\":`#D4D4D4`},children:`!`}),_jsx(_components.span,{style:{color:`#1F2328`,\"--shiki-dark\":`#9CDCFE`},children:`copier`}),_jsx(_components.span,{style:{color:`#1F2328`,\"--shiki-dark\":`#D4D4D4`},children:`.`}),_jsx(_components.span,{style:{color:`#8250DF`,\"--shiki-dark\":`#DCDCAA`},children:`copy`}),_jsx(_components.span,{style:{color:`#1F2328`,\"--shiki-dark\":`#D4D4D4`},children:`()) {`})]}),`\n`,_jsx(_components.span,{className:`line`,children:_jsx(_components.span,{style:{color:`#6E7781`,\"--shiki-dark\":`#6A9955`},children:` // Sending empty values to auto turn off NAU8325`})}),`\n`,_jsxs(_components.span,{className:`line`,children:[_jsx(_components.span,{style:{color:`#1F2328`,\"--shiki-dark\":`#9CDCFE`},children:` Serial`}),_jsx(_components.span,{style:{color:`#1F2328`,\"--shiki-dark\":`#D4D4D4`},children:`.`}),_jsx(_components.span,{style:{color:`#8250DF`,\"--shiki-dark\":`#DCDCAA`},children:`println`}),_jsx(_components.span,{style:{color:`#1F2328`,\"--shiki-dark\":`#D4D4D4`},children:`(`}),_jsx(_components.span,{style:{color:`#0A3069`,\"--shiki-dark\":`#CE9178`},children:`\"Playback done. Sending silence...\"`}),_jsx(_components.span,{style:{color:`#1F2328`,\"--shiki-dark\":`#D4D4D4`},children:`);`})]}),`\n`,_jsxs(_components.span,{className:`line`,children:[_jsx(_components.span,{style:{color:`#CF222E`,\"--shiki-dark\":`#569CD6`},children:` int16_t`}),_jsx(_components.span,{style:{color:`#1F2328`,\"--shiki-dark\":`#D4D4D4`},children:` zero `}),_jsx(_components.span,{style:{color:`#CF222E`,\"--shiki-dark\":`#D4D4D4`},children:`=`}),_jsx(_components.span,{style:{color:`#0550AE`,\"--shiki-dark\":`#B5CEA8`},children:` 0`}),_jsx(_components.span,{style:{color:`#1F2328`,\"--shiki-dark\":`#D4D4D4`},children:`;`})]}),`\n`,_jsxs(_components.span,{className:`line`,children:[_jsx(_components.span,{style:{color:`#CF222E`,\"--shiki-dark\":`#C586C0`},children:` for`}),_jsx(_components.span,{style:{color:`#1F2328`,\"--shiki-dark\":`#D4D4D4`},children:` (`}),_jsx(_components.span,{style:{color:`#CF222E`,\"--shiki-dark\":`#569CD6`},children:`int`}),_jsx(_components.span,{style:{color:`#1F2328`,\"--shiki-dark\":`#D4D4D4`},children:` i `}),_jsx(_components.span,{style:{color:`#CF222E`,\"--shiki-dark\":`#D4D4D4`},children:`=`}),_jsx(_components.span,{style:{color:`#0550AE`,\"--shiki-dark\":`#B5CEA8`},children:` 0`}),_jsx(_components.span,{style:{color:`#1F2328`,\"--shiki-dark\":`#D4D4D4`},children:`; i `}),_jsx(_components.span,{style:{color:`#CF222E`,\"--shiki-dark\":`#D4D4D4`},children:`\u003c`}),_jsx(_components.span,{style:{color:`#0550AE`,\"--shiki-dark\":`#B5CEA8`},children:` 2048`}),_jsx(_components.span,{style:{color:`#CF222E`,\"--shiki-dark\":`#D4D4D4`},children:` *`}),_jsx(_components.span,{style:{color:`#0550AE`,\"--shiki-dark\":`#B5CEA8`},children:` 2`}),_jsx(_components.span,{style:{color:`#1F2328`,\"--shiki-dark\":`#D4D4D4`},children:`; i`}),_jsx(_components.span,{style:{color:`#CF222E`,\"--shiki-dark\":`#D4D4D4`},children:`++`}),_jsx(_components.span,{style:{color:`#1F2328`,\"--shiki-dark\":`#D4D4D4`},children:`) {`})]}),`\n`,_jsxs(_components.span,{className:`line`,children:[_jsx(_components.span,{style:{color:`#1F2328`,\"--shiki-dark\":`#9CDCFE`},children:` i2s`}),_jsx(_components.span,{style:{color:`#1F2328`,\"--shiki-dark\":`#D4D4D4`},children:`.`}),_jsx(_components.span,{style:{color:`#8250DF`,\"--shiki-dark\":`#DCDCAA`},children:`write`}),_jsx(_components.span,{style:{color:`#1F2328`,\"--shiki-dark\":`#D4D4D4`},children:`((`}),_jsx(_components.span,{style:{color:`#CF222E`,\"--shiki-dark\":`#569CD6`},children:`uint8_t`}),_jsx(_components.span,{style:{color:`#CF222E`,\"--shiki-dark\":`#D4D4D4`},children:` *`}),_jsx(_components.span,{style:{color:`#1F2328`,\"--shiki-dark\":`#D4D4D4`},children:`)`}),_jsx(_components.span,{style:{color:`#CF222E`,\"--shiki-dark\":`#D4D4D4`},children:`\u0026`}),_jsx(_components.span,{style:{color:`#1F2328`,\"--shiki-dark\":`#D4D4D4`},children:`zero, `}),_jsx(_components.span,{style:{color:`#CF222E`,\"--shiki-dark\":`#569CD6`},children:`sizeof`}),_jsx(_components.span,{style:{color:`#1F2328`,\"--shiki-dark\":`#D4D4D4`},children:`(zero));`})]}),`\n`,_jsx(_components.span,{className:`line`,children:_jsx(_components.span,{style:{color:`#1F2328`,\"--shiki-dark\":`#D4D4D4`},children:` }`})}),`\n`,_jsxs(_components.span,{className:`line`,children:[_jsx(_components.span,{style:{color:`#CF222E`,\"--shiki-dark\":`#C586C0`},children:` while`}),_jsx(_components.span,{style:{color:`#1F2328`,\"--shiki-dark\":`#D4D4D4`},children:` (`}),_jsx(_components.span,{style:{color:`#0550AE`,\"--shiki-dark\":`#B5CEA8`},children:`1`}),_jsx(_components.span,{style:{color:`#1F2328`,\"--shiki-dark\":`#D4D4D4`},children:`)`})]}),`\n`,_jsx(_components.span,{className:`line`,children:_jsx(_components.span,{style:{color:`#1F2328`,\"--shiki-dark\":`#D4D4D4`},children:` ;`})}),`\n`,_jsx(_components.span,{className:`line`,children:_jsx(_components.span,{style:{color:`#1F2328`,\"--shiki-dark\":`#D4D4D4`},children:` }`})}),`\n`,_jsx(_components.span,{className:`line`,children:_jsx(_components.span,{style:{color:`#1F2328`,\"--shiki-dark\":`#D4D4D4`},children:`}`})}),`\n`,_jsx(_components.span,{className:`line`}),`\n`,_jsx(_components.span,{className:`line`,children:_jsx(_components.span,{style:{color:`#6E7781`,\"--shiki-dark\":`#6A9955`},children:`// ========== SD Card File Listing ==========`})}),`\n`,_jsxs(_components.span,{className:`line`,children:[_jsx(_components.span,{style:{color:`#CF222E`,\"--shiki-dark\":`#569CD6`},children:`void`}),_jsx(_components.span,{style:{color:`#8250DF`,\"--shiki-dark\":`#DCDCAA`},children:` listDir`}),_jsx(_components.span,{style:{color:`#1F2328`,\"--shiki-dark\":`#D4D4D4`},children:`(`}),_jsx(_components.span,{style:{color:`#953800`,\"--shiki-dark\":`#4EC9B0`},children:`fs`}),_jsx(_components.span,{style:{color:`#1F2328`,\"--shiki-dark\":`#D4D4D4`},children:`::`}),_jsx(_components.span,{style:{color:`#953800`,\"--shiki-dark\":`#4EC9B0`},children:`FS`}),_jsx(_components.span,{style:{color:`#CF222E`,\"--shiki-dark\":`#569CD6`},children:` \u0026`}),_jsx(_components.span,{style:{color:`#953800`,\"--shiki-dark\":`#9CDCFE`},children:`fs`}),_jsx(_components.span,{style:{color:`#1F2328`,\"--shiki-dark\":`#D4D4D4`},children:`, `}),_jsx(_components.span,{style:{color:`#CF222E`,\"--shiki-dark\":`#569CD6`},children:`const`}),_jsx(_components.span,{style:{color:`#CF222E`,\"--shiki-dark\":`#569CD6`},children:` char`}),_jsx(_components.span,{style:{color:`#CF222E`,\"--shiki-dark\":`#569CD6`},children:` *`}),_jsx(_components.span,{style:{color:`#953800`,\"--shiki-dark\":`#9CDCFE`},children:`dirname`}),_jsx(_components.span,{style:{color:`#1F2328`,\"--shiki-dark\":`#D4D4D4`},children:`, `}),_jsx(_components.span,{style:{color:`#CF222E`,\"--shiki-dark\":`#569CD6`},children:`uint8_t`}),_jsx(_components.span,{style:{color:`#953800`,\"--shiki-dark\":`#9CDCFE`},children:` levels`}),_jsx(_components.span,{style:{color:`#1F2328`,\"--shiki-dark\":`#D4D4D4`},children:`) {`})]}),`\n`,_jsxs(_components.span,{className:`line`,children:[_jsx(_components.span,{style:{color:`#1F2328`,\"--shiki-dark\":`#9CDCFE`},children:` Serial`}),_jsx(_components.span,{style:{color:`#1F2328`,\"--shiki-dark\":`#D4D4D4`},children:`.`}),_jsx(_components.span,{style:{color:`#8250DF`,\"--shiki-dark\":`#DCDCAA`},children:`printf`}),_jsx(_components.span,{style:{color:`#1F2328`,\"--shiki-dark\":`#D4D4D4`},children:`(`}),_jsx(_components.span,{style:{color:`#0A3069`,\"--shiki-dark\":`#CE9178`},children:`\"Listing directory: `}),_jsx(_components.span,{style:{color:`#CF222E`,\"--shiki-dark\":`#9CDCFE`},children:`%s`}),_jsx(_components.span,{style:{color:`#CF222E`,\"--shiki-dark\":`#D7BA7D`},children:`\\\\n`}),_jsx(_components.span,{style:{color:`#0A3069`,\"--shiki-dark\":`#CE9178`},children:`\"`}),_jsx(_components.span,{style:{color:`#1F2328`,\"--shiki-dark\":`#D4D4D4`},children:`, dirname);`})]}),`\n`,_jsxs(_components.span,{className:`line`,children:[_jsx(_components.span,{style:{color:`#1F2328`,\"--shiki-dark\":`#D4D4D4`},children:` File root `}),_jsx(_components.span,{style:{color:`#CF222E`,\"--shiki-dark\":`#D4D4D4`},children:`=`}),_jsx(_components.span,{style:{color:`#1F2328`,\"--shiki-dark\":`#9CDCFE`},children:` fs`}),_jsx(_components.span,{style:{color:`#1F2328`,\"--shiki-dark\":`#D4D4D4`},children:`.`}),_jsx(_components.span,{style:{color:`#8250DF`,\"--shiki-dark\":`#DCDCAA`},children:`open`}),_jsx(_components.span,{style:{color:`#1F2328`,\"--shiki-dark\":`#D4D4D4`},children:`(dirname);`})]}),`\n`,_jsxs(_components.span,{className:`line`,children:[_jsx(_components.span,{style:{color:`#CF222E`,\"--shiki-dark\":`#C586C0`},children:` if`}),_jsx(_components.span,{style:{color:`#1F2328`,\"--shiki-dark\":`#D4D4D4`},children:` (`}),_jsx(_components.span,{style:{color:`#CF222E`,\"--shiki-dark\":`#D4D4D4`},children:`!`}),_jsx(_components.span,{style:{color:`#1F2328`,\"--shiki-dark\":`#D4D4D4`},children:`root `}),_jsx(_components.span,{style:{color:`#CF222E`,\"--shiki-dark\":`#D4D4D4`},children:`||`}),_jsx(_components.span,{style:{color:`#CF222E`,\"--shiki-dark\":`#D4D4D4`},children:` !`}),_jsx(_components.span,{style:{color:`#1F2328`,\"--shiki-dark\":`#9CDCFE`},children:`root`}),_jsx(_components.span,{style:{color:`#1F2328`,\"--shiki-dark\":`#D4D4D4`},children:`.`}),_jsx(_components.span,{style:{color:`#8250DF`,\"--shiki-dark\":`#DCDCAA`},children:`isDirectory`}),_jsx(_components.span,{style:{color:`#1F2328`,\"--shiki-dark\":`#D4D4D4`},children:`()) {`})]}),`\n`,_jsxs(_components.span,{className:`line`,children:[_jsx(_components.span,{style:{color:`#1F2328`,\"--shiki-dark\":`#9CDCFE`},children:` Serial`}),_jsx(_components.span,{style:{color:`#1F2328`,\"--shiki-dark\":`#D4D4D4`},children:`.`}),_jsx(_components.span,{style:{color:`#8250DF`,\"--shiki-dark\":`#DCDCAA`},children:`println`}),_jsx(_components.span,{style:{color:`#1F2328`,\"--shiki-dark\":`#D4D4D4`},children:`(`}),_jsx(_components.span,{style:{color:`#0A3069`,\"--shiki-dark\":`#CE9178`},children:`\"Failed to open directory\"`}),_jsx(_components.span,{style:{color:`#1F2328`,\"--shiki-dark\":`#D4D4D4`},children:`);`})]}),`\n`,_jsxs(_components.span,{className:`line`,children:[_jsx(_components.span,{style:{color:`#CF222E`,\"--shiki-dark\":`#C586C0`},children:` return`}),_jsx(_components.span,{style:{color:`#1F2328`,\"--shiki-dark\":`#D4D4D4`},children:`;`})]}),`\n`,_jsx(_components.span,{className:`line`,children:_jsx(_components.span,{style:{color:`#1F2328`,\"--shiki-dark\":`#D4D4D4`},children:` }`})}),`\n`,_jsx(_components.span,{className:`line`}),`\n`,_jsxs(_components.span,{className:`line`,children:[_jsx(_components.span,{style:{color:`#1F2328`,\"--shiki-dark\":`#D4D4D4`},children:` File file `}),_jsx(_components.span,{style:{color:`#CF222E`,\"--shiki-dark\":`#D4D4D4`},children:`=`}),_jsx(_components.span,{style:{color:`#1F2328`,\"--shiki-dark\":`#9CDCFE`},children:` root`}),_jsx(_components.span,{style:{color:`#1F2328`,\"--shiki-dark\":`#D4D4D4`},children:`.`}),_jsx(_components.span,{style:{color:`#8250DF`,\"--shiki-dark\":`#DCDCAA`},children:`openNextFile`}),_jsx(_components.span,{style:{color:`#1F2328`,\"--shiki-dark\":`#D4D4D4`},children:`();`})]}),`\n`,_jsxs(_components.span,{className:`line`,children:[_jsx(_components.span,{style:{color:`#CF222E`,\"--shiki-dark\":`#C586C0`},children:` while`}),_jsx(_components.span,{style:{color:`#1F2328`,\"--shiki-dark\":`#D4D4D4`},children:` (file) {`})]}),`\n`,_jsxs(_components.span,{className:`line`,children:[_jsx(_components.span,{style:{color:`#CF222E`,\"--shiki-dark\":`#C586C0`},children:` if`}),_jsx(_components.span,{style:{color:`#1F2328`,\"--shiki-dark\":`#D4D4D4`},children:` (`}),_jsx(_components.span,{style:{color:`#1F2328`,\"--shiki-dark\":`#9CDCFE`},children:`file`}),_jsx(_components.span,{style:{color:`#1F2328`,\"--shiki-dark\":`#D4D4D4`},children:`.`}),_jsx(_components.span,{style:{color:`#8250DF`,\"--shiki-dark\":`#DCDCAA`},children:`isDirectory`}),_jsx(_components.span,{style:{color:`#1F2328`,\"--shiki-dark\":`#D4D4D4`},children:`()) {`})]}),`\n`,_jsxs(_components.span,{className:`line`,children:[_jsx(_components.span,{style:{color:`#1F2328`,\"--shiki-dark\":`#9CDCFE`},children:` Serial`}),_jsx(_components.span,{style:{color:`#1F2328`,\"--shiki-dark\":`#D4D4D4`},children:`.`}),_jsx(_components.span,{style:{color:`#8250DF`,\"--shiki-dark\":`#DCDCAA`},children:`print`}),_jsx(_components.span,{style:{color:`#1F2328`,\"--shiki-dark\":`#D4D4D4`},children:`(`}),_jsx(_components.span,{style:{color:`#0A3069`,\"--shiki-dark\":`#CE9178`},children:`\" DIR : \"`}),_jsx(_components.span,{style:{color:`#1F2328`,\"--shiki-dark\":`#D4D4D4`},children:`);`})]}),`\n`,_jsxs(_components.span,{className:`line`,children:[_jsx(_components.span,{style:{color:`#1F2328`,\"--shiki-dark\":`#9CDCFE`},children:` Serial`}),_jsx(_components.span,{style:{color:`#1F2328`,\"--shiki-dark\":`#D4D4D4`},children:`.`}),_jsx(_components.span,{style:{color:`#8250DF`,\"--shiki-dark\":`#DCDCAA`},children:`println`}),_jsx(_components.span,{style:{color:`#1F2328`,\"--shiki-dark\":`#D4D4D4`},children:`(`}),_jsx(_components.span,{style:{color:`#1F2328`,\"--shiki-dark\":`#9CDCFE`},children:`file`}),_jsx(_components.span,{style:{color:`#1F2328`,\"--shiki-dark\":`#D4D4D4`},children:`.`}),_jsx(_components.span,{style:{color:`#8250DF`,\"--shiki-dark\":`#DCDCAA`},children:`name`}),_jsx(_components.span,{style:{color:`#1F2328`,\"--shiki-dark\":`#D4D4D4`},children:`());`})]}),`\n`,_jsxs(_components.span,{className:`line`,children:[_jsx(_components.span,{style:{color:`#CF222E`,\"--shiki-dark\":`#C586C0`},children:` if`}),_jsx(_components.span,{style:{color:`#1F2328`,\"--shiki-dark\":`#D4D4D4`},children:` (levels) `}),_jsx(_components.span,{style:{color:`#8250DF`,\"--shiki-dark\":`#DCDCAA`},children:`listDir`}),_jsx(_components.span,{style:{color:`#1F2328`,\"--shiki-dark\":`#D4D4D4`},children:`(fs, `}),_jsx(_components.span,{style:{color:`#1F2328`,\"--shiki-dark\":`#9CDCFE`},children:`file`}),_jsx(_components.span,{style:{color:`#1F2328`,\"--shiki-dark\":`#D4D4D4`},children:`.`}),_jsx(_components.span,{style:{color:`#8250DF`,\"--shiki-dark\":`#DCDCAA`},children:`path`}),_jsx(_components.span,{style:{color:`#1F2328`,\"--shiki-dark\":`#D4D4D4`},children:`(), levels `}),_jsx(_components.span,{style:{color:`#CF222E`,\"--shiki-dark\":`#D4D4D4`},children:`-`}),_jsx(_components.span,{style:{color:`#0550AE`,\"--shiki-dark\":`#B5CEA8`},children:` 1`}),_jsx(_components.span,{style:{color:`#1F2328`,\"--shiki-dark\":`#D4D4D4`},children:`);`})]}),`\n`,_jsxs(_components.span,{className:`line`,children:[_jsx(_components.span,{style:{color:`#1F2328`,\"--shiki-dark\":`#D4D4D4`},children:` } `}),_jsx(_components.span,{style:{color:`#CF222E`,\"--shiki-dark\":`#C586C0`},children:`else`}),_jsx(_components.span,{style:{color:`#1F2328`,\"--shiki-dark\":`#D4D4D4`},children:` {`})]}),`\n`,_jsxs(_components.span,{className:`line`,children:[_jsx(_components.span,{style:{color:`#1F2328`,\"--shiki-dark\":`#9CDCFE`},children:` Serial`}),_jsx(_components.span,{style:{color:`#1F2328`,\"--shiki-dark\":`#D4D4D4`},children:`.`}),_jsx(_components.span,{style:{color:`#8250DF`,\"--shiki-dark\":`#DCDCAA`},children:`print`}),_jsx(_components.span,{style:{color:`#1F2328`,\"--shiki-dark\":`#D4D4D4`},children:`(`}),_jsx(_components.span,{style:{color:`#0A3069`,\"--shiki-dark\":`#CE9178`},children:`\" FILE: \"`}),_jsx(_components.span,{style:{color:`#1F2328`,\"--shiki-dark\":`#D4D4D4`},children:`);`})]}),`\n`,_jsxs(_components.span,{className:`line`,children:[_jsx(_components.span,{style:{color:`#1F2328`,\"--shiki-dark\":`#9CDCFE`},children:` Serial`}),_jsx(_components.span,{style:{color:`#1F2328`,\"--shiki-dark\":`#D4D4D4`},children:`.`}),_jsx(_components.span,{style:{color:`#8250DF`,\"--shiki-dark\":`#DCDCAA`},children:`print`}),_jsx(_components.span,{style:{color:`#1F2328`,\"--shiki-dark\":`#D4D4D4`},children:`(`}),_jsx(_components.span,{style:{color:`#1F2328`,\"--shiki-dark\":`#9CDCFE`},children:`file`}),_jsx(_components.span,{style:{color:`#1F2328`,\"--shiki-dark\":`#D4D4D4`},children:`.`}),_jsx(_components.span,{style:{color:`#8250DF`,\"--shiki-dark\":`#DCDCAA`},children:`name`}),_jsx(_components.span,{style:{color:`#1F2328`,\"--shiki-dark\":`#D4D4D4`},children:`());`})]}),`\n`,_jsxs(_components.span,{className:`line`,children:[_jsx(_components.span,{style:{color:`#1F2328`,\"--shiki-dark\":`#9CDCFE`},children:` Serial`}),_jsx(_components.span,{style:{color:`#1F2328`,\"--shiki-dark\":`#D4D4D4`},children:`.`}),_jsx(_components.span,{style:{color:`#8250DF`,\"--shiki-dark\":`#DCDCAA`},children:`print`}),_jsx(_components.span,{style:{color:`#1F2328`,\"--shiki-dark\":`#D4D4D4`},children:`(`}),_jsx(_components.span,{style:{color:`#0A3069`,\"--shiki-dark\":`#CE9178`},children:`\" SIZE: \"`}),_jsx(_components.span,{style:{color:`#1F2328`,\"--shiki-dark\":`#D4D4D4`},children:`);`})]}),`\n`,_jsxs(_components.span,{className:`line`,children:[_jsx(_components.span,{style:{color:`#1F2328`,\"--shiki-dark\":`#9CDCFE`},children:` Serial`}),_jsx(_components.span,{style:{color:`#1F2328`,\"--shiki-dark\":`#D4D4D4`},children:`.`}),_jsx(_components.span,{style:{color:`#8250DF`,\"--shiki-dark\":`#DCDCAA`},children:`println`}),_jsx(_components.span,{style:{color:`#1F2328`,\"--shiki-dark\":`#D4D4D4`},children:`(`}),_jsx(_components.span,{style:{color:`#1F2328`,\"--shiki-dark\":`#9CDCFE`},children:`file`}),_jsx(_components.span,{style:{color:`#1F2328`,\"--shiki-dark\":`#D4D4D4`},children:`.`}),_jsx(_components.span,{style:{color:`#8250DF`,\"--shiki-dark\":`#DCDCAA`},children:`size`}),_jsx(_components.span,{style:{color:`#1F2328`,\"--shiki-dark\":`#D4D4D4`},children:`());`})]}),`\n`,_jsx(_components.span,{className:`line`,children:_jsx(_components.span,{style:{color:`#1F2328`,\"--shiki-dark\":`#D4D4D4`},children:` }`})}),`\n`,_jsxs(_components.span,{className:`line`,children:[_jsx(_components.span,{style:{color:`#1F2328`,\"--shiki-dark\":`#D4D4D4`},children:` file `}),_jsx(_components.span,{style:{color:`#CF222E`,\"--shiki-dark\":`#D4D4D4`},children:`=`}),_jsx(_components.span,{style:{color:`#1F2328`,\"--shiki-dark\":`#9CDCFE`},children:` root`}),_jsx(_components.span,{style:{color:`#1F2328`,\"--shiki-dark\":`#D4D4D4`},children:`.`}),_jsx(_components.span,{style:{color:`#8250DF`,\"--shiki-dark\":`#DCDCAA`},children:`openNextFile`}),_jsx(_components.span,{style:{color:`#1F2328`,\"--shiki-dark\":`#D4D4D4`},children:`();`})]}),`\n`,_jsx(_components.span,{className:`line`,children:_jsx(_components.span,{style:{color:`#1F2328`,\"--shiki-dark\":`#D4D4D4`},children:` }`})}),`\n`,_jsx(_components.span,{className:`line`,children:_jsx(_components.span,{style:{color:`#1F2328`,\"--shiki-dark\":`#D4D4D4`},children:`}`})}),`\n`]})})}),`\n`,_jsx(Heading,{level:`3`,id:`step-4-upload-the-code-2`,children:`Step 4: Upload the Code`}),`\n`,_jsxs(_components.ol,{children:[`\n`,_jsxs(_components.li,{children:[`\n`,_jsx(_components.p,{children:_jsx(_components.strong,{children:`Prepare SD Card`})}),`\n`,_jsxs(_components.ul,{children:[`\n`,_jsx(_components.li,{children:`Format the microSD card (FAT32 recommended).`}),`\n`,_jsxs(_components.li,{children:[`Save your MP3 file as `,_jsx(_components.code,{children:`/Dwapara.mp3`}),` on the SD card root directory.`]}),`\n`,_jsx(_components.li,{children:`Insert the SD card into the SD card module.`}),`\n`]}),`\n`]}),`\n`,_jsxs(_components.li,{children:[`\n`,_jsx(_components.p,{children:_jsx(_components.strong,{children:`Connect the Board`})}),`\n`,_jsxs(_components.ul,{children:[`\n`,_jsx(_components.li,{children:`Connect your GLYPH board to your computer.`}),`\n`]}),`\n`]}),`\n`,_jsxs(_components.li,{children:[`\n`,_jsxs(_components.p,{children:[_jsx(_components.strong,{children:`Select the Board and Port`}),`\nDo the following settings in your Arduino IDE:`]}),`\n`,_jsxs(_components.ul,{children:[`\n`,_jsx(_components.li,{children:_jsx(_components.code,{children:`Tools > Board > esp32 > Pcbcupid GLYPH`})}),`\n`,_jsxs(_components.li,{children:[_jsx(_components.code,{children:`Tools > Port`}),` and select the port connected to your GLYPH.`]}),`\n`,_jsxs(_components.li,{children:[_jsx(_components.code,{children:`Tools > USB CDC on Boot >`}),` `,_jsx(_components.em,{children:_jsx(_components.strong,{children:`Enabled`})})]}),`\n`]}),`\n`]}),`\n`]}),`\n`,_jsx(Warning,{children:_jsxs(_components.p,{children:[`If `,_jsx(_components.code,{children:`USB CDC on Boot`}),` is not enabled, you won’t see any serial output in the Serial Monitor.`]})}),`\n`,_jsxs(_components.ol,{start:`4`,children:[`\n`,_jsxs(_components.li,{children:[_jsx(_components.strong,{children:`Upload the Code`}),`\n`,_jsxs(_components.ul,{children:[`\n`,_jsxs(_components.li,{children:[`Click the upload button (➡️ icon) or use the shortcut `,_jsx(_components.code,{children:`Ctrl + U`}),` in Arduino IDE to upload the code to the board.`]}),`\n`]}),`\n`]}),`\n`]}),`\n`,_jsx(Heading,{level:`3`,id:`step-5-observe-the-output-2`,children:`Step 5: Observe the Output`}),`\n`,_jsxs(_components.ul,{children:[`\n`,_jsxs(_components.li,{children:[`Open the Serial Monitor at `,_jsx(_components.strong,{children:`115200 baud`}),`.`]}),`\n`,_jsx(_components.li,{children:`The MP3 file stored on the SD card will play through the speaker connected to the NAU8325 module.`}),`\n`]})]})}function MDXContent(props={}){const{wrapper:MDXLayout}={..._provideComponents(),...props.components};return MDXLayout?_jsx(MDXLayout,{...props,children:_jsx(_createMdxContent,{...props})}):_createMdxContent(props)}return{ShopHeader,ImgGallery,default:MDXContent};function _missingMdxReference(id,component){throw new Error(`Expected `+(component?`component`:`object`)+\" `\"+id+\"` to be defined: you likely forgot to import, pass, or provide it.\")}","frontmatter":{},"scope":{"config":{},"pageMetadata":{"description":"Interface the NAU8325 digital input Class-D audio amplifier and codec module with a Glyph ESP32 board over I²S to generate sine waves and stream SD card audio.","title":"Audio Codec","sidebarTitle":"Audio Codec","href":"/documentation/modules/g-mod/audio-codec"}}},"mdxSourceWithNoJs":null,"noJsSplices":[[146,4651,")=>null;const ImgGallery=()=>null;functi"]]},"mdxExtracts":{"tableOfContents":[{"title":"How it Works","slug":"how-it-works","depth":2,"children":[]},{"title":"Recommended Audio Format","slug":"recommended-audio-format","depth":2,"children":[]},{"title":"Key Features \u0026 Applications","slug":"key-features-\u0026-applications","depth":2,"children":[{"title":"Key Features","slug":"key-features","depth":3,"children":[]},{"title":"Applications","slug":"applications","depth":3,"children":[]}]},{"title":"Example 1: Sine Wave Generation","slug":"example-1-sine-wave-generation","depth":2,"children":[{"title":"Pin Configuration","slug":"pin-configuration","depth":3,"children":[]},{"title":"Step 1: Hardware Required","slug":"step-1-hardware-required","depth":3,"children":[]},{"title":"Step 2: Circuit Diagram","slug":"step-2-circuit-diagram","depth":3,"children":[]},{"title":"Step 3: Code Setup","slug":"step-3-code-setup","depth":3,"children":[]},{"title":"Step 4: Upload the Code","slug":"step-4-upload-the-code","depth":3,"children":[]},{"title":"Step 5: Observe the Output","slug":"step-5-observe-the-output","depth":3,"children":[]}]},{"title":"Example 2: SD Card Audio Playback","slug":"example-2-sd-card-audio-playback","depth":2,"children":[{"title":"Pin Configuration","slug":"pin-configuration-2","depth":3,"children":[]},{"title":"Step 1: Hardware Required","slug":"step-1-hardware-required-2","depth":3,"children":[]},{"title":"Step 2: Circuit Diagram","slug":"step-2-circuit-diagram-2","depth":3,"children":[]},{"title":"Step 3: Code Setup","slug":"step-3-code-setup-2","depth":3,"children":[]},{"title":"Step 4: Upload the Code","slug":"step-4-upload-the-code-2","depth":3,"children":[]},{"title":"Step 5: Observe the Output","slug":"step-5-observe-the-output-2","depth":3,"children":[]}]}],"codeExamples":{}},"jsLinks":[],"subdomain":"pcbcupid-bae3761c","siteName":"PCB Cupid","title":"Audio Codec - PCB Cupid","navMaps":{"firstHrefInVersion":{},"firstHrefInLanguage":{}},"lastModified":"2026-09-30T10:39:45.680Z","originalFileLocation":"documentation/modules/g-mod/audio-codec.mdx"},"headHtml":"\u003cscript data-mint-head>(function(){var d=document.documentElement,p=null;if(!p){try{p=localStorage.getItem(\"isDarkMode\")}catch(e){}if(p==='true')p='dark';else if(p==='false')p='light';if(p!=='light'\u0026\u0026p!=='dark'\u0026\u0026p!=='system')p=\"system\"}var r=p==='system'?(matchMedia(\"(prefers-color-scheme: dark)\").matches?'dark':'light'):p;d.classList.remove(r==='dark'?'light':'dark');d.classList.add(r);d.setAttribute(\"data-theme-preference\",p)})();\u003c/script>\u003cmeta data-mint-head name=\"description\" content=\"Interface the NAU8325 digital input Class-D audio amplifier and codec module with a Glyph ESP32 board over I²S to generate sine waves and stream SD card audio.\">\u003cmeta data-mint-head name=\"application-name\" content=\"PCB Cupid\">\u003cmeta data-mint-head name=\"generator\" content=\"Mintlify\">\u003clink data-mint-head rel=\"icon\" type=\"image/png\" sizes=\"192x192\" href=\"/mintlify-assets/_mintlify/favicons/pcbcupid-bae3761c/TFd0Eu1csuxrLpjH/_generated/favicon/android-chrome-192x192.png\" media=\"(prefers-color-scheme: light)\">\u003clink data-mint-head rel=\"apple-touch-icon\" type=\"image/png\" sizes=\"180x180\" href=\"/mintlify-assets/_mintlify/favicons/pcbcupid-bae3761c/TFd0Eu1csuxrLpjH/_generated/favicon/apple-touch-icon.png\">\u003clink data-mint-head rel=\"icon\" type=\"image/png\" sizes=\"16x16\" href=\"/mintlify-assets/_mintlify/favicons/pcbcupid-bae3761c/TFd0Eu1csuxrLpjH/_generated/favicon/favicon-16x16.png\" media=\"(prefers-color-scheme: light)\">\u003clink data-mint-head rel=\"icon\" type=\"image/png\" sizes=\"32x32\" href=\"/mintlify-assets/_mintlify/favicons/pcbcupid-bae3761c/TFd0Eu1csuxrLpjH/_generated/favicon/favicon-32x32.png\" media=\"(prefers-color-scheme: light)\">\u003clink data-mint-head rel=\"shortcut icon\" type=\"image/x-icon\" href=\"/mintlify-assets/_mintlify/favicons/pcbcupid-bae3761c/TFd0Eu1csuxrLpjH/_generated/favicon/favicon.ico\" media=\"(prefers-color-scheme: light)\">\u003clink data-mint-head rel=\"icon\" type=\"image/png\" sizes=\"192x192\" href=\"/mintlify-assets/_mintlify/favicons/pcbcupid-bae3761c/TFd0Eu1csuxrLpjH/_generated/favicon-dark/android-chrome-192x192.png\" media=\"(prefers-color-scheme: dark)\">\u003clink data-mint-head rel=\"icon\" type=\"image/png\" sizes=\"16x16\" href=\"/mintlify-assets/_mintlify/favicons/pcbcupid-bae3761c/TFd0Eu1csuxrLpjH/_generated/favicon-dark/favicon-16x16.png\" media=\"(prefers-color-scheme: dark)\">\u003clink data-mint-head rel=\"icon\" type=\"image/png\" sizes=\"32x32\" href=\"/mintlify-assets/_mintlify/favicons/pcbcupid-bae3761c/TFd0Eu1csuxrLpjH/_generated/favicon-dark/favicon-32x32.png\" media=\"(prefers-color-scheme: dark)\">\u003clink data-mint-head rel=\"shortcut icon\" type=\"image/x-icon\" href=\"/mintlify-assets/_mintlify/favicons/pcbcupid-bae3761c/TFd0Eu1csuxrLpjH/_generated/favicon-dark/favicon.ico\" media=\"(prefers-color-scheme: dark)\">\u003cmeta data-mint-head property=\"og:title\" content=\"Audio Codec - PCB Cupid\">\u003cmeta data-mint-head property=\"og:description\" content=\"Interface the NAU8325 digital input Class-D audio amplifier and codec module with a Glyph ESP32 board over I²S to generate sine waves and stream SD card audio.\">\u003cmeta data-mint-head property=\"og:site_name\" content=\"PCB Cupid\">\u003cmeta data-mint-head property=\"og:url\" content=\"https://learn.pcbcupid.com/documentation/modules/g-mod/audio-codec\">\u003cmeta data-mint-head property=\"og:type\" content=\"website\">\u003cmeta data-mint-head property=\"og:image\" content=\"https://pcbcupid-bae3761c.mintlify.app/_mintlify/api/og/v2?division=G-Mod\u0026amp;title=Audio+Codec\u0026amp;description=Interface+the+NAU8325+digital+input+Class-D+audio+amplifier+and+codec+module+with+a+Glyph+ESP32+board+over+I%C2%B2S+to+generate+sine+waves+and+stream+SD+card+audio.\u0026amp;theme=9df5812cf1615495803a8f93\u0026amp;signature=0cae1aeeb71aeaf4e7b664c880b0289f67cff53a28d9cff267d35bbefe033d58\">\u003cmeta data-mint-head property=\"og:image:width\" content=\"1200\">\u003cmeta data-mint-head property=\"og:image:height\" content=\"630\">\u003cmeta data-mint-head name=\"twitter:card\" content=\"summary_large_image\">\u003cmeta data-mint-head name=\"twitter:title\" content=\"Audio Codec - PCB Cupid\">\u003cmeta data-mint-head name=\"twitter:description\" content=\"Interface the NAU8325 digital input Class-D audio amplifier and codec module with a Glyph ESP32 board over I²S to generate sine waves and stream SD card audio.\">\u003cmeta data-mint-head name=\"twitter:image\" content=\"https://pcbcupid-bae3761c.mintlify.app/_mintlify/api/og/v2?division=G-Mod\u0026amp;title=Audio+Codec\u0026amp;description=Interface+the+NAU8325+digital+input+Class-D+audio+amplifier+and+codec+module+with+a+Glyph+ESP32+board+over+I%C2%B2S+to+generate+sine+waves+and+stream+SD+card+audio.\u0026amp;theme=9df5812cf1615495803a8f93\u0026amp;signature=0cae1aeeb71aeaf4e7b664c880b0289f67cff53a28d9cff267d35bbefe033d58\">\u003cmeta data-mint-head name=\"twitter:image:width\" content=\"1200\">\u003cmeta data-mint-head name=\"twitter:image:height\" content=\"630\">\u003cmeta data-mint-head name=\"msapplication-config\" content=\"/mintlify-assets/_mintlify/favicons/pcbcupid-bae3761c/TFd0Eu1csuxrLpjH/_generated/favicon/browserconfig.xml\">\u003cmeta data-mint-head name=\"apple-mobile-web-app-title\" content=\"PCB Cupid\">\u003cmeta data-mint-head name=\"msapplication-TileColor\" content=\"#0D9373\">\u003clink data-mint-head rel=\"canonical\" href=\"https://learn.pcbcupid.com/documentation/modules/g-mod/audio-codec\">\u003clink data-mint-head rel=\"alternate\" type=\"application/xml\" href=\"/sitemap.xml\">\u003clink data-mint-head rel=\"alternate\" type=\"text/markdown\" href=\"/documentation/modules/g-mod/audio-codec.md\">\u003cscript data-mint-head type=\"application/ld+json\">{\"@context\":\"https://schema.org\",\"@graph\":[{\"@type\":\"Organization\",\"@id\":\"https://learn.pcbcupid.com/#organization\",\"name\":\"PCB Cupid\",\"url\":\"https://learn.pcbcupid.com\"},{\"@type\":\"WebSite\",\"@id\":\"https://learn.pcbcupid.com#website\",\"name\":\"PCB Cupid\",\"url\":\"https://learn.pcbcupid.com\",\"publisher\":{\"@id\":\"https://learn.pcbcupid.com/#organization\"}},{\"@type\":\"WebPage\",\"@id\":\"https://learn.pcbcupid.com/documentation/modules/g-mod/audio-codec#webpage\",\"url\":\"https://learn.pcbcupid.com/documentation/modules/g-mod/audio-codec\",\"name\":\"Audio Codec\",\"description\":\"Interface the NAU8325 digital input Class-D audio amplifier and codec module with a Glyph ESP32 board over I²S to generate sine waves and stream SD card audio.\",\"dateModified\":\"2026-09-30T10:39:45.680Z\",\"isPartOf\":{\"@id\":\"https://learn.pcbcupid.com#website\"},\"breadcrumb\":{\"@id\":\"https://learn.pcbcupid.com/documentation/modules/g-mod/audio-codec#breadcrumb\"}},{\"@type\":\"BreadcrumbList\",\"@id\":\"https://learn.pcbcupid.com/documentation/modules/g-mod/audio-codec#breadcrumb\",\"itemListElement\":[{\"@type\":\"ListItem\",\"position\":1,\"name\":\"Modules\",\"item\":\"https://learn.pcbcupid.com/documentation/modules/glyph/glyph-esp32c3/overview-glyph-c3\"},{\"@type\":\"ListItem\",\"position\":2,\"name\":\"G-Mod\",\"item\":\"https://learn.pcbcupid.com/documentation/modules/g-mod/1-ch-relay\"},{\"@type\":\"ListItem\",\"position\":3,\"name\":\"Audio Codec\",\"item\":\"https://learn.pcbcupid.com/documentation/modules/g-mod/audio-codec\"}]},{\"@type\":[\"Article\",\"TechArticle\"],\"@id\":\"https://learn.pcbcupid.com/documentation/modules/g-mod/audio-codec#article\",\"headline\":\"Audio Codec\",\"name\":\"Audio Codec\",\"description\":\"Interface the NAU8325 digital input Class-D audio amplifier and codec module with a Glyph ESP32 board over I²S to generate sine waves and stream SD card audio.\",\"url\":\"https://learn.pcbcupid.com/documentation/modules/g-mod/audio-codec\",\"mainEntityOfPage\":{\"@id\":\"https://learn.pcbcupid.com/documentation/modules/g-mod/audio-codec#webpage\"},\"dateModified\":\"2026-09-30T10:39:45.680Z\",\"publisher\":{\"@id\":\"https://learn.pcbcupid.com/#organization\"},\"isPartOf\":{\"@id\":\"https://learn.pcbcupid.com#website\"}}]}\u003c/script>\u003cscript data-mint-head type=\"application/ld+json\">{\"@context\":\"https://schema.org\",\"@type\":\"WebSite\",\"name\":\"PCB Cupid\",\"creator\":{\"@type\":\"Organization\",\"name\":\"Mintlify\",\"url\":\"https://mintlify.com\"}}\u003c/script>","siteName":"PCB Cupid","nav":{"global":null,"tabs":[{"tab":"Documentation","groups":[{"group":"Welcome","pages":[{"title":"Introduction","href":""},{"title":"Getting Started","href":"/documentation/welcome/getting-started"},{"group":"Prerequisites","pages":[{"title":"Setting Up MCP","href":"/documentation/welcome/prerequisites/setting-up-mcp"},{"title":"Arduino IDE Setup","href":"/documentation/welcome/prerequisites/arduino-ide-setup"},{"title":"ESP-IDF Setup for Glyph Boards","href":"/documentation/welcome/prerequisites/esp-idf"},{"title":"Smowcode IDE Setup","href":"/documentation/welcome/prerequisites/smowcode-ide-setup"},{"title":"Code Composer Studio IDE Setup","href":"/documentation/welcome/prerequisites/cc-studio"},{"title":"Glink Connector Overview","href":"/documentation/welcome/prerequisites/glink"},{"title":"CircuitPython Setup Guide","href":"/documentation/welcome/prerequisites/circuitpython-setup-guide"}]}]},{"group":"Modules","pages":[{"group":"Glyph","pages":[{"group":"Glyph C3","pages":[{"title":"Overview","sidebarTitle":"Overview","href":"/documentation/modules/glyph/glyph-esp32c3/overview-glyph-c3"},{"title":"Pinouts","sidebarTitle":"Pinouts","href":"/documentation/modules/glyph/glyph-esp32c3/pinouts"},{"title":"Assembly","sidebarTitle":"Assembly","href":"/documentation/modules/glyph/glyph-esp32c3/assembly"},{"title":"Power Management","sidebarTitle":"Power Management","href":"/documentation/modules/glyph/glyph-esp32c3/power-management"}]},{"group":"Glyph C6","pages":[{"title":"Overview","sidebarTitle":"Overview","href":"/documentation/modules/glyph/glyph-esp32c6/overview-glyph-c6"},{"title":"Pinouts","sidebarTitle":"Pinouts","href":"/documentation/modules/glyph/glyph-esp32c6/glyphc6-pinouts"},{"title":"Assembly","sidebarTitle":"Assembly","href":"/documentation/modules/glyph/glyph-esp32c6/glyphc6-assembly"},{"title":"Power Management","sidebarTitle":"Power Management","href":"/documentation/modules/glyph/glyph-esp32c6/glyph-esp32-c6-power-management"}]},{"group":"Glyph H2","pages":[{"title":"Overview","sidebarTitle":"Overview","href":"/documentation/modules/glyph/glyph-esp32h2/overview-glyph-h2"},{"title":"Pinouts","sidebarTitle":"Pinouts","href":"/documentation/modules/glyph/glyph-esp32h2/pinouts-h2"},{"title":"Assembly","sidebarTitle":"Assembly","href":"/documentation/modules/glyph/glyph-esp32h2/glyph-assembly"},{"title":"Power Management","sidebarTitle":"Power Management","href":"/documentation/modules/glyph/glyph-esp32h2/power-management-glyph"}]},{"group":"Glyph S3","pages":[{"title":"Overview","sidebarTitle":"Overview","href":"/documentation/modules/glyph/glyph-esp32s3/glyph-s3-overview"},{"title":"Pinouts","sidebarTitle":"Pinouts","href":"/documentation/modules/glyph/glyph-esp32s3/glyph-esp32-s3-pinouts"},{"title":"Assembly","sidebarTitle":"Assembly","href":"/documentation/modules/glyph/glyph-esp32s3/glyph-esp32-s3-assembly"},{"title":"Power Management","sidebarTitle":"Power Management","href":"/documentation/modules/glyph/glyph-esp32s3/glyph-esp32-s3-power-management"}]},{"group":"Glyph 2040","pages":[{"title":"Overview","sidebarTitle":"Overview","href":"/documentation/modules/glyph/glyph-2040/overview-glyph-2040"}]}]},{"group":"Glyph Mini","pages":[{"group":"Glyph Mini 2040","pages":[{"title":"Overview","sidebarTitle":"Overview","href":"/documentation/modules/glyph-mini/glyph-mini-2040/overview"}]}]},{"group":"G-Mod","pages":[{"title":"1-Channel Relay","sidebarTitle":"1-Channel Relay","href":"/documentation/modules/g-mod/1-ch-relay"},{"title":"2-Channel Relay","sidebarTitle":"2-Channel Relay","href":"/documentation/modules/g-mod/relay"},{"title":"Micro SD Card","sidebarTitle":"SD Card","href":"/documentation/modules/g-mod/sd-card"},{"title":"MCP79412 RTC","sidebarTitle":"MCP79412 RTC","href":"/documentation/modules/g-mod/mcp79412-rtc"},{"title":"PCF8563 Real-Time Clock Module","sidebarTitle":"PCF8563 RTC","href":"/documentation/modules/g-mod/pcf8563-rtc"},{"title":"Limit Switch Module","sidebarTitle":"Limit Switch","href":"/documentation/modules/g-mod/limit-switch"},{"title":"WS2812B RGB Ring","sidebarTitle":"WS2812B RGB Ring","href":"/documentation/modules/g-mod/ws2812b-led"},{"title":"Key Array","sidebarTitle":"Key Array","href":"/documentation/modules/g-mod/key-array"},{"title":"Serial Flash","sidebarTitle":"Serial Flash","href":"/documentation/modules/g-mod/serial-flash"},{"title":"Dual Motor Driver","sidebarTitle":"Motor Driver","href":"/documentation/modules/g-mod/motor-driver"},{"title":"Lithium Charger","sidebarTitle":"Lithium Charger","href":"/documentation/modules/g-mod/lithium-charger"},{"title":"DC-DC Buck Converter (SY81103)","sidebarTitle":"Buck Converter","href":"/documentation/modules/g-mod/dc-buck-converter"},{"description":"The GMOD SX1308 DC-DC Boost Converter is a high-frequency, high-efficiency step-up module that converts low input voltages (2V–24V) to higher output voltages (2V–28V).","title":"DC-DC Boost Converter (SX1308)","sidebarTitle":"Boost Converter","href":"/documentation/modules/g-mod/dc-boost-converter"},{"title":"Audio Codec","sidebarTitle":"Audio Codec","href":"/documentation/modules/g-mod/audio-codec"},{"description":"The CAN Bus Communication Module (CAN G-Mod) enables reliable, noise-resistant data exchange between microcontrollers and CAN networks for automotive and industrial systems.","title":"CAN Bus Transceiver","sidebarTitle":"CAN Bus","href":"/documentation/modules/g-mod/can-bus"},{"title":"RS-485 Transceiver","sidebarTitle":"RS-485 Transceiver","href":"/documentation/modules/g-mod/rs-485-transceiver"},{"title":"Bi-Directional Voltage-Level Translator","sidebarTitle":"Voltage-Level Translator","href":"/documentation/modules/g-mod/bi-voltage-level-translator"}]},{"group":"G-Sense","pages":[{"title":"Single-Channel I2S Microphone","sidebarTitle":"Microphone","href":"/documentation/modules/g-sense/microphone"},{"title":"Single-Channel I2S Microphone (T5848)","sidebarTitle":"Microphone (T5848)","href":"/documentation/modules/g-sense/t5848-microphone"},{"title":"2-Channel Microphone","sidebarTitle":"2-Channel Microphone","href":"/documentation/modules/g-sense/2-channel-microphone"},{"title":"SHT35 Temperature and Humidity Sensor","sidebarTitle":"SHT35","href":"/documentation/modules/g-sense/sht35"},{"title":"SHT45 Temperature and Humidity Sensor","sidebarTitle":"SHT45","href":"/documentation/modules/g-sense/sht45"},{"title":"GSI003 Industrial Temp \u0026 Humidity Sensor","sidebarTitle":"GSI003","href":"/documentation/modules/g-sense/hdc3020-rs485"},{"title":"QMC6309 Magnetometer","sidebarTitle":"QMC6309 Magnetometer","href":"/documentation/modules/g-sense/qmc6309-magnetometer"},{"title":"Capacitive Touch Slider","sidebarTitle":"Capacitive Touch Slider","href":"/documentation/modules/g-sense/capacitive-touch-slider"}]},{"group":"G-Kit","pages":[{"title":"SoundBox — DIY MP3 Player","sidebarTitle":"MP3 Player","href":"/documentation/modules/g-kit/soundbox"}]},{"group":"Breakout Boards","pages":[{"title":"Qwiic 2-in-1","sidebarTitle":"Qwiic 2-in-1","href":"/documentation/modules/breakout-boards/qwiic-2-in-1"},{"title":"Qwiic 4-in-1","sidebarTitle":"Qwiic 4-in-1","href":"/documentation/modules/breakout-boards/qwiic-4-in-1"},{"title":"USB 4-in-1","sidebarTitle":"USB 4-in-1","href":"/documentation/modules/breakout-boards/usb-4-in-1"},{"title":"USB-A Female","sidebarTitle":"USB-A Female","href":"/documentation/modules/breakout-boards/usb-a-breakout-female"},{"title":"USB-A Male","sidebarTitle":"USB-A Male","href":"/documentation/modules/breakout-boards/usb-a-breakout-male"},{"title":"USB-C","sidebarTitle":"USB-C","href":"/documentation/modules/breakout-boards/usb-c"}]},{"group":"Gadgets","pages":[{"title":"USB to RS485 Converter","sidebarTitle":"USB to RS485","href":"/documentation/modules/gadgets/usb-to-rs485"},{"title":"USB to TTL Converter","sidebarTitle":"USB to TTL","href":"/documentation/modules/gadgets/usb-ttl"}]}]},{"group":"Enclosure","pages":[{"title":"3D Printed Enclosure for Glyph C3/C6","sidebarTitle":"Enclosure-C3/C6","href":"/documentation/enclosure/3d-printed-enclosure-for-glyph-esp32-boards"}]}]},{"tab":"Examples","pages":[{"title":"Examples","href":"/guides/arduino-ide-blink-led"}]},{"tab":"PCB Design","pages":[{"title":"PCB Design","href":"/pcb-design/design/kicad/introduction-on-kicad"}]}]},"title":"Audio Codec - PCB Cupid","buildId":"dpl_HcHmUS6i3UwswnTHJUEdcTtwfdTQ","deploymentId":"dpl_HcHmUS6i3UwswnTHJUEdcTtwfdTQ","dynamics":["a74be98ba7"],"chunks":["zoom-image-lightbox-CFBqa0On.js","lightbox-handle-r17bVUz3.js"]}