Temperature monitoring using OpenWeatherMap & GLYPH
This guide will help you to set up a Temperature Monitoring system with a GLYPH-C3 that fetches Weather data and retrieve the Current Temperature data for a specified location using the OpenWeatherMap API and display it on the SH1106-OLED-Display.
OpenWeatherMap is a popular weather data service that provides a variety of weather information, including current weather, forecasts, historical data, and climate information. It offers APIs that developers can integrate into their applications to retrieve weather data for specific locations. There are some key points to be remembered, they are:
-
API (Application Programming Interface): An API allows different software applications to communicate with each other. In the context of OpenWeatherMap, it lets developers access weather data programmatically.
-
API Key: It is a unique identifier assigned to each user when they sign up for OpenWeatherMap’s services. It acts as a password to authenticate requests to the API, ensuring that the user has permission to access the data.
-
Endpoint: An endpoint is a specific URL within the API that corresponds to a particular function or resource.
Let us consider the example of detecting the Temperature of Bangalore city. The API key inserted in the code below will be different for each user. This API key is also present in OpenWeatherMap. The specific location for which we want to detect the temperature is also selected in OpenWeatherMap.
SH1106 OLED Display:
The SH1106 is also a driver used in OLED displays, mostly in larger 1.3-inch OLED screens. Like the SSD1306, it also supports 128x64 pixels of visible screen space and works over I2C or SPI.
However, the SH1106 has a slightly different memory setup — it actually has 132 columns in its internal memory instead of 128. That means there’s a small mismatch between its memory and the visible screen. Because of this, if you use the same SSD1306 libraries with an SH1106 screen, the image might appear shifted, cut off, or not show at all.
To fix this, you should use libraries like U8g2 or SH1106Wire, which are made to handle this offset and map the pixels correctly.
1)Microcontroller Sends Commands & Data
You connect the display to a microcontroller like an ESP32, Arduino, or GLYPH board using I2C or SPI.
You write code like display.print(“Hello”).
That gets converted into commands and image data.
The microcontroller sends this over I2C or SPI to the SH1106 chip.
2️) SH1106 Stores Data in Internal RAM
Inside the SH1106 chip is display memory (called GDDRAM) — a kind of pixel buffer.
It stores 132 columns × 64 rows of pixel data (even though only 128 columns are visible).
Each pixel on the display is controlled by a single bit in this memory:
1 means the pixel is ON (white)
0 means the pixel is OFF (black)
So when you send an image or text, the SH1106 stores that information in its memory.
3️) Pixel Data is Mapped to the Display
Here’s where SH1106 is a bit different from SSD1306:
The first 2 columns of memory (column 0 and 1) are not visible on screen.
Display starts from column 2 to column 129 — these 128 columns are what you see.
So any image you send must be shifted by 2 columns to be centered properly.
4️) SH1106 Continuously Refreshes the Screen
The chip refreshes the OLED pixels many times per second using the data in memory.
You don’t need to manage the refresh — the SH1106 does it automatically.
It uses electrical signals to light up the pixels row by row, column by column (like scanning).
5️) Screen Shows Your Image or Text
Finally, the OLED pixels light up based on the data in memory, and you see your message, graphics, or sensor values on screen.
Step 1: Hardware Required
- Glyph Board
- SH1106 OLED Display
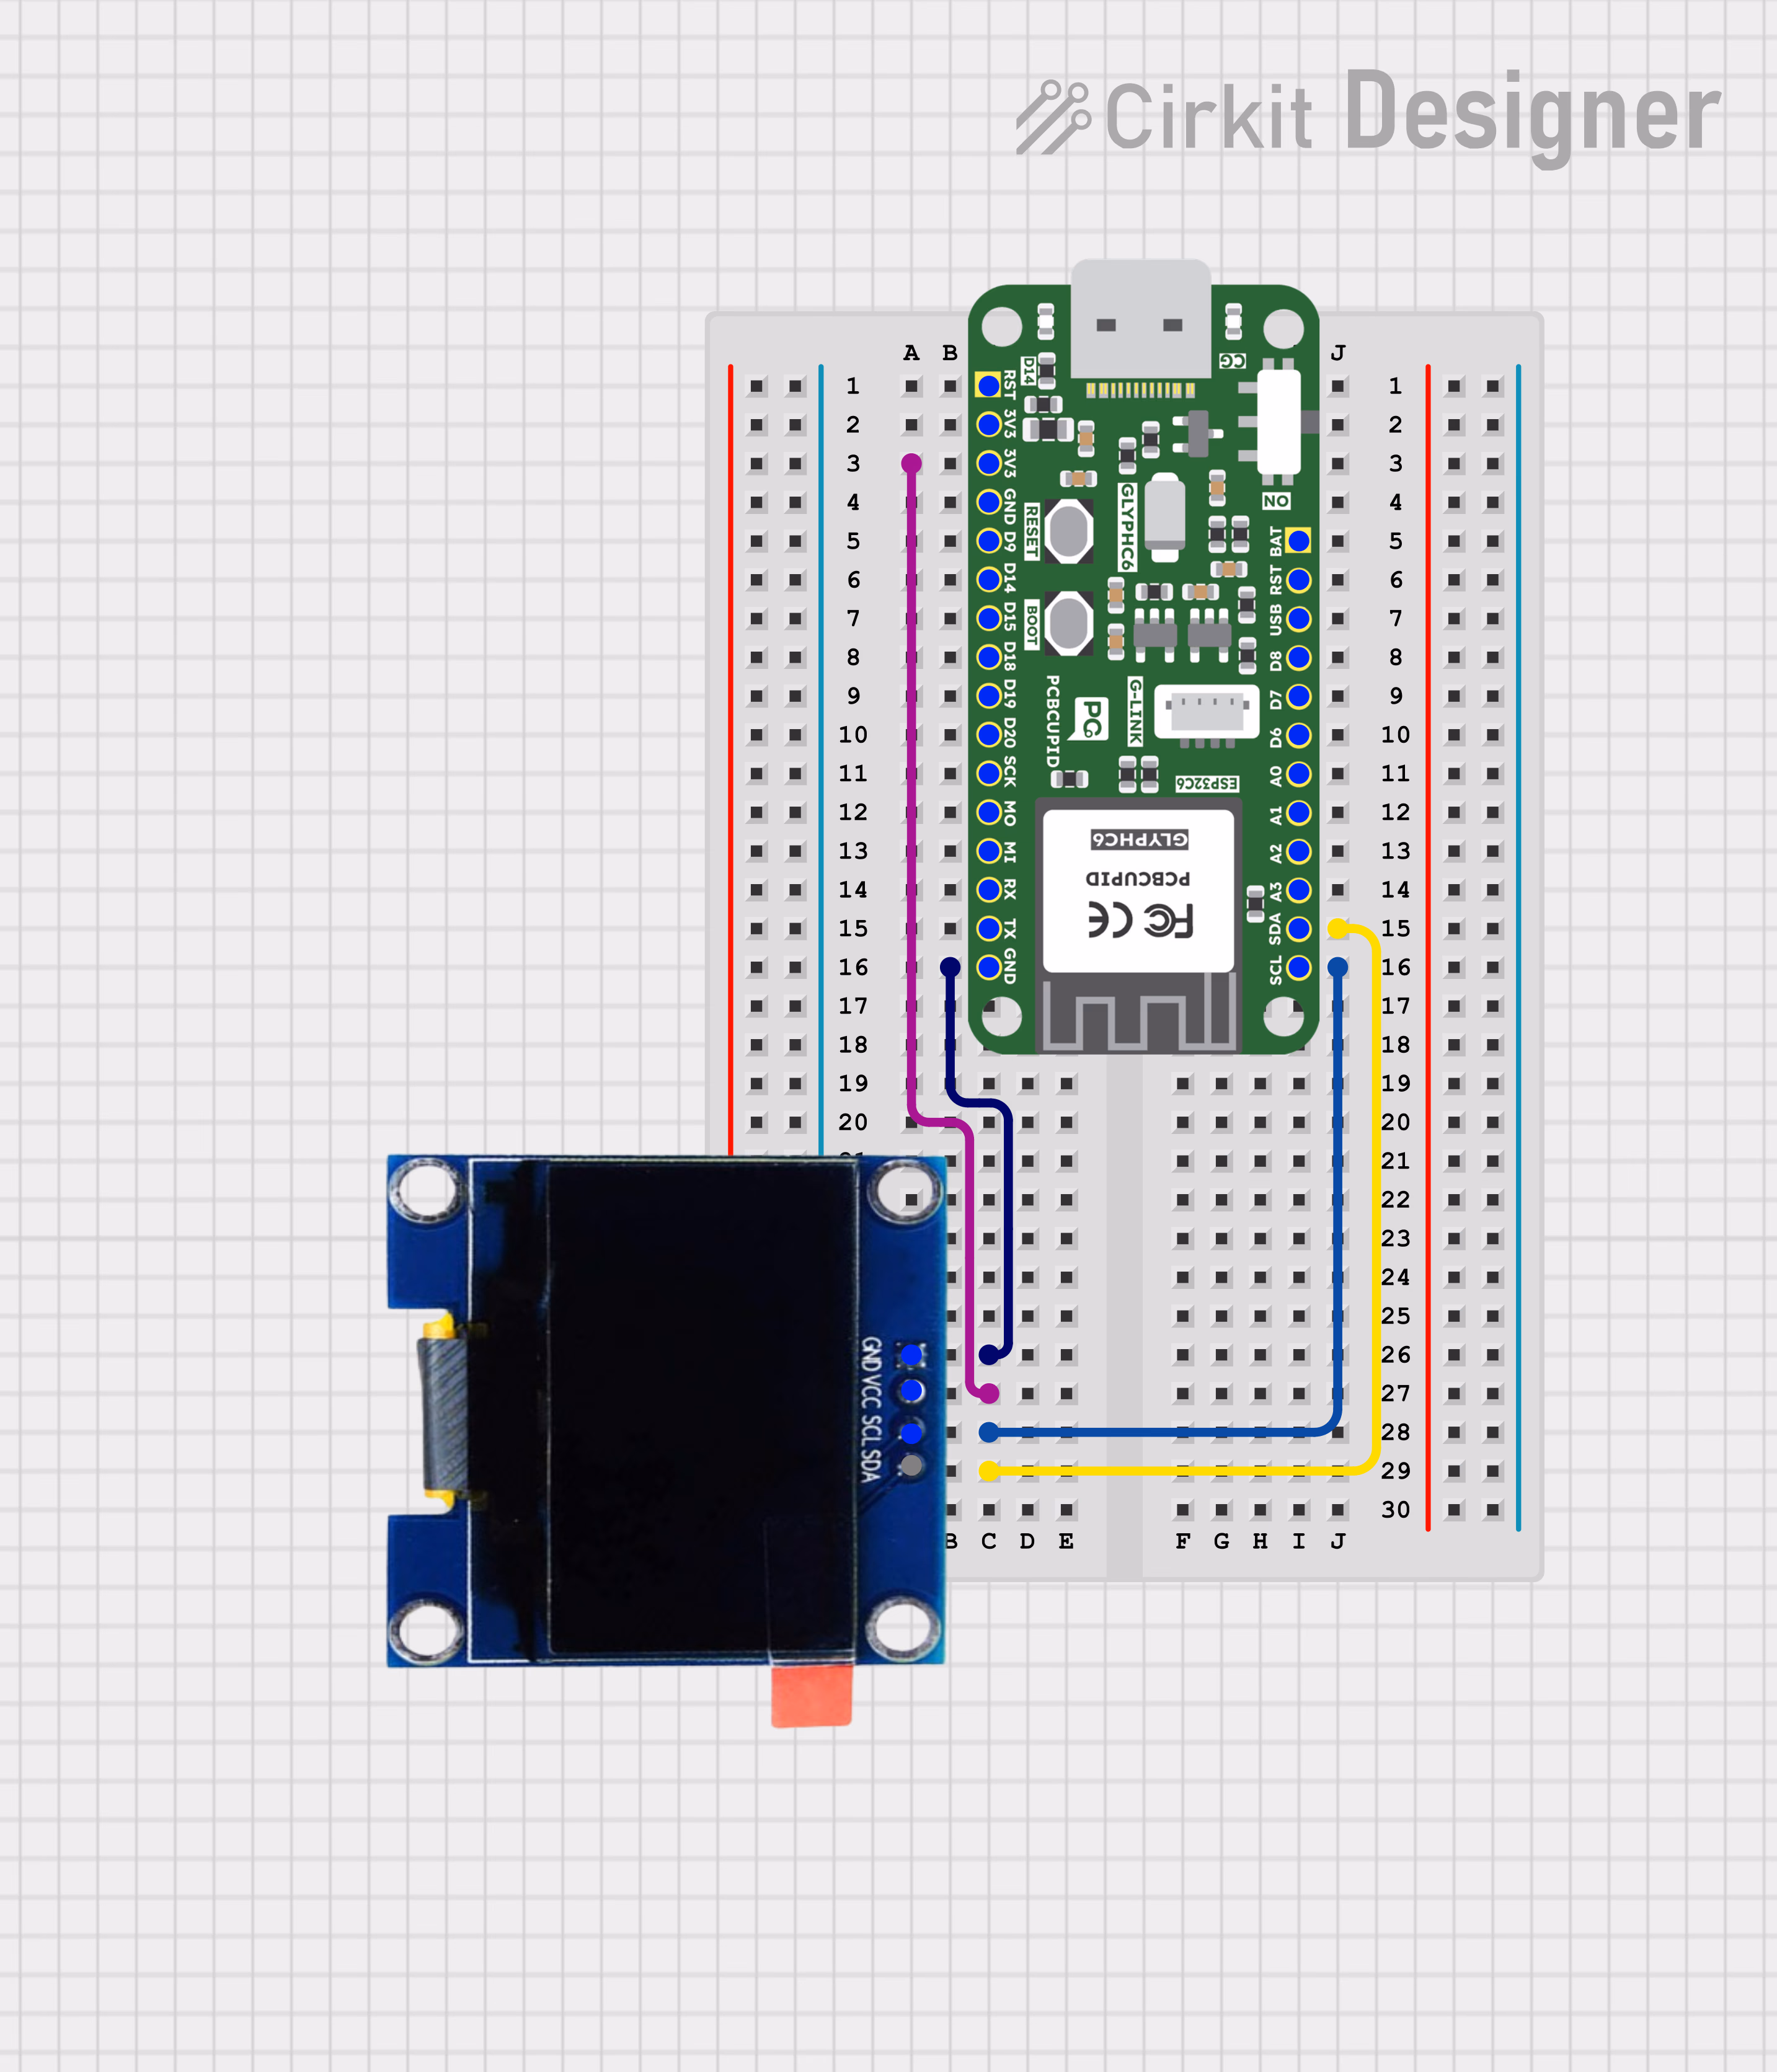
Step 2: Circuit Diagram
Step 3: Code Setup
-
Open Arduino IDE.
-
Install the U8g2 library by going to
Sketch > Include Library > Manage Libraries and search for U8g2 library by olikraus
-
Copy and paste the following code into the Arduino IDE:
Step 4: Upload the Code
- Connect the Board
- Connect your GLYPH board to your computer
-
Select the Board and Port
Do the following settings in your Arduino IDE,
Do the following settings in your Arduino IDE,
Tools > Board > esp32 > Pcbcupid GLYPH C3
For the Pcbcupid GLYPH C3 to appear under Tools > Board > esp32, the esp32 board version installed in the Arduino IDE should be greater than or equal to 3.1.0.
Tools > Port and select the port connected to your GLYPH.Tools > USB CDC on Boot > Enabled
If USB CDC on BOOT not enabled, you won’t be seeing any serial data on Arduino IDE.
- Upload the Code
- Click the upload button (➡️ icon) or use the shortcut
CTRL + U in Arduino IDE to upload the code to the board.
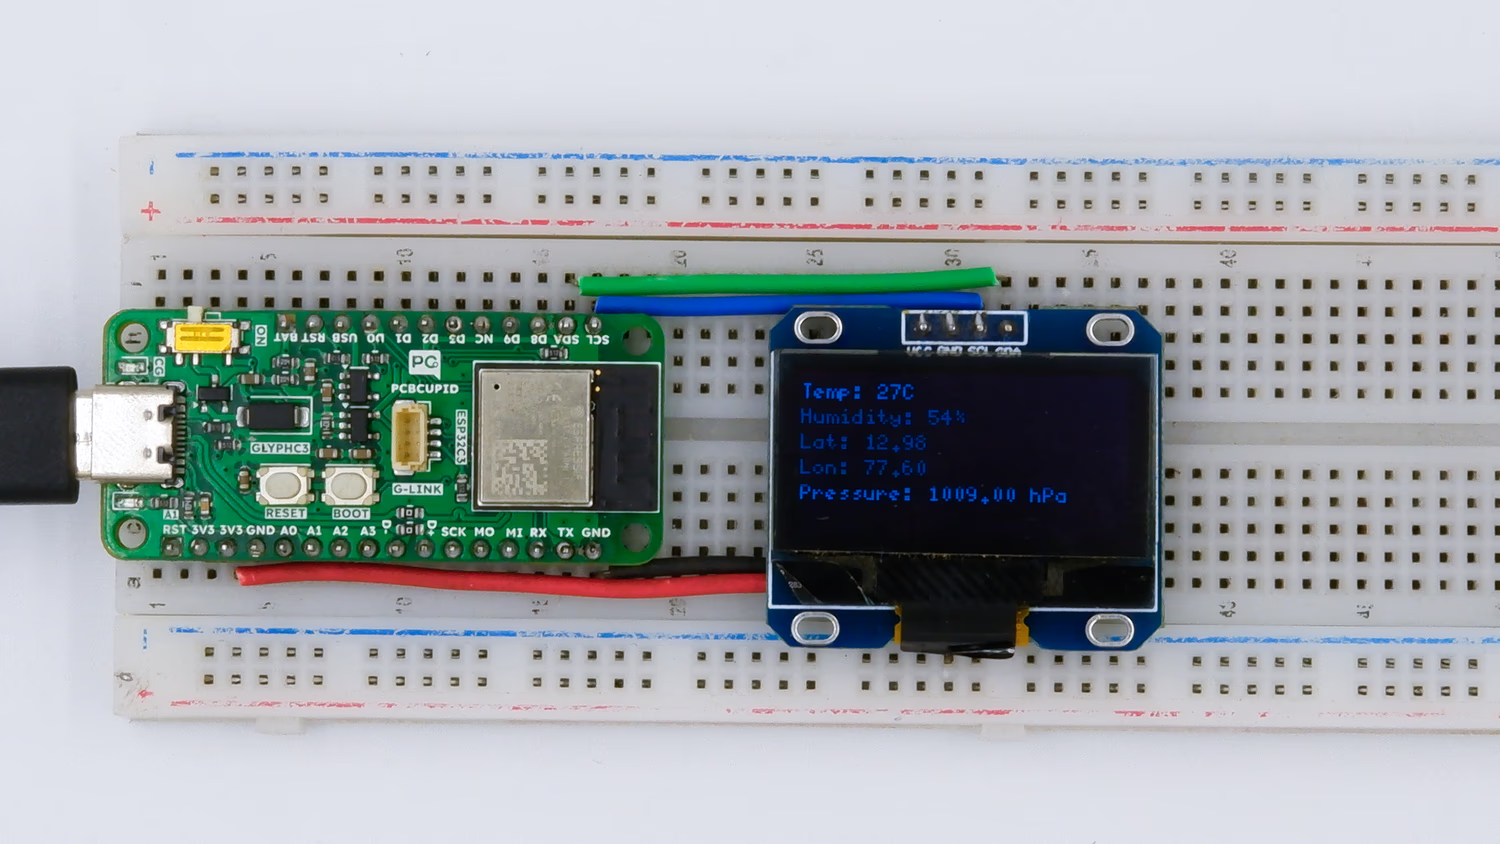
Step 5: Observe the Output on the SH1106 OLED Display
The SH1106 OLED Display should now show the entire Weather Details from OpenWeatherMap like Temperature, Latitude etc.