Use KiCad tools to make your schematic more readable with proper labels, hierarchical sheets, alignment, and graphical elements for professional output.
Prettify Your Schematic with Kicad
In the previous article, we made an average looking circuit using the schematic editor by using the bare minimum tools that KiCAD has to offer. In this article, we’ll discuss more interesting tools and make the same schematic more presentable.
Page Settings
Let’s start by adding essential information to the document, like adding author name and other information that we like to add about the circuit (like a date or description). To do that, click on page setting icon and add the information that’s required.Let start by adding date, we can either use the current date or we can also add a custom date. Then followed by we’ll add the number of revisions that we are working on, for now the circuit is currently version 1 so, V1.Then we’ll add the title of the project followed by the company and use comment option to add more information to the document. Here, we can build a custom template as well, but let’s keep that topic for another article.Once the data is filled just hit okay, you can see the entered details on the right bottom part of the document.
Net Name
Now, back to the circuit. Just like the components, each connection has its own name, that’s called ‘Net name‘. When we click on the connection and look at the bottom status bar we can see the name of the connection.This is one of the powerful features of KiCAD. Even if the connection is not manually made, but the two components have the same net name, they we’ll be connected in the backend by KiCAD. This is great because we can avoid overlapping and having way too many connections going across the drawing sheet.The names GND and 3.3V are automatically assigned by the power symbols. But this is not the case for all connections. When we click on other connection (say the one connecting to the resistors), we can see that net does not have any name (NO NET). In that case we can create a custom net name for the connection.In the toolbar select the tool called “Add net label ” and click on the net that we need to add the name.While adding net label, one is free to choose whatever name they want but we would suggest keeping them meaning full, not to use some random letters or symbols. Follow the same process for the rest of the connection, which should result in the below figure :
No Connection Flag
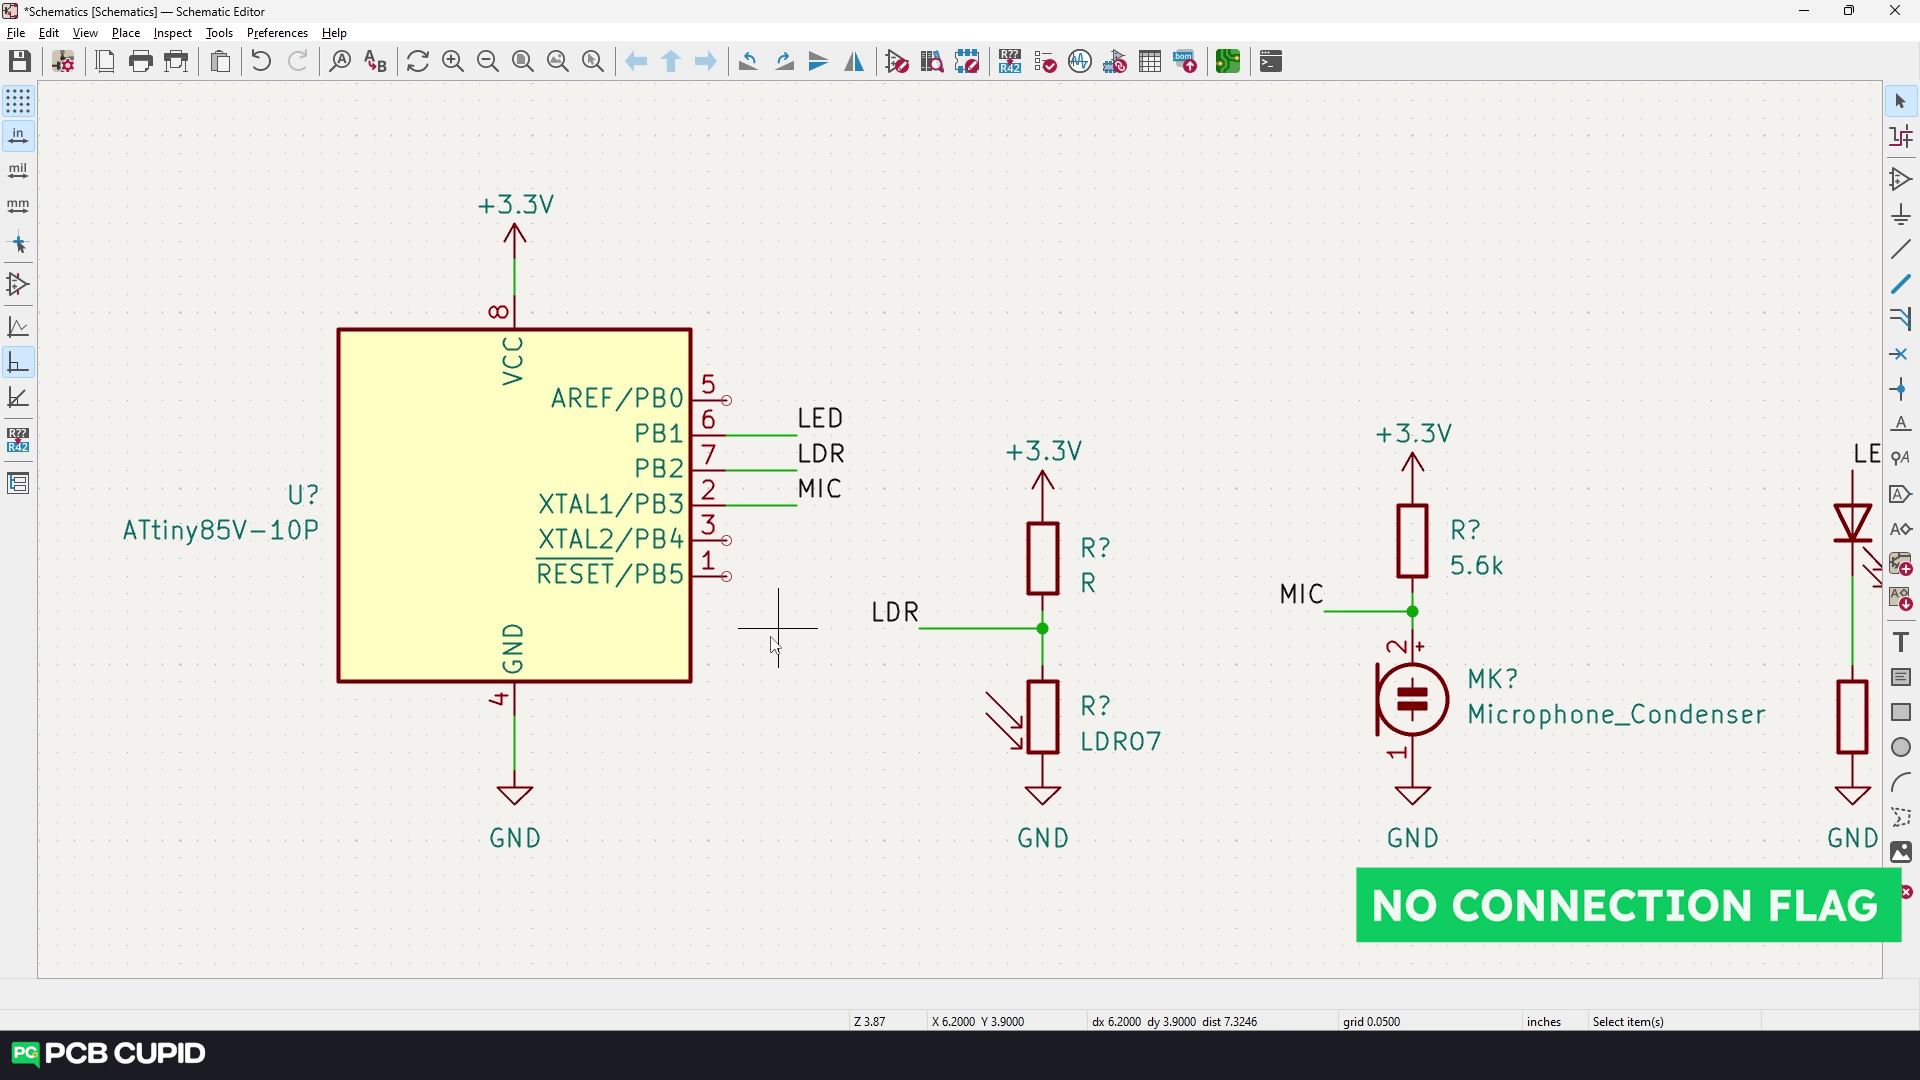
Now, there might be situations where few pins are not being used, like pins 1, 3 and 5 of ATTINTY in our case. This can be little troublesome later down the road, also while performing Electrical Rules Check (ERC), it doesn’t clearly communicate what those pins do. So KiCAD provides a ‘No connection ‘ flag that we can use, which make sure we don’t accidently connect any components to it.
Automatic Annotation of Schematic
Now, let’s fix the values and designators . We have discussed about editing values in the previous articles, refresh your memory here.To fix designators, go to the “annotation tool ” on the top bar.Make sure the entire schematic is selected (and select the ‘reset existing annotation’) and click on annotate.This will automatically add numbers to the components.
Text
Since there are no more annoying crossover connections we can create sections of the circuit which are easier to understand. We can name the sections using the text tool. The option of changing the appearance is also there but we’ll stick to default for now.
To make it faster, we can just copy the text using ‘Ctrl + C ‘ and paste, where needed using ‘Ctrl + V ‘ and to edit the text, use the shortcut ‘E ‘
After naming the section the circuit should look like this:
Graphics
To clearly define the sections we can use graphics tools (bottom set of tool on right tool bar).Just select the tools and mark the area, and to change the appearance select the graphics and press ‘E‘.Once done, the circuit should be something like this:This clearly makes the whole circuit readable, easy to understand and gives a clean look, doesn’t it?
Images & Logo
To make it much better we can also add logos and images to the circuit if you wish. You can do that by using the ‘bitmap image tool ‘.
TextBox
By using a textbox, it’s easier to share this circuit online and or have a link to a website or a project page.The text box feature is new, previous versions of KiCAD (5.0 and 6.0) did not have it.This completes the features of Schematic editor. If you like to watch this as video tutorial please check this out :In the next article, let’s look at one crucial step that we’ve to perform before moving to PCB layout editor. Until then keep learning and keep creating!If you have any queries, please drop them here
{"docsConfig":{"theme":"mint","$schema":"https://mintlify.com/docs.json","name":"PCB Cupid","colors":{"primary":"#0D9373"},"favicon":"https://mintcdn.com/pcbcupid-bae3761c/4dXNuJjZhqL5zqVd/images/favicon_PCBcupid.png?fit=max\u0026auto=format\u0026n=4dXNuJjZhqL5zqVd\u0026q=85\u0026s=697c4189e0a983e1722bddbedde79f61","appearance":{"strict":true},"background":{"decoration":"gradient"},"navbar":{"links":[{"href":"https://spell.pcbcupid.com","label":"Circuit Spell"},{"href":"https://shop.pcbcupid.com","label":"Shop"},{"href":"/","label":"Learn"},{"href":"https://events.pcbcupid.com","label":"Events"},{"href":"https://forum.pcbcupid.com","label":"Forum"},{"href":"https://pcbcupid.com/articles","label":"Articles"},{"href":"https://pcbcupid.com/tools","label":"Tools"}]},"seo":{"indexing":"all"},"fonts":{"family":"Space Grotesk","weight":400},"icons":{"library":"lucide"},"styling":{"eyebrows":"breadcrumbs","latex":true},"contextual":{"options":["copy","chatgpt","claude","cursor","vscode","mcp"],"display":"toc"},"thumbnails":{"appearance":"dark"},"navigation":{"pages":[]}},"deployment":{"deploymentMetadataValue":{"subdomain":"pcbcupid-bae3761c","hasAudioNarration":false,"actualSubdomain":"pcbcupid-bae3761c","customDomains":["learn.pcbcupid.com"],"gitSource":{"type":"github","owner":"pcbcupid","repo":"pcbcupid-docs","deployBranch":"main","contentDirectory":"","isPrivate":false,"mountPath":"","label":""},"feedback":{"thumbs":true,"edits":true,"issues":true},"entitlements":{"AI_CHAT":{"status":"DISABLED"}},"buildId":"6ae268427b458a5c875a9a81","clientVersion":"0.0.4205","searchFilterCounts":[{"language":"default","tag":"Documentation","count":77},{"language":"default","tag":"Modules","count":67},{"language":"default","tag":"PCB Design","count":45},{"language":"default","tag":"Examples","count":32},{"language":"default","tag":"Glyph","count":25},{"language":"default","tag":"G-Mod","count":17},{"language":"default","tag":"KiCad","count":16},{"language":"default","tag":"Basic","count":15},{"language":"default","tag":"Welcome","count":9},{"language":"default","tag":"G-Sense","count":8}]},"assistantConfig":{"enableAskAiButton":false,"enableStarterQuestions":false,"enableContextualStarterQuestions":false,"enableAskAiSearchBar":true},"basePath":"","hasChatPermissions":false,"hasWebMcpPermissions":false,"toggles":[{"name":"kill-isr","enabled":true,"variant":{"name":"disabled","enabled":false,"feature_enabled":true},"impressionData":false},{"name":"custom-rbac-roles","enabled":true,"variant":{"name":"disabled","enabled":false,"feature_enabled":true},"impressionData":false},{"name":"agent-mintlify-slack","enabled":true,"variant":{"name":"disabled","enabled":false,"feature_enabled":true},"impressionData":false},{"name":"agent-integrations-settings","enabled":true,"variant":{"name":"disabled","enabled":false,"feature_enabled":true},"impressionData":false},{"name":"rbac-expansion","enabled":true,"variant":{"name":"disabled","enabled":false,"feature_enabled":true},"impressionData":false},{"name":"automations-pr-grouping","enabled":true,"variant":{"name":"disabled","enabled":false,"feature_enabled":true},"impressionData":false},{"name":"custom-prefix","enabled":true,"variant":{"name":"disabled","enabled":false,"feature_enabled":true},"impressionData":false},{"name":"analytics-v7","enabled":true,"variant":{"name":"disabled","enabled":false,"feature_enabled":true},"impressionData":false},{"name":"user-flows-analytics","enabled":true,"variant":{"name":"disabled","enabled":false,"feature_enabled":true},"impressionData":false},{"name":"no-publish-flow","enabled":true,"variant":{"name":"disabled","enabled":false,"feature_enabled":true},"impressionData":false},{"name":"workos-onboarding","enabled":true,"variant":{"name":"disabled","enabled":false,"feature_enabled":true},"impressionData":false},{"name":"snapshot-serving-live","enabled":true,"variant":{"name":"disabled","enabled":false,"feature_enabled":true},"impressionData":false},{"name":"stripTemperatureMiddleware","enabled":true,"variant":{"name":"disabled","enabled":false,"feature_enabled":true},"impressionData":false},{"name":"support-platform-pylon-zendesk","enabled":true,"variant":{"name":"disabled","enabled":false,"feature_enabled":true},"impressionData":false},{"name":"snapshot-serving","enabled":true,"variant":{"name":"disabled","enabled":false,"feature_enabled":true},"impressionData":false},{"name":"instant-rollback","enabled":true,"variant":{"name":"disabled","enabled":false,"feature_enabled":true},"impressionData":false},{"name":"granular-notifications-server","enabled":true,"variant":{"name":"disabled","enabled":false,"feature_enabled":true},"impressionData":false},{"name":"granular-notifications","enabled":true,"variant":{"name":"disabled","enabled":false,"feature_enabled":true},"impressionData":false},{"name":"automations-fable","enabled":true,"variant":{"name":"disabled","enabled":false,"feature_enabled":true},"impressionData":false},{"name":"fixed-ai-action-pricing","enabled":true,"variant":{"name":"disabled","enabled":false,"feature_enabled":true},"impressionData":false},{"name":"automation-resolve-merge-conflict","enabled":true,"variant":{"name":"disabled","enabled":false,"feature_enabled":true},"impressionData":false},{"name":"scoped-publishing","enabled":true,"variant":{"name":"disabled","enabled":false,"feature_enabled":true},"impressionData":false},{"name":"mintql","enabled":true,"variant":{"name":"disabled","enabled":false,"feature_enabled":true},"impressionData":false},{"name":"page-level-analytics","enabled":true,"variant":{"name":"disabled","enabled":false,"feature_enabled":true},"impressionData":false},{"name":"editor-version-history-v2","enabled":true,"variant":{"name":"disabled","enabled":false,"feature_enabled":true},"impressionData":false},{"name":"billing-page-v2","enabled":true,"variant":{"name":"disabled","enabled":false,"feature_enabled":true},"impressionData":false},{"name":"full-page-search","enabled":true,"variant":{"name":"disabled","enabled":false,"feature_enabled":true},"impressionData":false},{"name":"workspace-projects","enabled":true,"variant":{"name":"disabled","enabled":false,"feature_enabled":true},"impressionData":false},{"name":"assistant-v5","enabled":true,"variant":{"name":"disabled","enabled":false,"feature_enabled":true},"impressionData":false},{"name":"fork-pr-previews","enabled":true,"variant":{"name":"disabled","enabled":false,"feature_enabled":true},"impressionData":false},{"name":"revalidation-jwt","enabled":true,"variant":{"name":"disabled","enabled":false,"feature_enabled":true},"impressionData":false},{"name":"workos-sso-scim","enabled":true,"variant":{"name":"disabled","enabled":false,"feature_enabled":true},"impressionData":false},{"name":"hobby-abuse-scan","enabled":true,"variant":{"name":"disabled","enabled":false,"feature_enabled":true},"impressionData":false},{"name":"dashboard-inbox","enabled":true,"variant":{"name":"disabled","enabled":false,"feature_enabled":true},"impressionData":false},{"name":"workos-signup","enabled":true,"variant":{"name":"disabled","enabled":false,"feature_enabled":true},"impressionData":false},{"name":"turbopuffer-dual-write","enabled":true,"variant":{"name":"disabled","enabled":false,"feature_enabled":true},"impressionData":false},{"name":"workos-enabled","enabled":true,"variant":{"name":"disabled","enabled":false,"feature_enabled":true},"impressionData":false},{"name":"approve-review-flow","enabled":true,"variant":{"name":"disabled","enabled":false,"feature_enabled":true},"impressionData":false},{"name":"editor-metadata","enabled":true,"variant":{"name":"disabled","enabled":false,"feature_enabled":true},"impressionData":false},{"name":"sso-setup-deadline-banner","enabled":true,"variant":{"name":"disabled","enabled":false,"feature_enabled":true},"impressionData":false},{"name":"turbopuffer-serve","enabled":true,"variant":{"name":"disabled","enabled":false,"feature_enabled":true},"impressionData":false},{"name":"live-agents","enabled":true,"variant":{"name":"disabled","enabled":false,"feature_enabled":true},"impressionData":false},{"name":"starter-pricing","enabled":true,"variant":{"name":"control","enabled":true,"payload":{"type":"string","value":"control"},"feature_enabled":true},"impressionData":false},{"name":"llms-txt-v2","enabled":true,"variant":{"name":"disabled","enabled":false,"feature_enabled":true},"impressionData":false},{"name":"wildcard-email-auth","enabled":true,"variant":{"name":"disabled","enabled":false,"feature_enabled":true},"impressionData":false}],"googleFontsInlined":true},"customCss":[],"page":{"pagePath":"pcb-design/design/kicad/prettify-your-schematic","slug":"/pcb-design/design/kicad/prettify-your-schematic","pageMetadata":{"description":"Use KiCad tools to make your schematic more readable with proper labels, hierarchical sheets, alignment, and graphical elements for professional output.","title":"KiCad Schematic Prettify","image":"https://files.pcbcupid.com/Documentation/PCB_Designing/KiCAD/Prettify_Your_Schematic/PCBCUPID_schematic_prettify.webp","href":"/pcb-design/design/kicad/prettify-your-schematic"},"description":{"compiledSource":"\"use strict\";\nconst {jsx: _jsx} = arguments[0];\nconst {useMDXComponents: _provideComponents} = arguments[0];\nfunction _createMdxContent(props) {\n const _components = {\n p: \"p\",\n ..._provideComponents(),\n ...props.components\n };\n return _jsx(_components.p, {\n children: \"Use KiCad tools to make your schematic more readable with proper labels, hierarchical sheets, alignment, and graphical elements for professional output.\"\n });\n}\nfunction MDXContent(props = {}) {\n const {wrapper: MDXLayout} = {\n ..._provideComponents(),\n ...props.components\n };\n return MDXLayout ? _jsx(MDXLayout, {\n ...props,\n children: _jsx(_createMdxContent, {\n ...props\n })\n }) : _createMdxContent(props);\n}\nreturn {\n default: MDXContent\n};\n","frontmatter":{},"scope":{}},"pageType":"default","mdx":{"mdxSource":{"compiledSource":"\"use strict\";const{Fragment:_Fragment,jsx:_jsx,jsxs:_jsxs}=arguments[0];const{useMDXComponents:_provideComponents}=arguments[0];const YouTubeEmbed=({src,title})=>_jsx(`div`,{style:{position:`relative`,width:`100%`,maxWidth:`800px`,margin:`1.5rem auto`,aspectRatio:`16/9`,overflow:`hidden`,borderRadius:`12px`},children:_jsx(`iframe`,{src,title:title||`YouTube video`,allow:`accelerometer; autoplay; clipboard-write; encrypted-media; gyroscope; picture-in-picture; web-share`,allowFullScreen:true,loading:`lazy`,style:{position:`absolute`,top:0,left:0,width:`100%`,height:`100%`,border:`none`}})});function _createMdxContent(props){const _components={a:`a`,em:`em`,img:`img`,p:`p`,strong:`strong`,..._provideComponents(),...props.components},{Heading,Tip,_MdxComponentBoundary}=_components;if(!Heading)_missingMdxReference(`Heading`,true);if(!Tip)_missingMdxReference(`Tip`,true);if(!_MdxComponentBoundary)_missingMdxReference(`_MdxComponentBoundary`,true);return _jsxs(_Fragment,{children:[_jsx(Heading,{level:`1`,id:`prettify-your-schematic-with-kicad`,children:`Prettify Your Schematic with Kicad`}),`\n`,_jsxs(_components.p,{children:[_jsx(_components.img,{src:`https://files.pcbcupid.com/Documentation/PCB_Designing/KiCAD/Prettify_Your_Schematic/PCBCUPID_schematic_prettify.webp`,alt:`How_To_Prettify_Your_Schematic_with_Kicad `}),`In the previous `,_jsx(_components.a,{href:`https://learn.pcbcupid.com/pcb-design/kicad-tutorial/kicad-schematic-editor`,children:`article`}),`, we made an average looking circuit using the schematic editor by using the bare minimum tools that KiCAD has to offer. In this article, we’ll discuss more interesting tools and make the same schematic more presentable.`]}),`\n`,_jsx(Heading,{level:`2`,id:`page-settings`,children:`Page Settings`}),`\n`,_jsx(_components.p,{children:`Let’s start by adding essential information to the document, like adding author name and other information that we like to add about the circuit (like a date or description). To do that, click on page setting icon and add the information that’s required.`}),`\n`,_jsx(_components.p,{children:_jsx(_components.img,{src:`https://files.pcbcupid.com/Documentation/PCB_Designing/KiCAD/Prettify_Your_Schematic/PCBCUPID_KiCAD_page%20settings.avif`,alt:`PCBCUPID_KiCAD_page%20settings`})}),`\n`,_jsx(_components.p,{children:`Let start by adding date, we can either use the current date or we can also add a custom date. Then followed by we’ll add the number of revisions that we are working on, for now the circuit is currently version 1 so, V1.`}),`\n`,_jsx(_components.p,{children:_jsx(_components.img,{src:`https://files.pcbcupid.com/Documentation/PCB_Designing/KiCAD/Prettify_Your_Schematic/PCBCUPID_KiCAD_page%20settings%201.avif`,alt:`PCBCUPID_KiCAD_page%20settings%201`})}),`\n`,_jsx(_components.p,{children:`Then we’ll add the title of the project followed by the company and use comment option to add more information to the document. Here, we can build a custom template as well, but let’s keep that topic for another article.`}),`\n`,_jsx(_components.p,{children:`Once the data is filled just hit okay, you can see the entered details on the right bottom part of the document.`}),`\n`,_jsx(_components.p,{children:_jsx(_components.img,{src:`https://files.pcbcupid.com/Documentation/PCB_Designing/KiCAD/Prettify_Your_Schematic/PCBCUPID_KiCAD_edit.avif`,alt:`PCBCUPID_KiCAD_edit`})}),`\n`,_jsx(Heading,{level:`2`,id:`net-name`,children:`Net Name`}),`\n`,_jsxs(_components.p,{children:[`Now, back to the circuit. Just like the components, each connection has its own name, that’s called ‘`,_jsx(_components.strong,{children:`Net name`}),`‘. When we click on the connection and look at the bottom status bar we can see the name of the connection.`]}),`\n`,_jsx(_components.p,{children:_jsx(_components.img,{src:`https://files.pcbcupid.com/Documentation/PCB_Designing/KiCAD/Prettify_Your_Schematic/PCBCUPID_KiCAD_circuit.avif`,alt:`PCBCUPID_KiCAD_circuit`})}),`\n`,_jsx(_components.p,{children:`This is one of the powerful features of KiCAD. Even if the connection is not manually made, but the two components have the same net name, they we’ll be connected in the backend by KiCAD. This is great because we can avoid overlapping and having way too many connections going across the drawing sheet.`}),`\n`,_jsx(_components.p,{children:_jsx(_components.img,{src:`https://files.pcbcupid.com/Documentation/PCB_Designing/KiCAD/Prettify_Your_Schematic/PCBCUPID_KiCAD_circuit2.avif`,alt:`PCBCUPID_KiCAD_circuit2`})}),`\n`,_jsxs(_components.p,{children:[`The names `,_jsx(_components.strong,{children:`GND`}),` and `,_jsx(_components.strong,{children:`3.3V`}),` are automatically assigned by the power symbols. But this is not the case for all connections. When we click on other connection (say the one connecting to the resistors), we can see that net does not have any name (`,_jsx(_components.em,{children:`NO NET`}),`). In that case we can create a custom net name for the connection.`]}),`\n`,_jsxs(_components.p,{children:[`In the toolbar select the tool called “`,_jsx(_components.strong,{children:`Add net label`}),` ” and click on the net that we need to add the name.`]}),`\n`,_jsx(_components.p,{children:_jsx(_components.img,{src:`https://files.pcbcupid.com/Documentation/PCB_Designing/KiCAD/Prettify_Your_Schematic/PCBCUPID_KiCAD_add%20net%20label.avif`,alt:`PCBCUPID_KiCAD_add%20net%20label`})}),`\n`,_jsx(_components.p,{children:`While adding net label, one is free to choose whatever name they want but we would suggest keeping them meaning full, not to use some random letters or symbols. Follow the same process for the rest of the connection, which should result in the below figure :`}),`\n`,_jsx(_components.p,{children:_jsx(_components.img,{src:`https://files.pcbcupid.com/Documentation/PCB_Designing/KiCAD/Prettify_Your_Schematic/PCBCUPID_KiCAD_components.avif`,alt:`PCBCUPID_KiCAD_components`})}),`\n`,_jsx(Heading,{level:`2`,id:`no-connection-flag`,children:`No Connection Flag`}),`\n`,_jsxs(_components.p,{children:[`Now, there might be situations where few pins are not being used, like pins 1, 3 and 5 of ATTINTY in our case. This can be little troublesome later down the road, also while performing Electrical Rules Check (ERC), it doesn’t clearly communicate what those pins do. So KiCAD provides a ‘`,_jsx(_components.strong,{children:`No connection`}),` ‘ flag that we can use, which make sure we don’t accidently connect any components to it.`]}),`\n`,_jsx(_components.p,{children:_jsx(_components.img,{src:`https://files.pcbcupid.com/Documentation/PCB_Designing/KiCAD/Prettify_Your_Schematic/PCBCUPID_KiCAD_no%20connection%20flag.avif`,alt:`PCBCUPID_KiCAD_no%20connection%20flag`})}),`\n`,_jsx(Heading,{level:`2`,id:`automatic-annotation-of-schematic`,children:`Automatic Annotation of Schematic`}),`\n`,_jsxs(_components.p,{children:[`Now, let’s fix the `,_jsx(_components.em,{children:`values`}),` and `,_jsx(_components.em,{children:`designators`}),` . We have discussed about editing `,_jsx(_components.em,{children:`values`}),` in the previous articles, refresh your memory `,_jsx(_components.a,{href:`https://learn.pcbcupid.com/pcb-design/kicad-tutorial/kicad-schematic-editor`,children:`here`}),`.`]}),`\n`,_jsxs(_components.p,{children:[`To fix designators, go to the “`,_jsx(_components.strong,{children:`annotation tool`}),` ” on the top bar.`]}),`\n`,_jsx(_components.p,{children:_jsx(_components.img,{src:`https://files.pcbcupid.com/Documentation/PCB_Designing/KiCAD/Prettify_Your_Schematic/PCBCUPID_KiCAD_auto%20annotation.avif`,alt:`PCBCUPID_KiCAD_auto%20annotation`})}),`\n`,_jsxs(_components.p,{children:[`Make sure the entire schematic is selected (and select the `,_jsx(_components.strong,{children:`‘reset existing annotation’`}),`) and click on annotate.`]}),`\n`,_jsx(_components.p,{children:_jsx(_components.img,{src:`https://files.pcbcupid.com/Documentation/PCB_Designing/KiCAD/Prettify_Your_Schematic/PCBCUPID_KiCAD_annotate%20schematic.avif`,alt:`PCBCUPID_KiCAD_annotate%20schematic`})}),`\n`,_jsx(_components.p,{children:`This will automatically add numbers to the components.`}),`\n`,_jsx(_components.p,{children:_jsx(_components.img,{src:`https://files.pcbcupid.com/Documentation/PCB_Designing/KiCAD/Prettify_Your_Schematic/PCBCUPID_KiCAD_annotate%20schematic%202.avif`,alt:`PCBCUPID_KiCAD_annotate%20schematic%202`})}),`\n`,_jsx(Heading,{level:`2`,id:`text`,children:`Text`}),`\n`,_jsx(_components.p,{children:`Since there are no more annoying crossover connections we can create sections of the circuit which are easier to understand. We can name the sections using the text tool. The option of changing the appearance is also there but we’ll stick to default for now.`}),`\n`,_jsx(_components.p,{children:_jsx(_components.img,{src:`https://files.pcbcupid.com/Documentation/PCB_Designing/KiCAD/Prettify_Your_Schematic/PCBCUPID_KiCAD_text%20tool.avif`,alt:`PCBCUPID_KiCAD_text%20tool`})}),`\n`,_jsx(Tip,{children:_jsxs(_components.p,{children:[`To make it faster, we can just copy the text using ‘`,_jsx(_components.strong,{children:`Ctrl + C`}),` ‘ and paste, where needed using ‘`,_jsx(_components.strong,{children:`Ctrl + V`}),` ‘ and to edit the text, use the shortcut ‘`,_jsx(_components.strong,{children:`E`}),` ‘`]})}),`\n`,_jsx(_components.p,{children:`After naming the section the circuit should look like this:`}),`\n`,_jsx(_components.p,{children:_jsx(_components.img,{src:`https://files.pcbcupid.com/Documentation/PCB_Designing/KiCAD/Prettify_Your_Schematic/PCBCUPID_KiCAD_tooools.avif`,alt:`PCBCUPID_KiCAD_tooools`})}),`\n`,_jsx(Heading,{level:`2`,id:`graphics`,children:`Graphics`}),`\n`,_jsx(_components.p,{children:`To clearly define the sections we can use graphics tools (bottom set of tool on right tool bar).`}),`\n`,_jsx(_components.p,{children:_jsx(_components.img,{src:`https://files.pcbcupid.com/Documentation/PCB_Designing/KiCAD/Prettify_Your_Schematic/PCBCUPID_KiCAD_graphics%20tool.avif`,alt:`PCBCUPID_KiCAD_graphics%20tool`})}),`\n`,_jsxs(_components.p,{children:[`Just select the tools and mark the area, and to change the appearance select the graphics and press ‘`,_jsx(_components.strong,{children:`E`}),`‘.`]}),`\n`,_jsx(_components.p,{children:_jsx(_components.img,{src:`https://files.pcbcupid.com/Documentation/PCB_Designing/KiCAD/Prettify_Your_Schematic/PCBCUPID_KiCAD_rect%20prop.avif`,alt:`PCBCUPID_KiCAD_rect%20prop`})}),`\n`,_jsx(_components.p,{children:`Once done, the circuit should be something like this:`}),`\n`,_jsx(_components.p,{children:_jsx(_components.img,{src:`https://files.pcbcupid.com/Documentation/PCB_Designing/KiCAD/Prettify_Your_Schematic/PCBCUPID_KiCAD_finall.avif`,alt:`PCBCUPID_KiCAD_finall`})}),`\n`,_jsx(_components.p,{children:`This clearly makes the whole circuit readable, easy to understand and gives a clean look, doesn’t it?`}),`\n`,_jsx(Heading,{level:`2`,id:`images-\u0026-logo`,children:`Images \u0026 Logo`}),`\n`,_jsxs(_components.p,{children:[`To make it much better we can also add logos and images to the circuit if you wish. You can do that by using the ‘`,_jsx(_components.strong,{children:`bitmap image tool`}),` ‘.`]}),`\n`,_jsx(_components.p,{children:_jsx(_components.img,{src:`https://files.pcbcupid.com/Documentation/PCB_Designing/KiCAD/Prettify_Your_Schematic/PCBCUPID_KiCAD_finall.avif`,alt:`PCBCUPID_KiCAD_finall`})}),`\n`,_jsx(Heading,{level:`2`,id:`textbox`,children:`TextBox`}),`\n`,_jsx(_components.p,{children:`By using a textbox, it’s easier to share this circuit online and or have a link to a website or a project page.`}),`\n`,_jsx(_components.p,{children:_jsx(_components.img,{src:`https://files.pcbcupid.com/Documentation/PCB_Designing/KiCAD/Prettify_Your_Schematic/PCBCUPID_KiCAD_text%20tool.avif`,alt:`PCBCUPID_KiCAD_text%20tool`})}),`\n`,_jsx(_components.p,{children:`The text box feature is new, previous versions of KiCAD (5.0 and 6.0) did not have it.`}),`\n`,_jsxs(_components.p,{children:[`This completes the features of Schematic editor. If you like to watch this as `,_jsx(_components.a,{href:`https://youtu.be/iqIRjMkHVjY`,children:`video tutorial`}),` please check this out :`]}),`\n`,_jsx(_components.p,{children:`In the next article, let’s look at one crucial step that we’ve to perform before moving to PCB layout editor. Until then keep learning and keep creating!`}),`\n`,_jsxs(_components.p,{children:[`If you have any queries, please drop them `,_jsx(_components.a,{href:`https://forum.pcbcupid.com/`,title:`Forum`,children:`here`})]}),`\n`,_jsx(Heading,{level:`2`,id:`video-tutorial`,children:`Video Tutorial`}),`\n`,_jsx(_MdxComponentBoundary,{name:`YouTubeEmbed`,children:_jsx(YouTubeEmbed,{src:`https://www.youtube.com/embed/iqIRjMkHVjY`,title:`Prettify Your Schematic`})})]})}function MDXContent(props={}){const{wrapper:MDXLayout}={..._provideComponents(),...props.components};return MDXLayout?_jsx(MDXLayout,{...props,children:_jsx(_createMdxContent,{...props})}):_createMdxContent(props)}return{YouTubeEmbed,default:MDXContent};function _missingMdxReference(id,component){throw new Error(`Expected `+(component?`component`:`object`)+\" `\"+id+\"` to be defined: you likely forgot to import, pass, or provide it.\")}","frontmatter":{},"scope":{"config":{},"pageMetadata":{"description":"Use KiCad tools to make your schematic more readable with proper labels, hierarchical sheets, alignment, and graphical elements for professional output.","title":"KiCad Schematic Prettify","image":"https://files.pcbcupid.com/Documentation/PCB_Designing/KiCAD/Prettify_Your_Schematic/PCBCUPID_schematic_prettify.webp","href":"/pcb-design/design/kicad/prettify-your-schematic"}}},"mdxSourceWithNoJs":null,"noJsSplices":[[148,609,")=>null;function _cr"]]},"mdxExtracts":{"tableOfContents":[{"title":"Prettify Your Schematic with Kicad","slug":"prettify-your-schematic-with-kicad","depth":1,"children":[]},{"title":"Page Settings","slug":"page-settings","depth":2,"children":[]},{"title":"Net Name","slug":"net-name","depth":2,"children":[]},{"title":"No Connection Flag","slug":"no-connection-flag","depth":2,"children":[]},{"title":"Automatic Annotation of Schematic","slug":"automatic-annotation-of-schematic","depth":2,"children":[]},{"title":"Text","slug":"text","depth":2,"children":[]},{"title":"Graphics","slug":"graphics","depth":2,"children":[]},{"title":"Images \u0026 Logo","slug":"images-\u0026-logo","depth":2,"children":[]},{"title":"TextBox","slug":"textbox","depth":2,"children":[]},{"title":"Video Tutorial","slug":"video-tutorial","depth":2,"children":[]}],"codeExamples":{}},"jsLinks":[],"subdomain":"pcbcupid-bae3761c","siteName":"PCB Cupid","title":"KiCad Schematic Prettify - PCB Cupid","navMaps":{"firstHrefInVersion":{},"firstHrefInLanguage":{}},"lastModified":"2026-05-21T11:02:51.686Z","originalFileLocation":"pcb-design/design/kicad/prettify-your-schematic.mdx"},"headHtml":"\u003cscript data-mint-head>(function(){var d=document.documentElement,p=null;if(!p){try{p=localStorage.getItem(\"isDarkMode\")}catch(e){}if(p==='true')p='dark';else if(p==='false')p='light';if(p!=='light'\u0026\u0026p!=='dark'\u0026\u0026p!=='system')p=\"system\"}var r=p==='system'?(matchMedia(\"(prefers-color-scheme: dark)\").matches?'dark':'light'):p;d.classList.remove(r==='dark'?'light':'dark');d.classList.add(r);d.setAttribute(\"data-theme-preference\",p)})();\u003c/script>\u003cmeta data-mint-head name=\"description\" content=\"Use KiCad tools to make your schematic more readable with proper labels, hierarchical sheets, alignment, and graphical elements for professional output.\">\u003cmeta data-mint-head name=\"application-name\" content=\"PCB Cupid\">\u003cmeta data-mint-head name=\"generator\" content=\"Mintlify\">\u003clink data-mint-head rel=\"icon\" type=\"image/png\" sizes=\"192x192\" href=\"/mintlify-assets/_mintlify/favicons/pcbcupid-bae3761c/TFd0Eu1csuxrLpjH/_generated/favicon/android-chrome-192x192.png\" media=\"(prefers-color-scheme: light)\">\u003clink data-mint-head rel=\"apple-touch-icon\" type=\"image/png\" sizes=\"180x180\" href=\"/mintlify-assets/_mintlify/favicons/pcbcupid-bae3761c/TFd0Eu1csuxrLpjH/_generated/favicon/apple-touch-icon.png\">\u003clink data-mint-head rel=\"icon\" type=\"image/png\" sizes=\"16x16\" href=\"/mintlify-assets/_mintlify/favicons/pcbcupid-bae3761c/TFd0Eu1csuxrLpjH/_generated/favicon/favicon-16x16.png\" media=\"(prefers-color-scheme: light)\">\u003clink data-mint-head rel=\"icon\" type=\"image/png\" sizes=\"32x32\" href=\"/mintlify-assets/_mintlify/favicons/pcbcupid-bae3761c/TFd0Eu1csuxrLpjH/_generated/favicon/favicon-32x32.png\" media=\"(prefers-color-scheme: light)\">\u003clink data-mint-head rel=\"shortcut icon\" type=\"image/x-icon\" href=\"/mintlify-assets/_mintlify/favicons/pcbcupid-bae3761c/TFd0Eu1csuxrLpjH/_generated/favicon/favicon.ico\" media=\"(prefers-color-scheme: light)\">\u003clink data-mint-head rel=\"icon\" type=\"image/png\" sizes=\"192x192\" href=\"/mintlify-assets/_mintlify/favicons/pcbcupid-bae3761c/TFd0Eu1csuxrLpjH/_generated/favicon-dark/android-chrome-192x192.png\" media=\"(prefers-color-scheme: dark)\">\u003clink data-mint-head rel=\"icon\" type=\"image/png\" sizes=\"16x16\" href=\"/mintlify-assets/_mintlify/favicons/pcbcupid-bae3761c/TFd0Eu1csuxrLpjH/_generated/favicon-dark/favicon-16x16.png\" media=\"(prefers-color-scheme: dark)\">\u003clink data-mint-head rel=\"icon\" type=\"image/png\" sizes=\"32x32\" href=\"/mintlify-assets/_mintlify/favicons/pcbcupid-bae3761c/TFd0Eu1csuxrLpjH/_generated/favicon-dark/favicon-32x32.png\" media=\"(prefers-color-scheme: dark)\">\u003clink data-mint-head rel=\"shortcut icon\" type=\"image/x-icon\" href=\"/mintlify-assets/_mintlify/favicons/pcbcupid-bae3761c/TFd0Eu1csuxrLpjH/_generated/favicon-dark/favicon.ico\" media=\"(prefers-color-scheme: dark)\">\u003cmeta data-mint-head property=\"og:title\" content=\"KiCad Schematic Prettify - PCB Cupid\">\u003cmeta data-mint-head property=\"og:description\" content=\"Use KiCad tools to make your schematic more readable with proper labels, hierarchical sheets, alignment, and graphical elements for professional output.\">\u003cmeta data-mint-head property=\"og:site_name\" content=\"PCB Cupid\">\u003cmeta data-mint-head property=\"og:url\" content=\"https://learn.pcbcupid.com/pcb-design/design/kicad/prettify-your-schematic\">\u003cmeta data-mint-head property=\"og:type\" content=\"website\">\u003cmeta data-mint-head property=\"og:image\" content=\"https://pcbcupid-bae3761c.mintlify.site/_mintlify/api/og/v2?division=KiCad\u0026amp;title=KiCad+Schematic+Prettify\u0026amp;description=Use+KiCad+tools+to+make+your+schematic+more+readable+with+proper+labels%2C+hierarchical+sheets%2C+alignment%2C+and+graphical+elements+for+professional+output.\u0026amp;theme=2c7e3818cca0f9e7f4434aa9\u0026amp;signature=a9f232e74b90aec88cb02973f3167e0056cb0814a6cde6331acc86b731f37f26\">\u003cmeta data-mint-head property=\"og:image:width\" content=\"1200\">\u003cmeta data-mint-head property=\"og:image:height\" content=\"630\">\u003cmeta data-mint-head name=\"twitter:card\" content=\"summary_large_image\">\u003cmeta data-mint-head name=\"twitter:title\" content=\"KiCad Schematic Prettify - PCB Cupid\">\u003cmeta data-mint-head name=\"twitter:description\" content=\"Use KiCad tools to make your schematic more readable with proper labels, hierarchical sheets, alignment, and graphical elements for professional output.\">\u003cmeta data-mint-head name=\"twitter:image\" content=\"https://pcbcupid-bae3761c.mintlify.site/_mintlify/api/og/v2?division=KiCad\u0026amp;title=KiCad+Schematic+Prettify\u0026amp;description=Use+KiCad+tools+to+make+your+schematic+more+readable+with+proper+labels%2C+hierarchical+sheets%2C+alignment%2C+and+graphical+elements+for+professional+output.\u0026amp;theme=2c7e3818cca0f9e7f4434aa9\u0026amp;signature=a9f232e74b90aec88cb02973f3167e0056cb0814a6cde6331acc86b731f37f26\">\u003cmeta data-mint-head name=\"twitter:image:width\" content=\"1200\">\u003cmeta data-mint-head name=\"twitter:image:height\" content=\"630\">\u003cmeta data-mint-head name=\"msapplication-config\" content=\"/mintlify-assets/_mintlify/favicons/pcbcupid-bae3761c/TFd0Eu1csuxrLpjH/_generated/favicon/browserconfig.xml\">\u003cmeta data-mint-head name=\"apple-mobile-web-app-title\" content=\"PCB Cupid\">\u003cmeta data-mint-head name=\"msapplication-TileColor\" content=\"#0D9373\">\u003clink data-mint-head rel=\"canonical\" href=\"https://learn.pcbcupid.com/pcb-design/design/kicad/prettify-your-schematic\">\u003clink data-mint-head rel=\"alternate\" type=\"application/xml\" href=\"/sitemap.xml\">\u003clink data-mint-head rel=\"alternate\" type=\"text/markdown\" href=\"/pcb-design/design/kicad/prettify-your-schematic.md\">\u003cscript data-mint-head type=\"application/ld+json\">{\"@context\":\"https://schema.org\",\"@graph\":[{\"@type\":\"Organization\",\"@id\":\"https://learn.pcbcupid.com/#organization\",\"name\":\"PCB Cupid\",\"url\":\"https://learn.pcbcupid.com\"},{\"@type\":\"WebSite\",\"@id\":\"https://learn.pcbcupid.com#website\",\"name\":\"PCB Cupid\",\"url\":\"https://learn.pcbcupid.com\",\"publisher\":{\"@id\":\"https://learn.pcbcupid.com/#organization\"}},{\"@type\":\"WebPage\",\"@id\":\"https://learn.pcbcupid.com/pcb-design/design/kicad/prettify-your-schematic#webpage\",\"url\":\"https://learn.pcbcupid.com/pcb-design/design/kicad/prettify-your-schematic\",\"name\":\"KiCad Schematic Prettify\",\"description\":\"Use KiCad tools to make your schematic more readable with proper labels, hierarchical sheets, alignment, and graphical elements for professional output.\",\"dateModified\":\"2026-05-21T11:02:51.686Z\",\"isPartOf\":{\"@id\":\"https://learn.pcbcupid.com#website\"},\"breadcrumb\":{\"@id\":\"https://learn.pcbcupid.com/pcb-design/design/kicad/prettify-your-schematic#breadcrumb\"}},{\"@type\":\"BreadcrumbList\",\"@id\":\"https://learn.pcbcupid.com/pcb-design/design/kicad/prettify-your-schematic#breadcrumb\",\"itemListElement\":[{\"@type\":\"ListItem\",\"position\":1,\"name\":\"PCB Design\",\"item\":\"https://learn.pcbcupid.com/pcb-design/design/kicad/introduction-on-kicad\"},{\"@type\":\"ListItem\",\"position\":2,\"name\":\"KiCad\",\"item\":\"https://learn.pcbcupid.com/pcb-design/design/kicad/introduction-on-kicad\"},{\"@type\":\"ListItem\",\"position\":3,\"name\":\"KiCad Schematic Prettify\",\"item\":\"https://learn.pcbcupid.com/pcb-design/design/kicad/prettify-your-schematic\"}]},{\"@type\":[\"Article\",\"TechArticle\"],\"@id\":\"https://learn.pcbcupid.com/pcb-design/design/kicad/prettify-your-schematic#article\",\"headline\":\"KiCad Schematic Prettify\",\"name\":\"KiCad Schematic Prettify\",\"description\":\"Use KiCad tools to make your schematic more readable with proper labels, hierarchical sheets, alignment, and graphical elements for professional output.\",\"url\":\"https://learn.pcbcupid.com/pcb-design/design/kicad/prettify-your-schematic\",\"mainEntityOfPage\":{\"@id\":\"https://learn.pcbcupid.com/pcb-design/design/kicad/prettify-your-schematic#webpage\"},\"dateModified\":\"2026-05-21T11:02:51.686Z\",\"publisher\":{\"@id\":\"https://learn.pcbcupid.com/#organization\"},\"isPartOf\":{\"@id\":\"https://learn.pcbcupid.com#website\"}}]}\u003c/script>\u003cscript data-mint-head type=\"application/ld+json\">{\"@context\":\"https://schema.org\",\"@type\":\"WebSite\",\"name\":\"PCB Cupid\",\"publisher\":{\"@type\":\"Organization\",\"name\":\"PCB Cupid\"},\"provider\":{\"@type\":\"Organization\",\"name\":\"Mintlify\",\"url\":\"https://mintlify.com\"}}\u003c/script>","agentPointerHref":"/pcb-design/design/kicad/prettify-your-schematic.md","siteName":"PCB Cupid","nav":{"global":null,"tabs":[{"tab":"Documentation","pages":[{"title":"Documentation","href":""}]},{"tab":"Examples","pages":[{"title":"Examples","href":"/guides/arduino-ide-blink-led"}]},{"tab":"PCB Design","groups":[{"group":"PCB Design","pages":[{"group":"KiCad","pages":[{"title":"KiCad For Beginners","href":"/pcb-design/design/kicad/introduction-on-kicad"},{"title":"KiCad User Interface","href":"/pcb-design/design/kicad/kicad-user-interface"},{"description":"This is a follow up article KiCad tutorial,Where you learn how to use the schmatic editor and build a schematic for a digital Diya!","title":"KiCad Schematic Editor","href":"/pcb-design/design/kicad/schematic-editor"},{"title":"KiCad Schematic Prettify","href":"/pcb-design/design/kicad/prettify-your-schematic"},{"description":"Run electrical rule checks (ERC) in KiCad and verify your schematic for unconnected pins, conflicting outputs, and other errors before PCB layout.","title":"KiCad Electrical Rule Checker","href":"/pcb-design/design/kicad/performing-erc-and-verify-circuit-in-kicad"},{"title":"KiCad Footprint Selection","href":"/pcb-design/design/kicad/select-the-best-footprint"},{"title":"KiCad Footprint Assignment Tool","href":"/pcb-design/design/kicad/kicads-footprint-assignment-tool"},{"title":"KiCad PCB Stackup","href":"/pcb-design/design/kicad/pcb-stackup"},{"title":"KiCad Constraints \u0026 Net Class","href":"/pcb-design/design/kicad/constraints-and-net-class"},{"title":"KiCad PCB Layout Editor","href":"/pcb-design/design/kicad/pcb-layout-editor"},{"title":"KiCad PCB Routing","href":"/pcb-design/design/kicad/pcb-routing"},{"title":"KiCad Design Rule Checker","href":"/pcb-design/design/kicad/drc-in-kicad"},{"title":"KiCad Gerber Generation","href":"/pcb-design/design/kicad/generate-gerber-file-in-kicad"},{"title":"KiCad Custom Symbols","href":"/pcb-design/design/kicad/custom-symbols-in-kicad"},{"title":"KiCad Custom Footprint","href":"/pcb-design/design/kicad/custom-footprints-in-kicad"},{"title":"KiCad PCB Optimization","href":"/pcb-design/design/kicad/optimize-pcb-in-kicad"}]},{"group":"EasyEDA","pages":[{"title":"EasyEDA Tutorial for Beginners","href":"/pcb-design/design/easyeda/easyeda-intro"},{"title":"EasyEDA Schematic Editor with IP5306","href":"/pcb-design/design/easyeda/ip5306-battery-management"},{"title":"Creating Custom Symbols in EasyEDA","href":"/pcb-design/design/easyeda/custom-symbol-in-easyeda"},{"title":"Assigning Footprints in EasyEDA","href":"/pcb-design/design/easyeda/assigning-footprint-in-easyeda"},{"title":"EasyEDA PCB Layout with TP5640","href":"/pcb-design/design/easyeda/tp5640-pcblayout"},{"title":"EasyEDA DRC and Gerber Export","href":"/pcb-design/design/easyeda/drc-and-gerber-generation"}]}]},{"group":"PCB Orders","pages":[{"title":"Ordering PCBs from LionCircuits","sidebarTitle":"Lioncircuits","href":"/pcb-design/orders/ordering-from-lioncircuits-website"}]}]}]},"basePath":"","title":"KiCad Schematic Prettify - PCB Cupid","deploymentId":"dpl_FZMKUpaaKiVETbfqhoUe4sPFDTmY","buildId":"dpl_FZMKUpaaKiVETbfqhoUe4sPFDTmY","dynamics":["a74be98ba7"],"chunks":["zoom-image-lightbox-B9O1U98p.js","lightbox-handle-r17bVUz3.js"]}
 In the previous article, we made an average looking circuit using the schematic editor by using the bare minimum tools that KiCAD has to offer. In this article, we’ll discuss more interesting tools and make the same schematic more presentable.
 Let start by adding date, we can either use the current date or we can also add a custom date. Then followed by we’ll add the number of revisions that we are working on, for now the circuit is currently version 1 so, V1.
 Then we’ll add the title of the project followed by the company and use comment option to add more information to the document. Here, we can build a custom template as well, but let’s keep that topic for another article.
Once the data is filled just hit okay, you can see the entered details on the right bottom part of the document.

 This is one of the powerful features of KiCAD. Even if the connection is not manually made, but the two components have the same net name, they we’ll be connected in the backend by KiCAD. This is great because we can avoid overlapping and having way too many connections going across the drawing sheet.
 The names GND and 3.3V are automatically assigned by the power symbols. But this is not the case for all connections. When we click on other connection (say the one connecting to the resistors), we can see that net does not have any name (NO NET). In that case we can create a custom net name for the connection.
In the toolbar select the tool called “Add net label ” and click on the net that we need to add the name.
 While adding net label, one is free to choose whatever name they want but we would suggest keeping them meaning full, not to use some random letters or symbols. Follow the same process for the rest of the connection, which should result in the below figure :

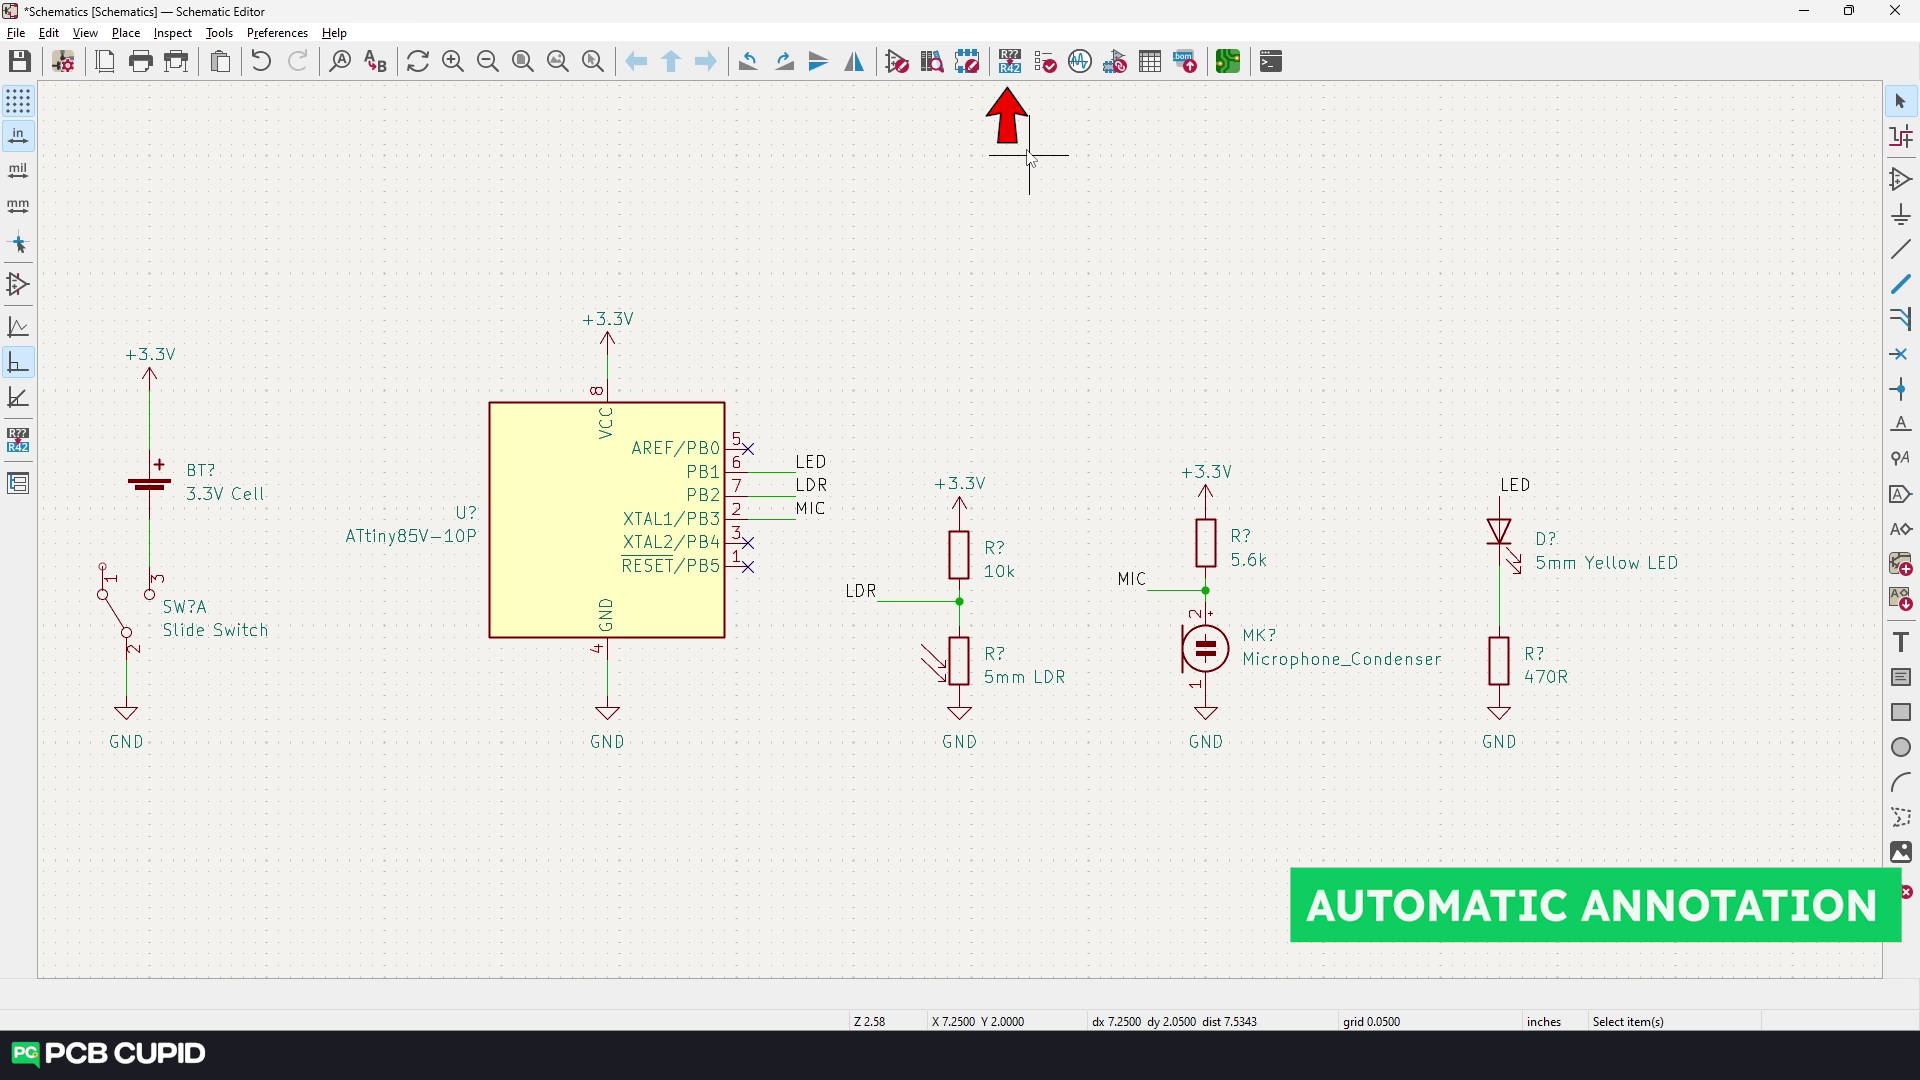 Make sure the entire schematic is selected (and select the ‘reset existing annotation’) and click on annotate.
 This will automatically add numbers to the components.

 After naming the section the circuit should look like this:

 Just select the tools and mark the area, and to change the appearance select the graphics and press ‘E‘.
 Once done, the circuit should be something like this:
 This clearly makes the whole circuit readable, easy to understand and gives a clean look, doesn’t it?