> ## Documentation Index
> Fetch the complete documentation index at: https://learn.pcbcupid.com/llms.txt
> Use this file to discover all available pages before exploring further.
> Build the Z-Claw robotic gripper that uses on-device AI and computer vision on ESP32 to detect, classify, and pick up objects autonomously.
# Z-Claw AI
# Z-Claw AI Assistant
Z-Claw is the smallest AI personal assistant you can build. It runs on the **GLYPH-C3** board and lets you talk to an AI to control your home, set reminders, and more.
## How it Works? (The Simple Version)
Even though it's tiny, your **GLYPH-C3** board is doing some smart work:
1. **Connection**: It connects to your WiFi and listens for your messages (via Telegram or a Serial monitor).
2. **The Brain**: It sends your question to an **AI Brain** (either running on your computer with **Ollama** or in the cloud).
3. **Actions**: The AI doesn't just talk—it understands "tools." For example, if you say "Turn on the light," the AI tells the board to flick a switch (GPIO pin).
4. **No Lag**: Because the code is written in **C**, it's extremely fast and uses very little power.
***
## What You Need
Before starting, make sure you have your hardware and software environment ready.
### Hardware Required
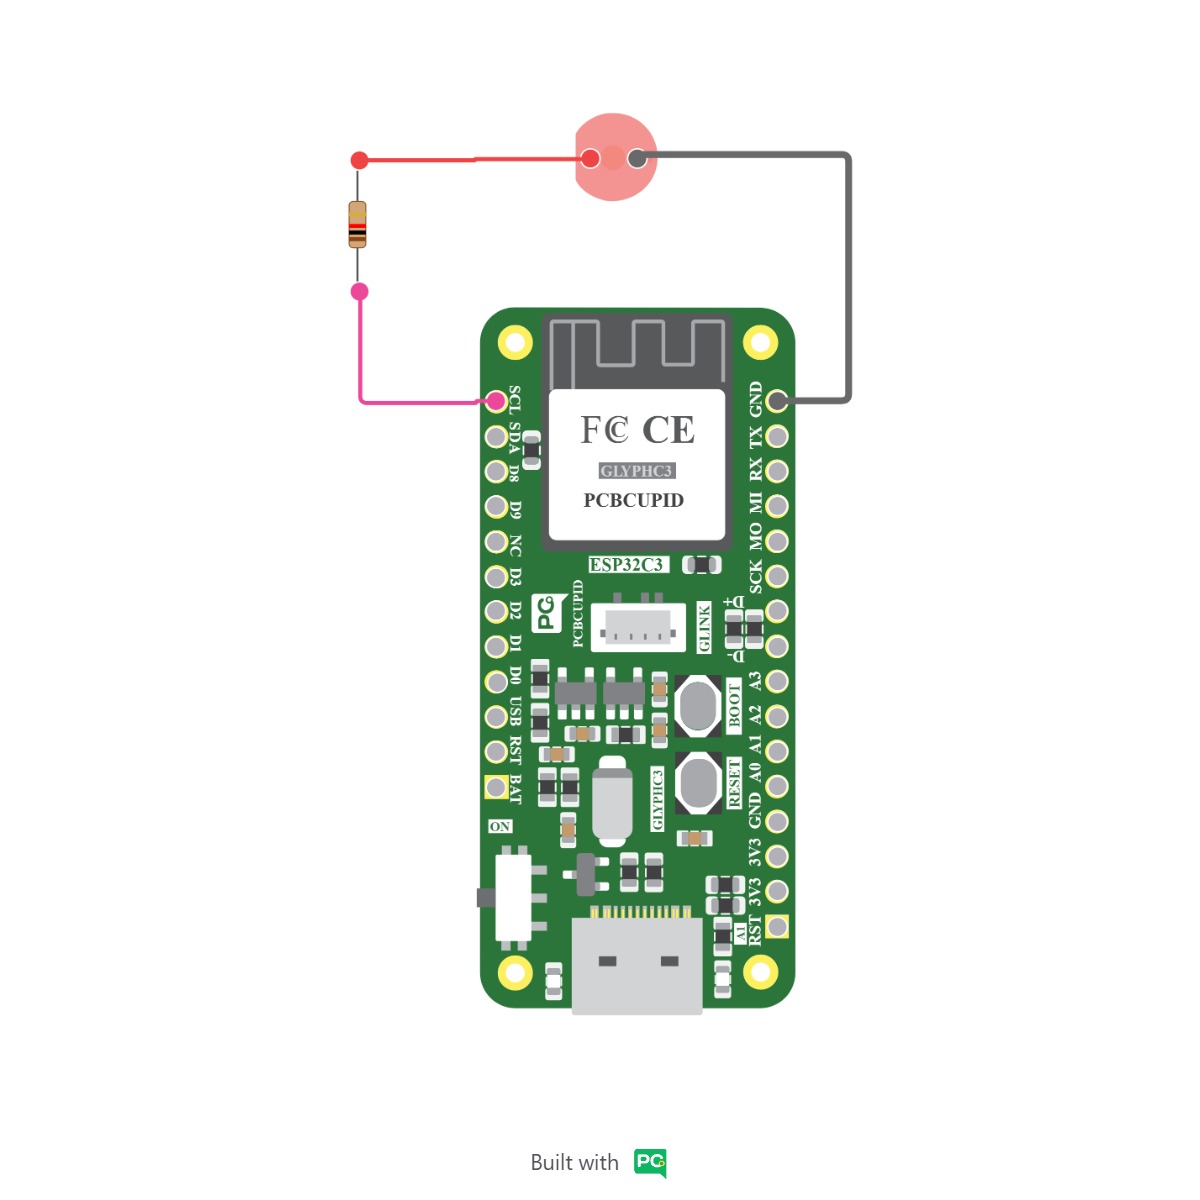
* **GLYPH-C3 board** (The main AI device).
* **LED** (For testing).
* **220 ohm resistor** (For testing).
* **Breadboard** (For testing).
* **Jumper wires** (For testing).
### Circuit diagram
### Software
* **ESP-IDF v5.x**: The core development tools from Espressif.
* **Git**: Required to download the project files.
* **Python**: Required for the build system and provisioning scripts.
***
## Software Setup
You have two ways to give your assistant a "brain":
1. **Ollama (Local)**: No cost, runs on your own computer (Recommended).
2. **API Key (Cloud)**: Uses a paid service like OpenRouter.
### Step 1: Get the Code
First, we need to download the Z-Claw project files from GitHub to your computer. Go to the [Z-Claw GitHub Repository](https://github.com/tnm/zclaw) and copy the clone URL.
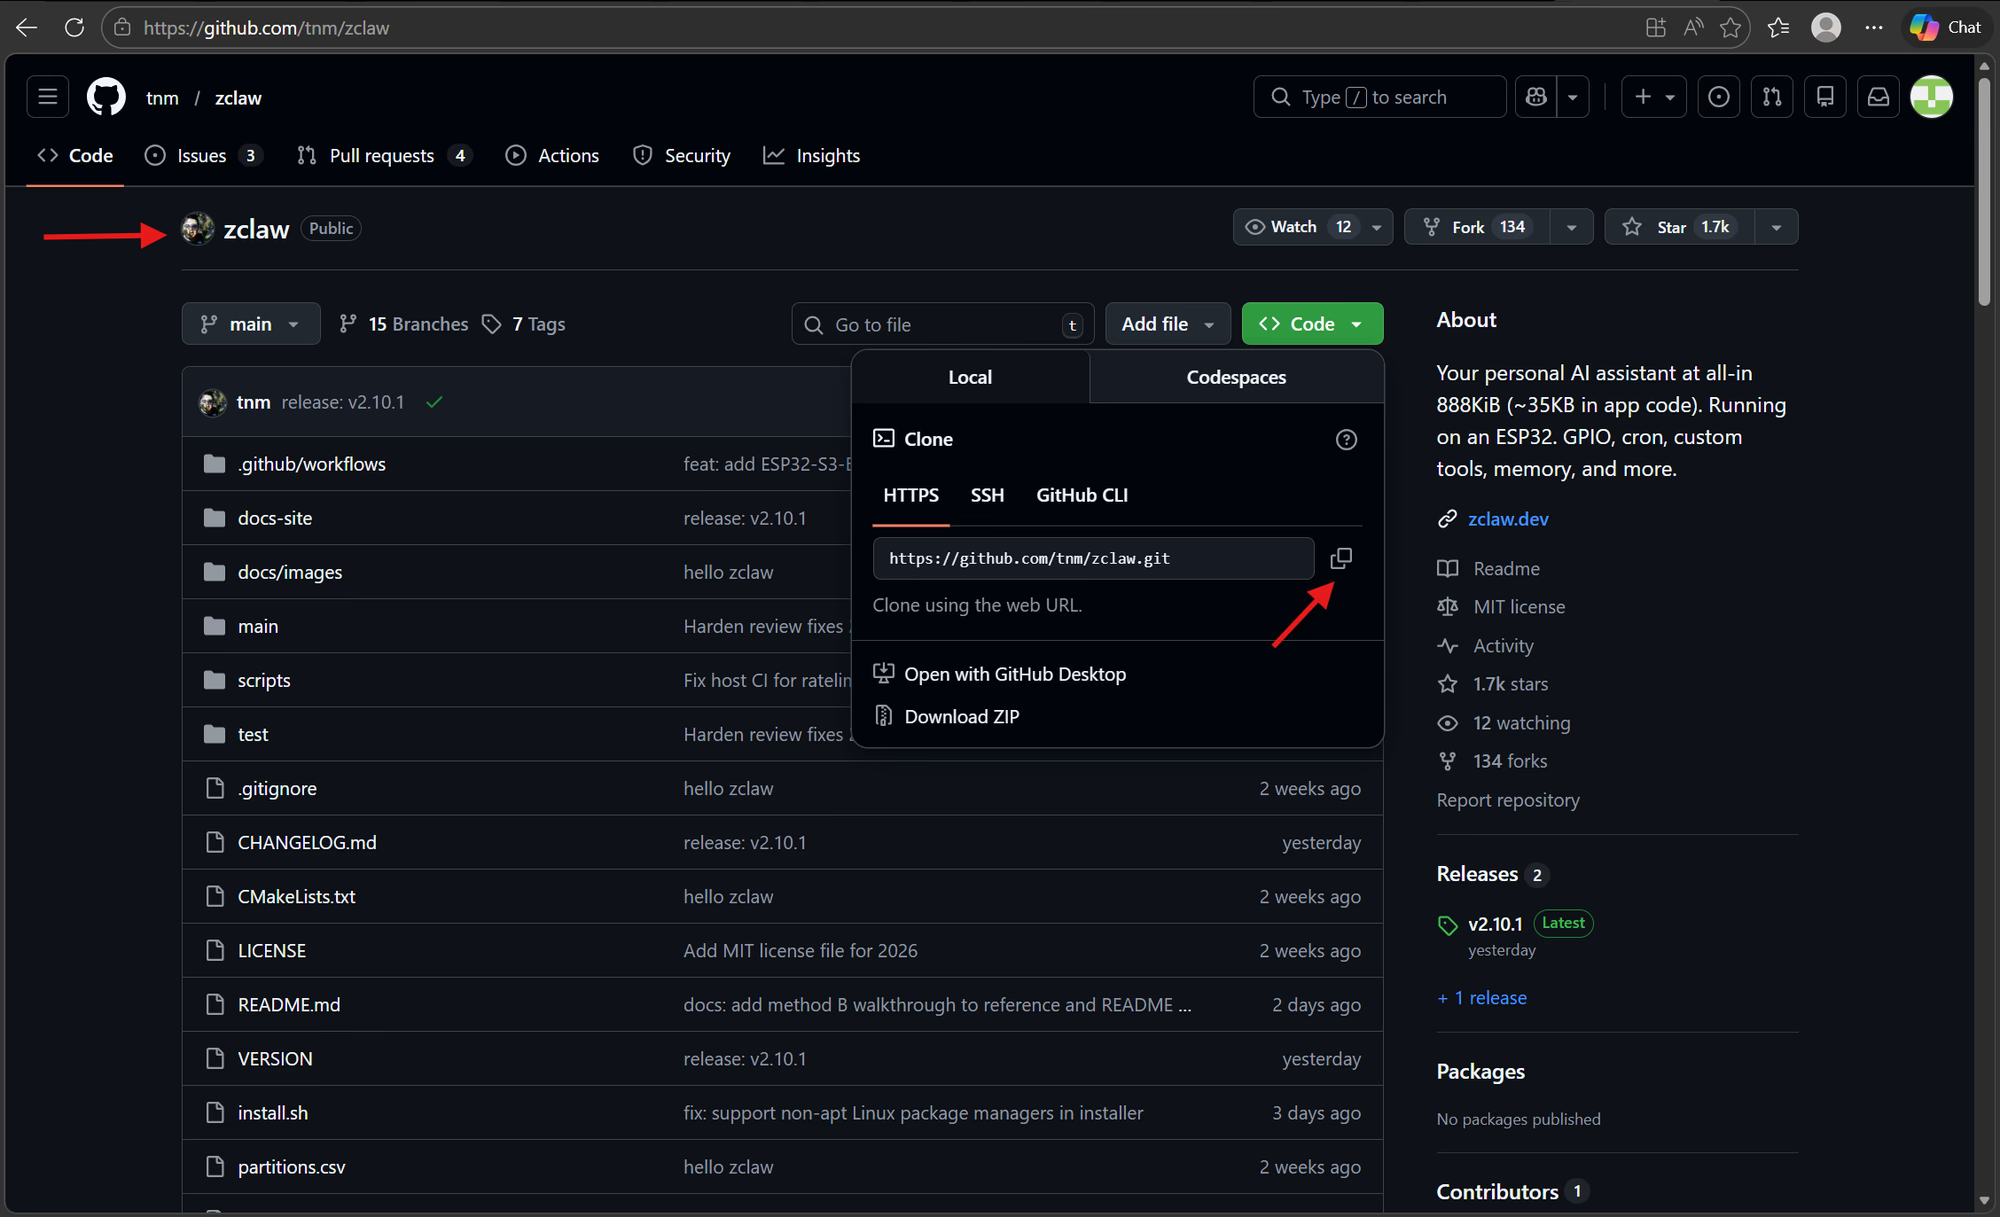
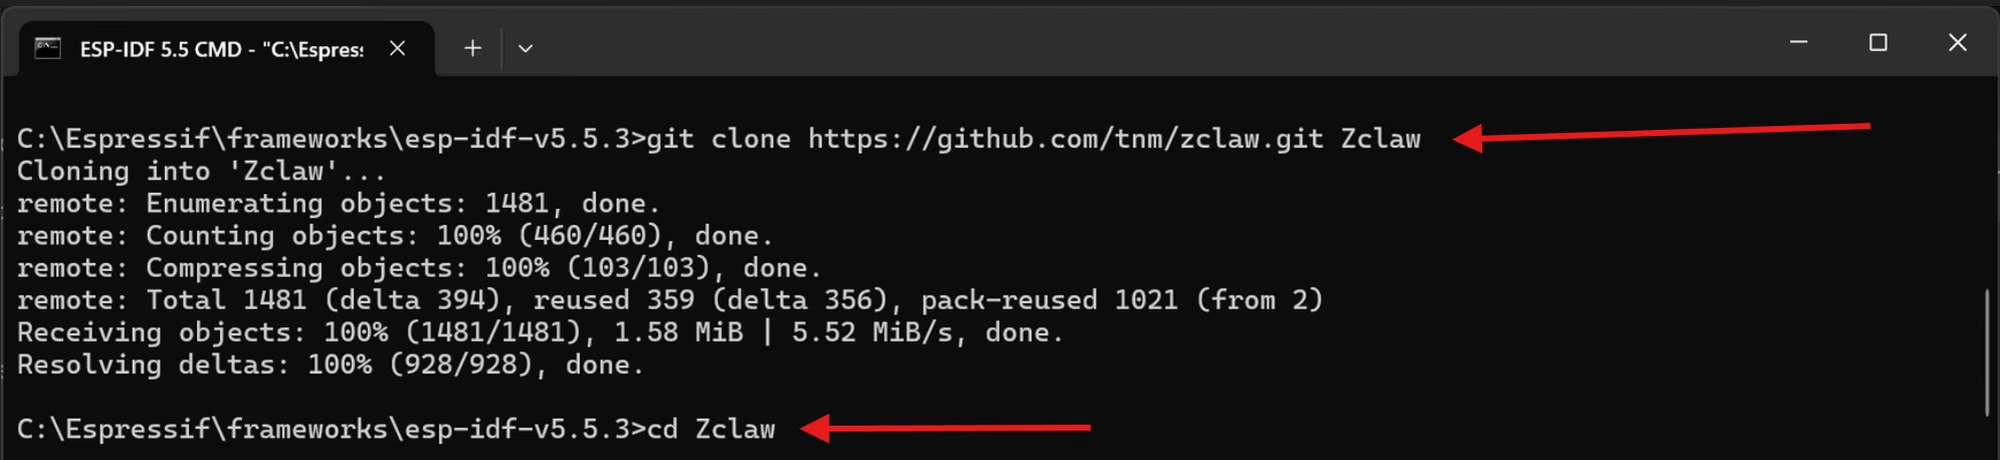
Open your terminal and run:
```bash theme={null}
git clone --recursive https://github.com/zclaw-org/zclaw.git %userprofile%\ZClaw
```
***
### Step 2: Setup YOUR ESP-IDF Environment
To compile and upload the code, you need the ESP-IDF tools. You have two ways to do this:
#### Option A: ESP-IDF Terminal
If you installed the standalone ESP-IDF 5.x tools, open the **ESP-IDF 5.x PowerShell** (or CMD) from your Windows Start Menu.
Once open, navigate to your project folder:
```bash theme={null}
cd %userprofile%\ZClaw
```
#### Option B: VS Code Extension
You can also use the official ESP-IDF extension for VS Code. This makes it easier to build and flash using the VS Code interface.
For a full guide on setting up the extension, see our [ESP-IDF Setup Guide](/boards/needs/esp-idf).
***
### Step 3: Set the Target Board
Every ESP32 chip is slightly different. We need to tell the project that we are using the **esp32c3** chip (the one inside your **GLYPH-C3**).
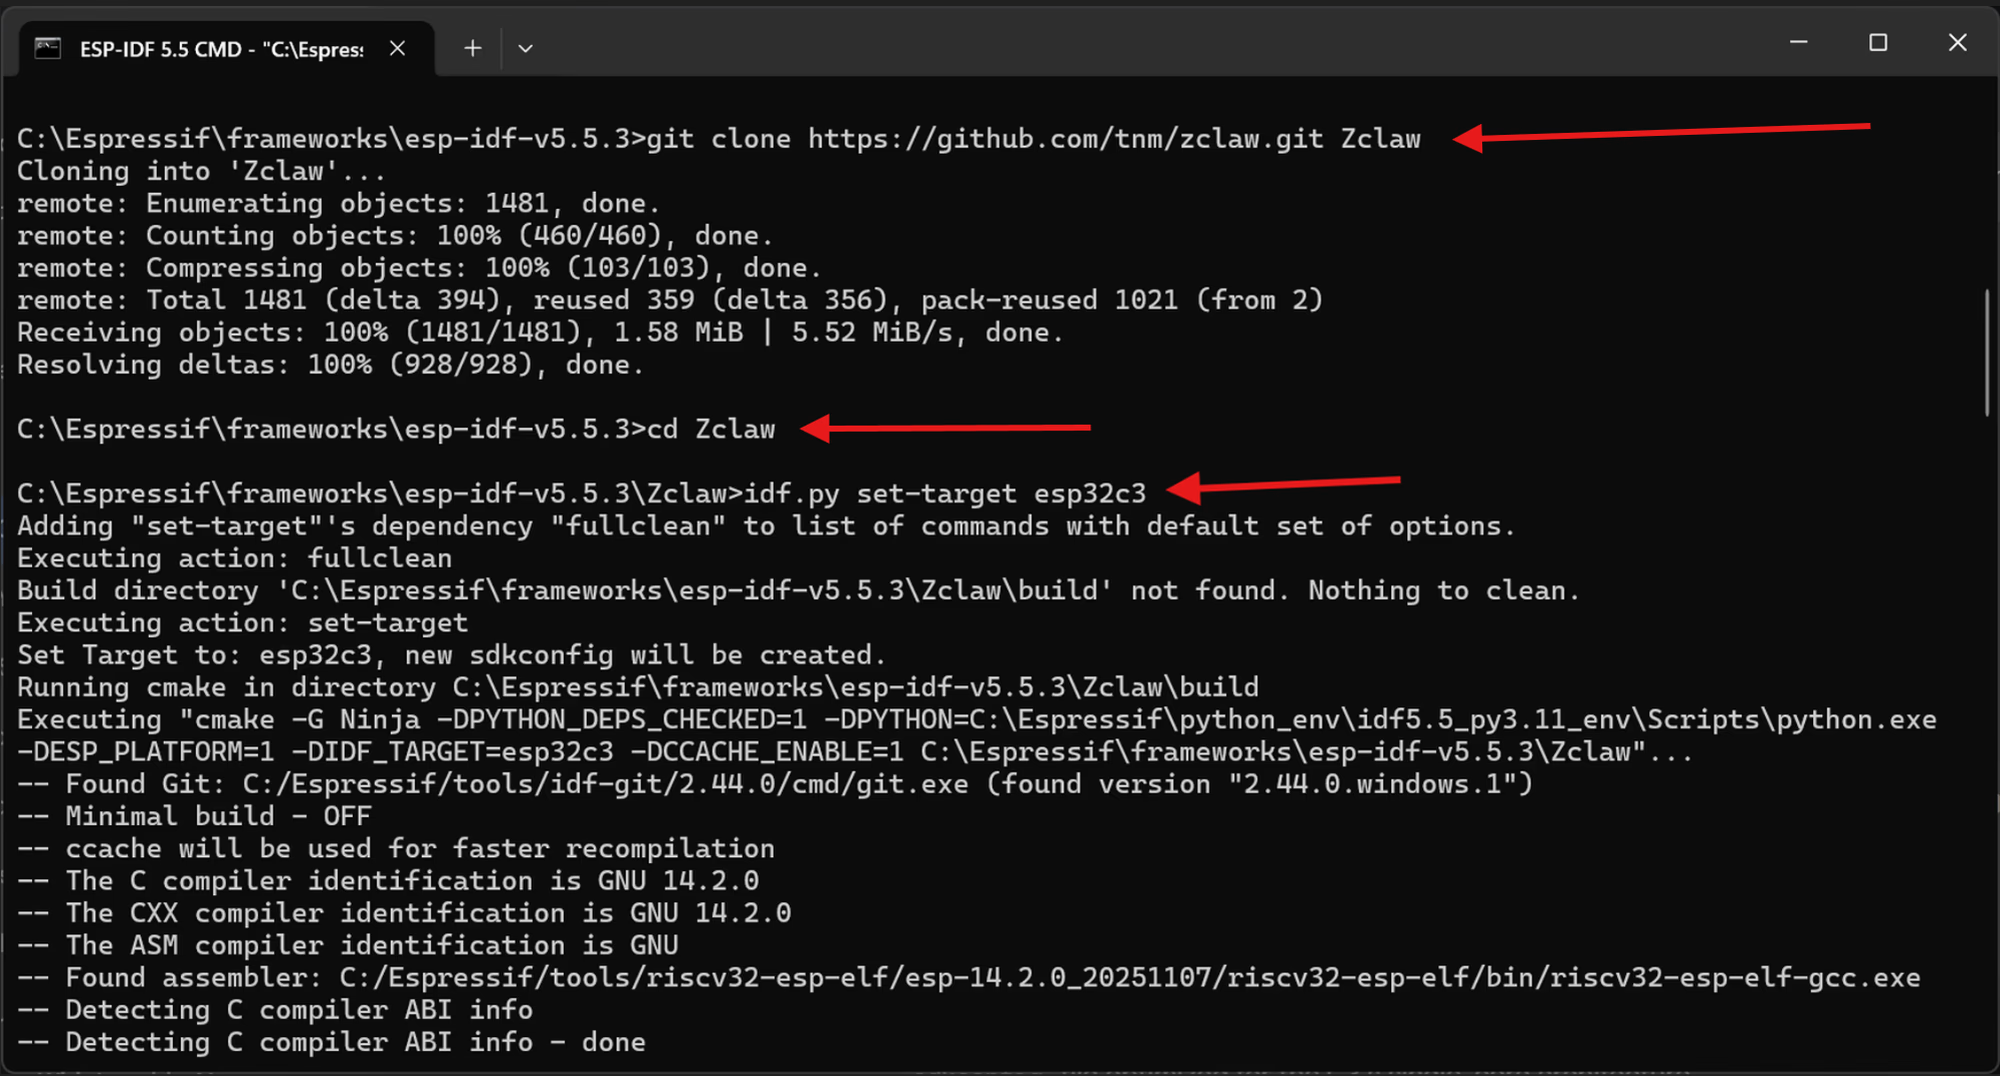
```bash theme={null}
cd ZClaw
idf.py set-target esp32c3
```
***
### Step 4: Configure Your AI Brain
Before connecting your board, you need to decide which AI **"Brain"** to use. You will need these details for both the configuration menu below and the provisioning script in **Step 7**.
#### Prepare Your AI Details
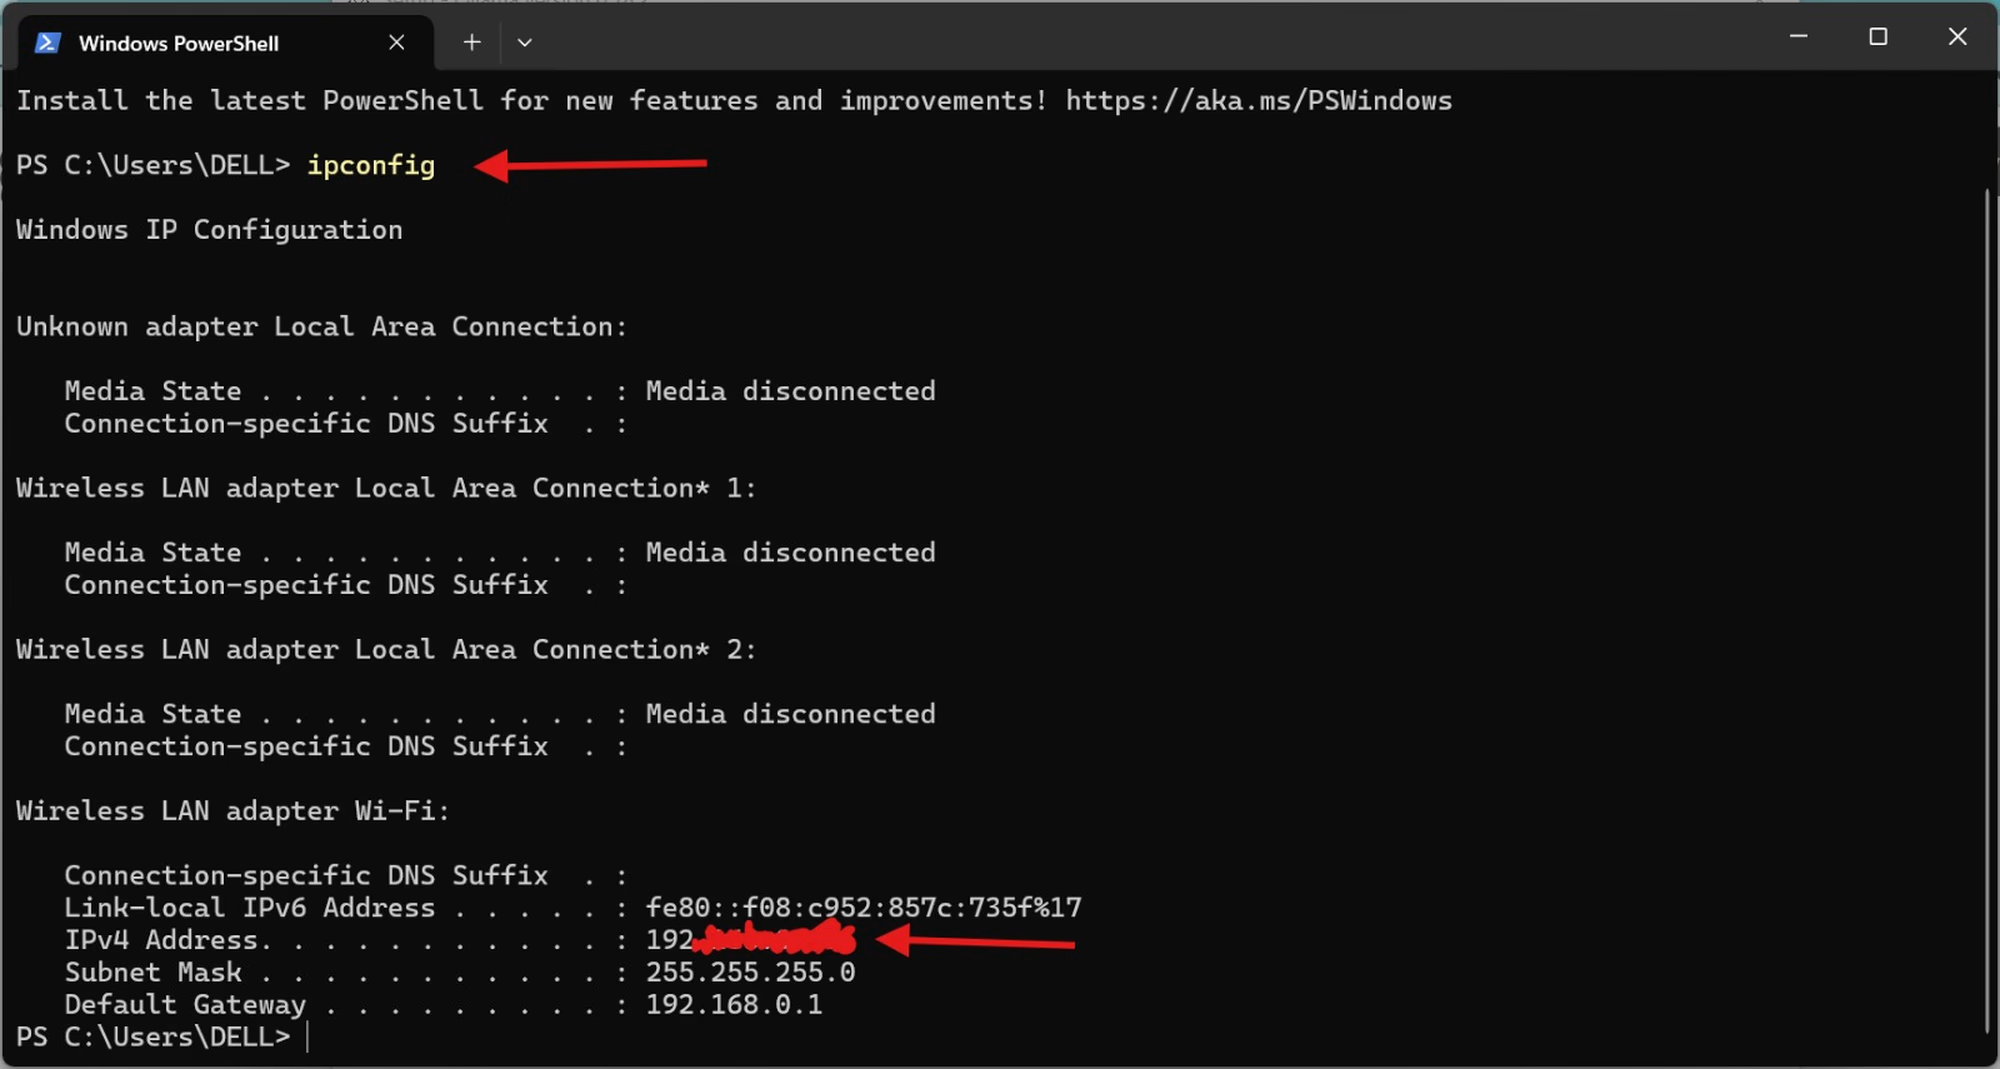
* **Option A: Ollama (Local AI)**: Install [Ollama](https://ollama.com/) on your computer. Make sure it's running and keep your computer's IP address ready (e.g., `http://192.168.1.50:11434`).
* **Local Device URL**: After getting the IP address, you should also have a local device URL ready that you will need to enter in the terminal manually.
 * **Option B: OpenRouter (Cloud AI)**/**OpenAI** and keep it ready.
**Need an API Key?**
Get one from [OpenRouter](https://openrouter.ai/settings/keys) or [OpenAI](https://openai.com/) by creating a new key named "zclaw".
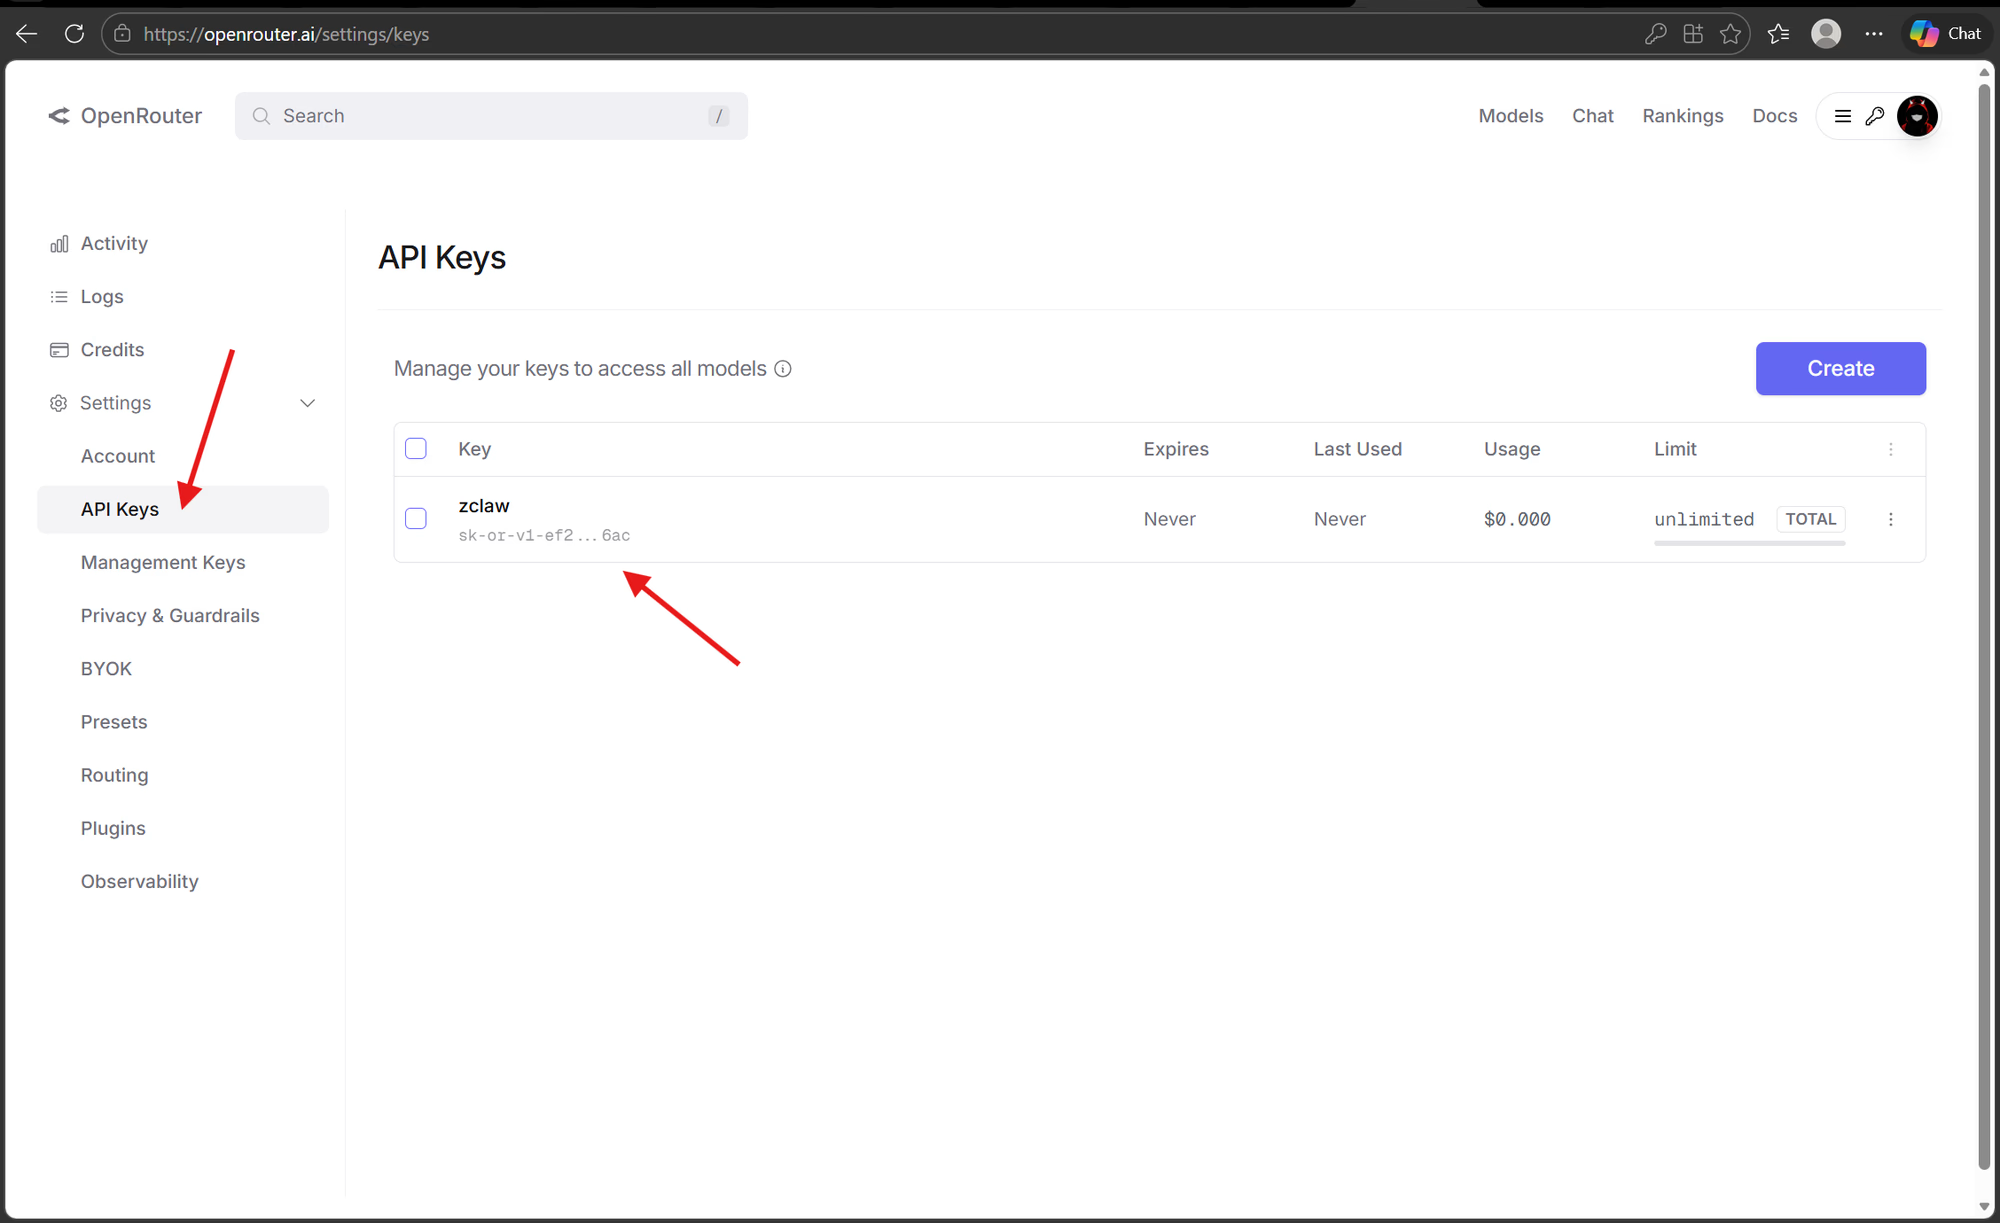
Gathering these details now will make the next steps much smoother! You'll need them again in **Step 7**.
#### Run the Configuration Menu
Now, open the "Settings" menu to tell your board which AI to talk to:
```bash theme={null}
idf.py menuconfig
```
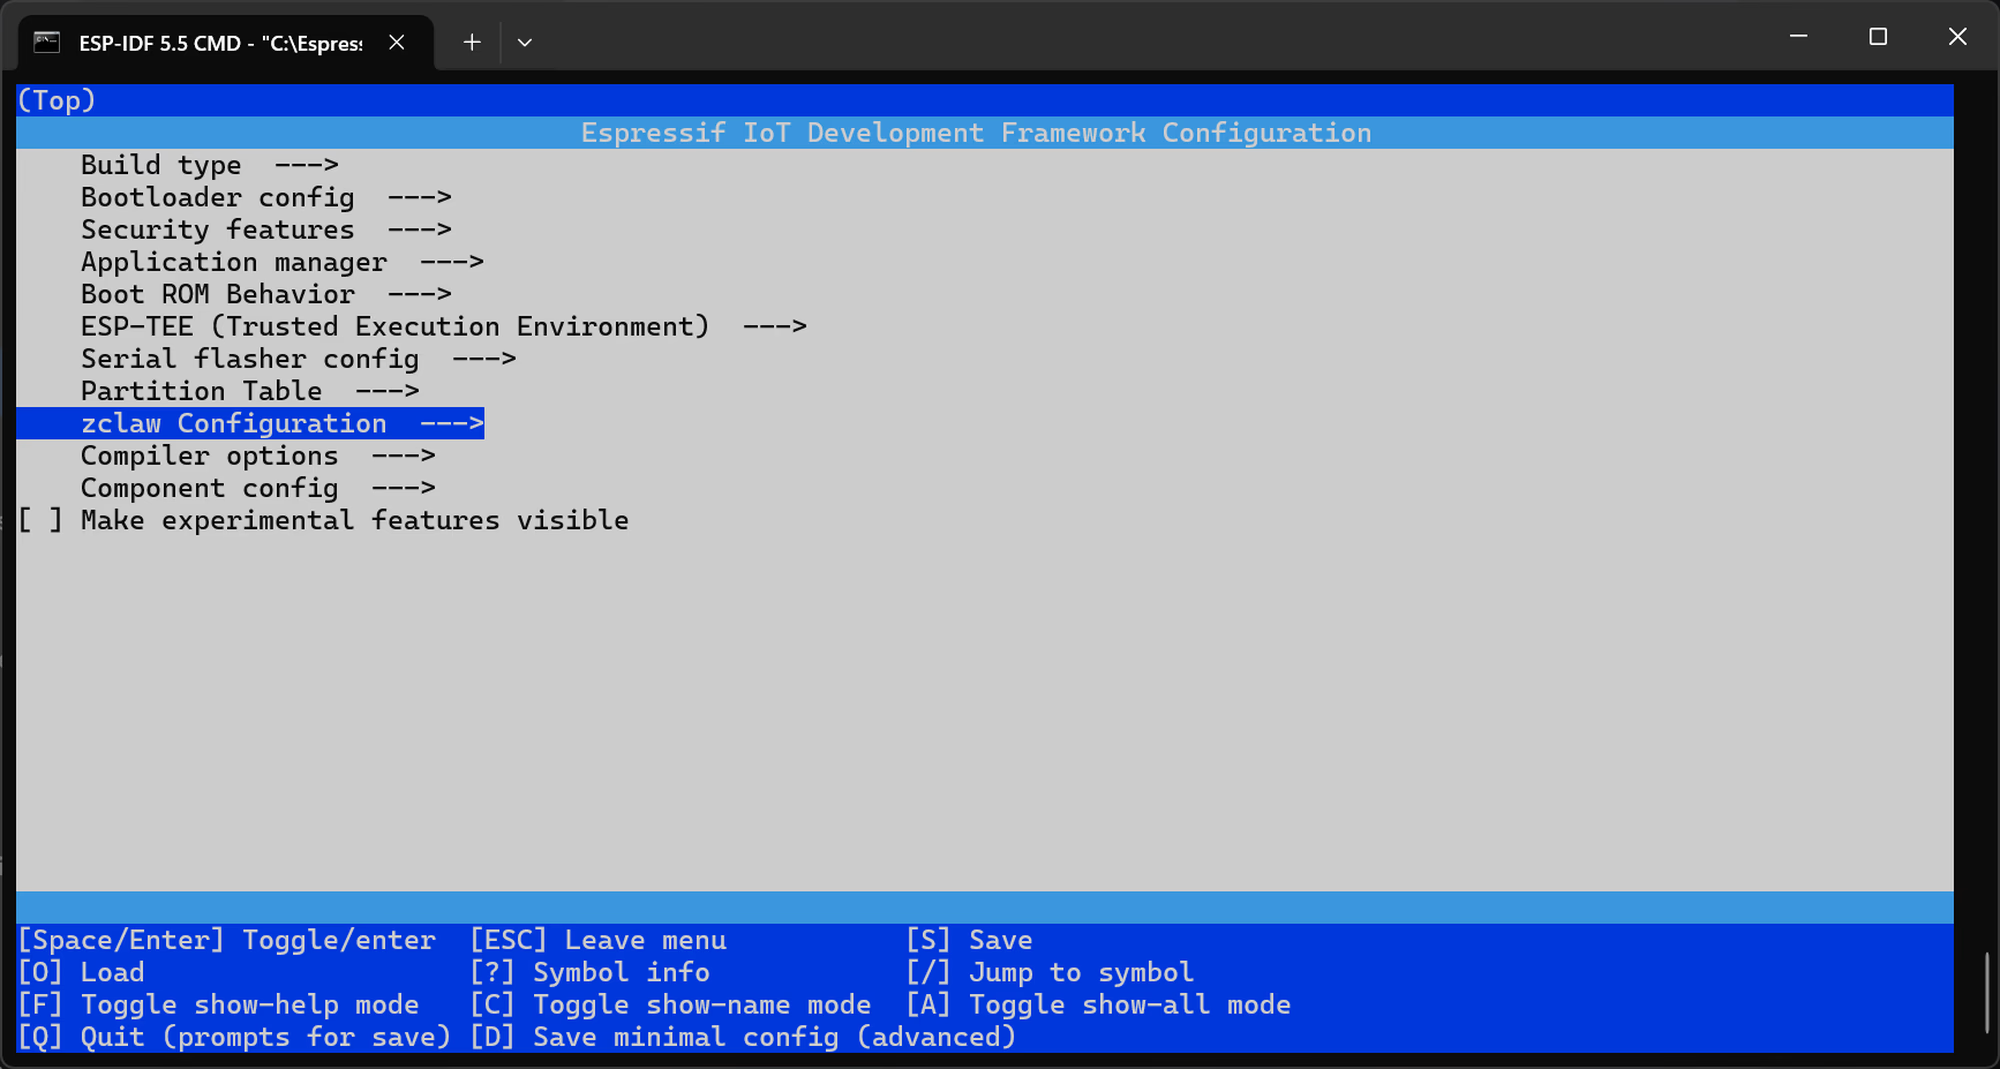
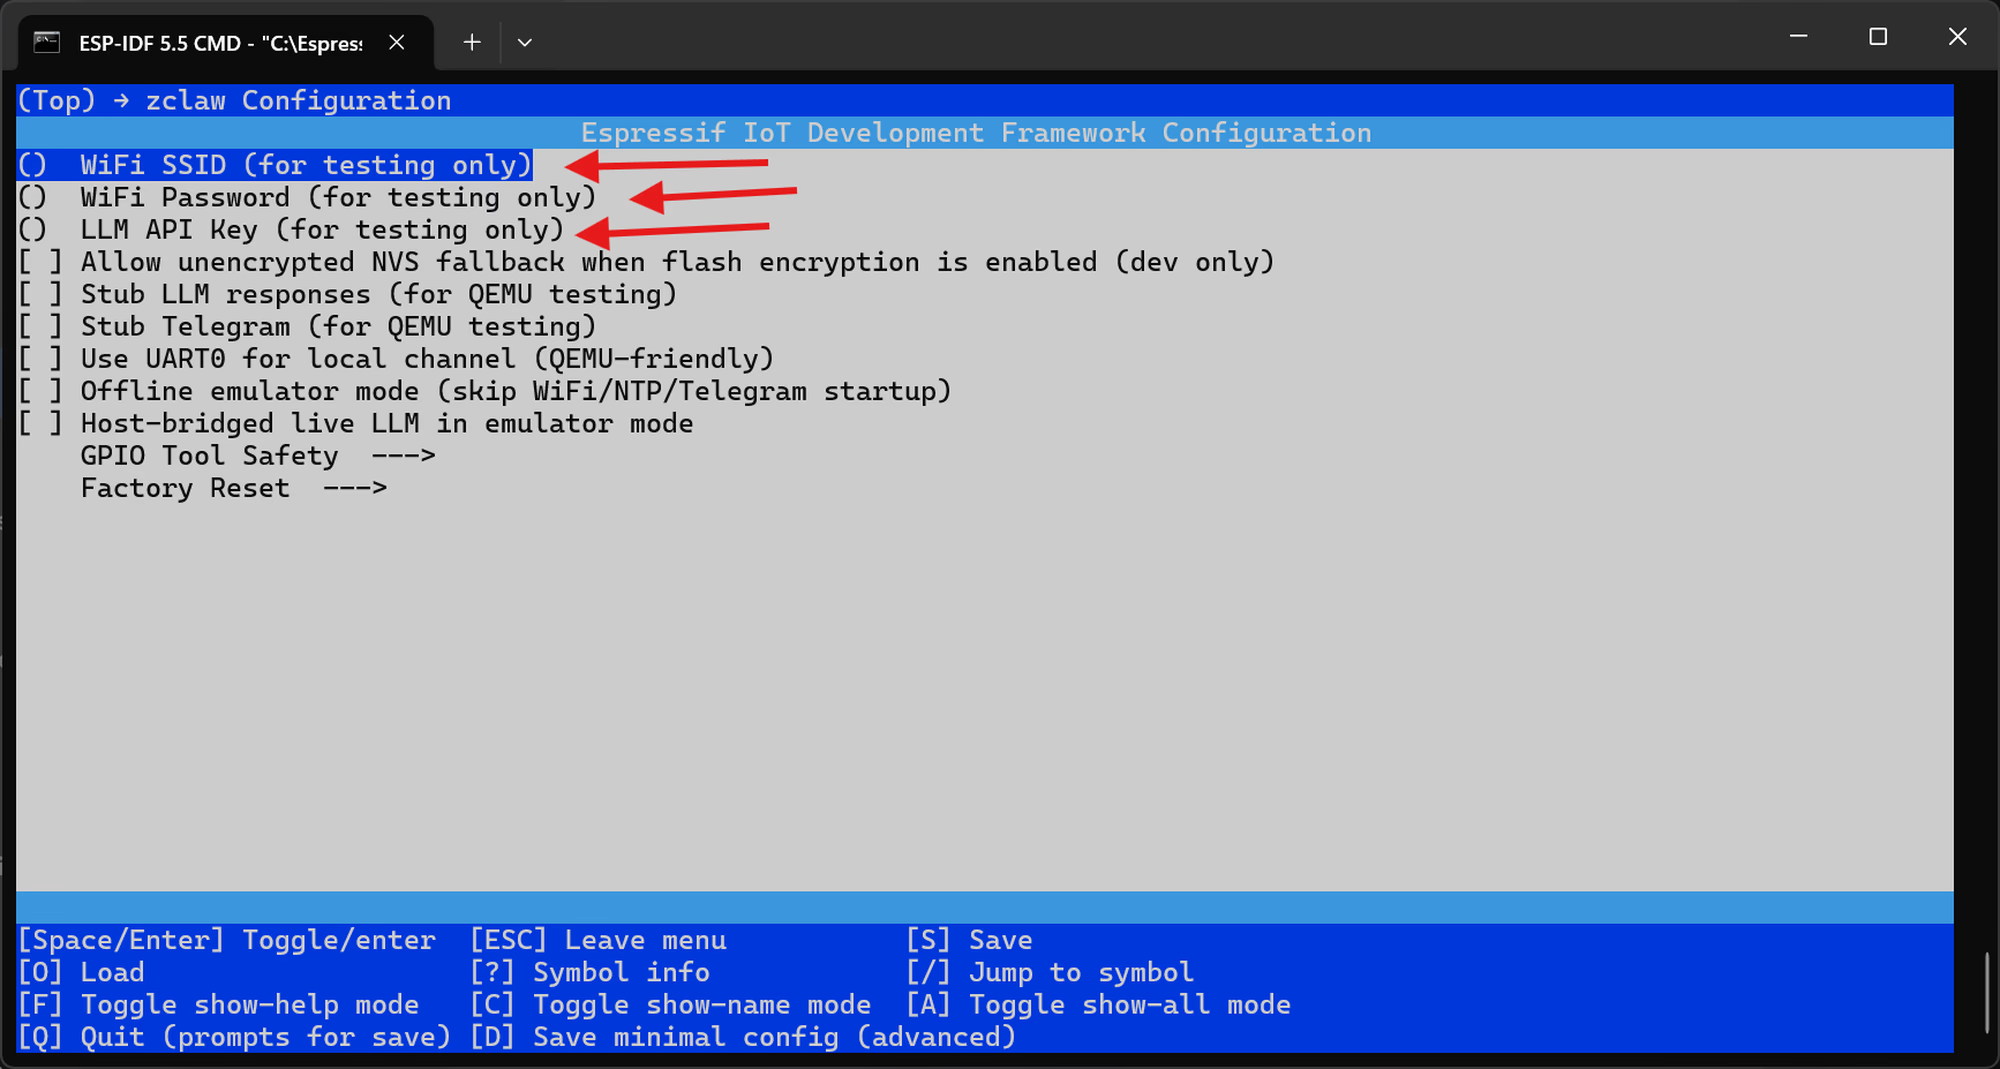
Select **zclaw Configuration --->**.
* **Option B: OpenRouter (Cloud AI)**/**OpenAI** and keep it ready.
**Need an API Key?**
Get one from [OpenRouter](https://openrouter.ai/settings/keys) or [OpenAI](https://openai.com/) by creating a new key named "zclaw".

Gathering these details now will make the next steps much smoother! You'll need them again in **Step 7**.
#### Run the Configuration Menu
Now, open the "Settings" menu to tell your board which AI to talk to:
```bash theme={null}
idf.py menuconfig
```
Select **zclaw Configuration --->**.

 ***
### Step 5: Add Telegram Bot
This allows you to message your assistant from your phone using the Telegram app.
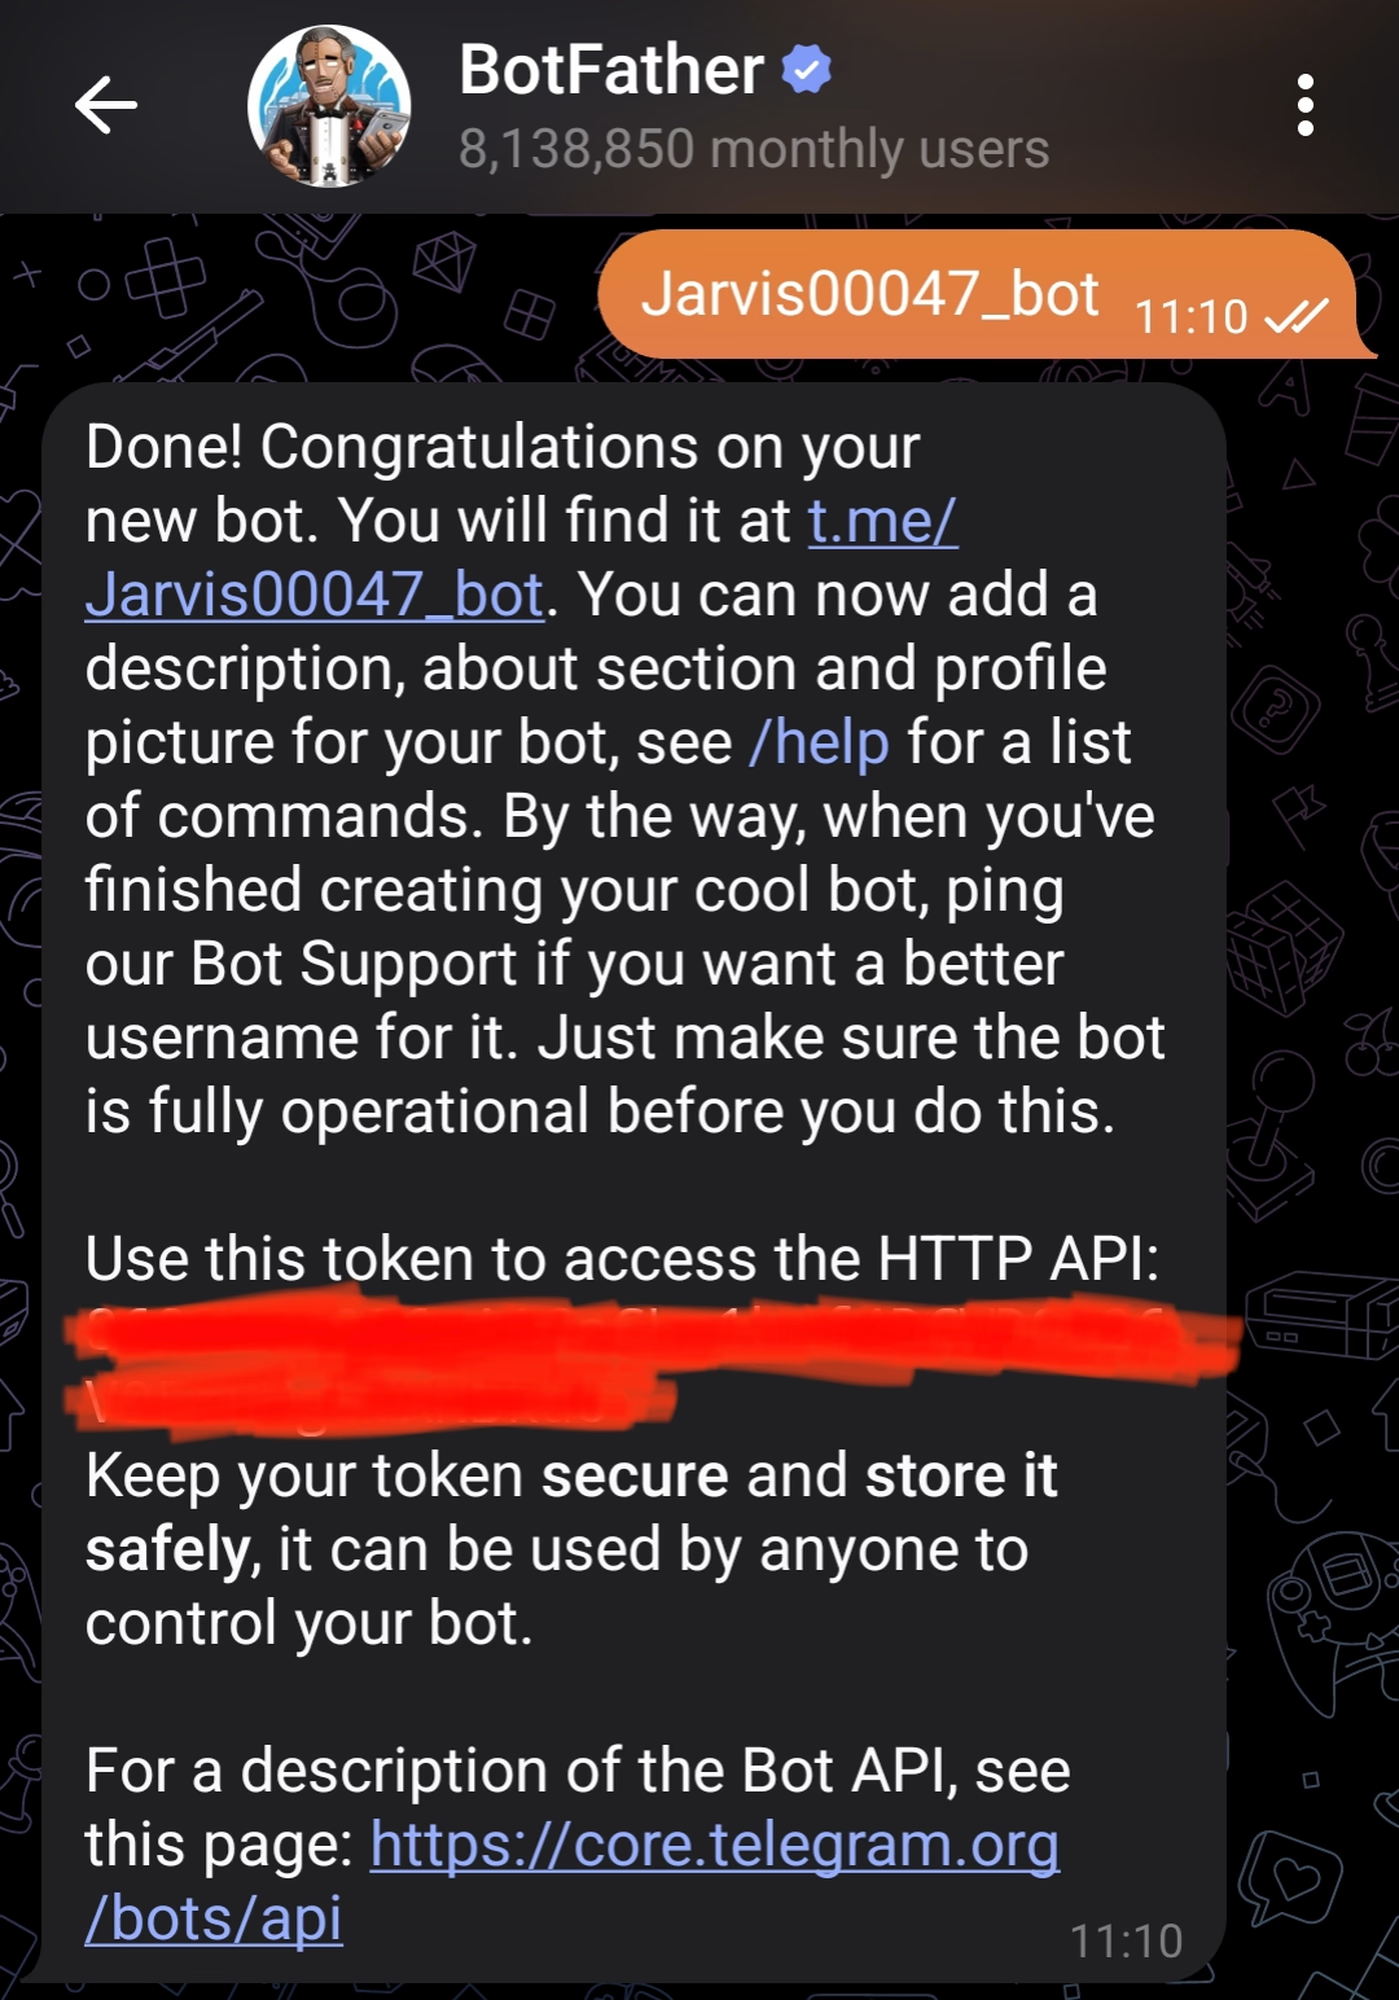
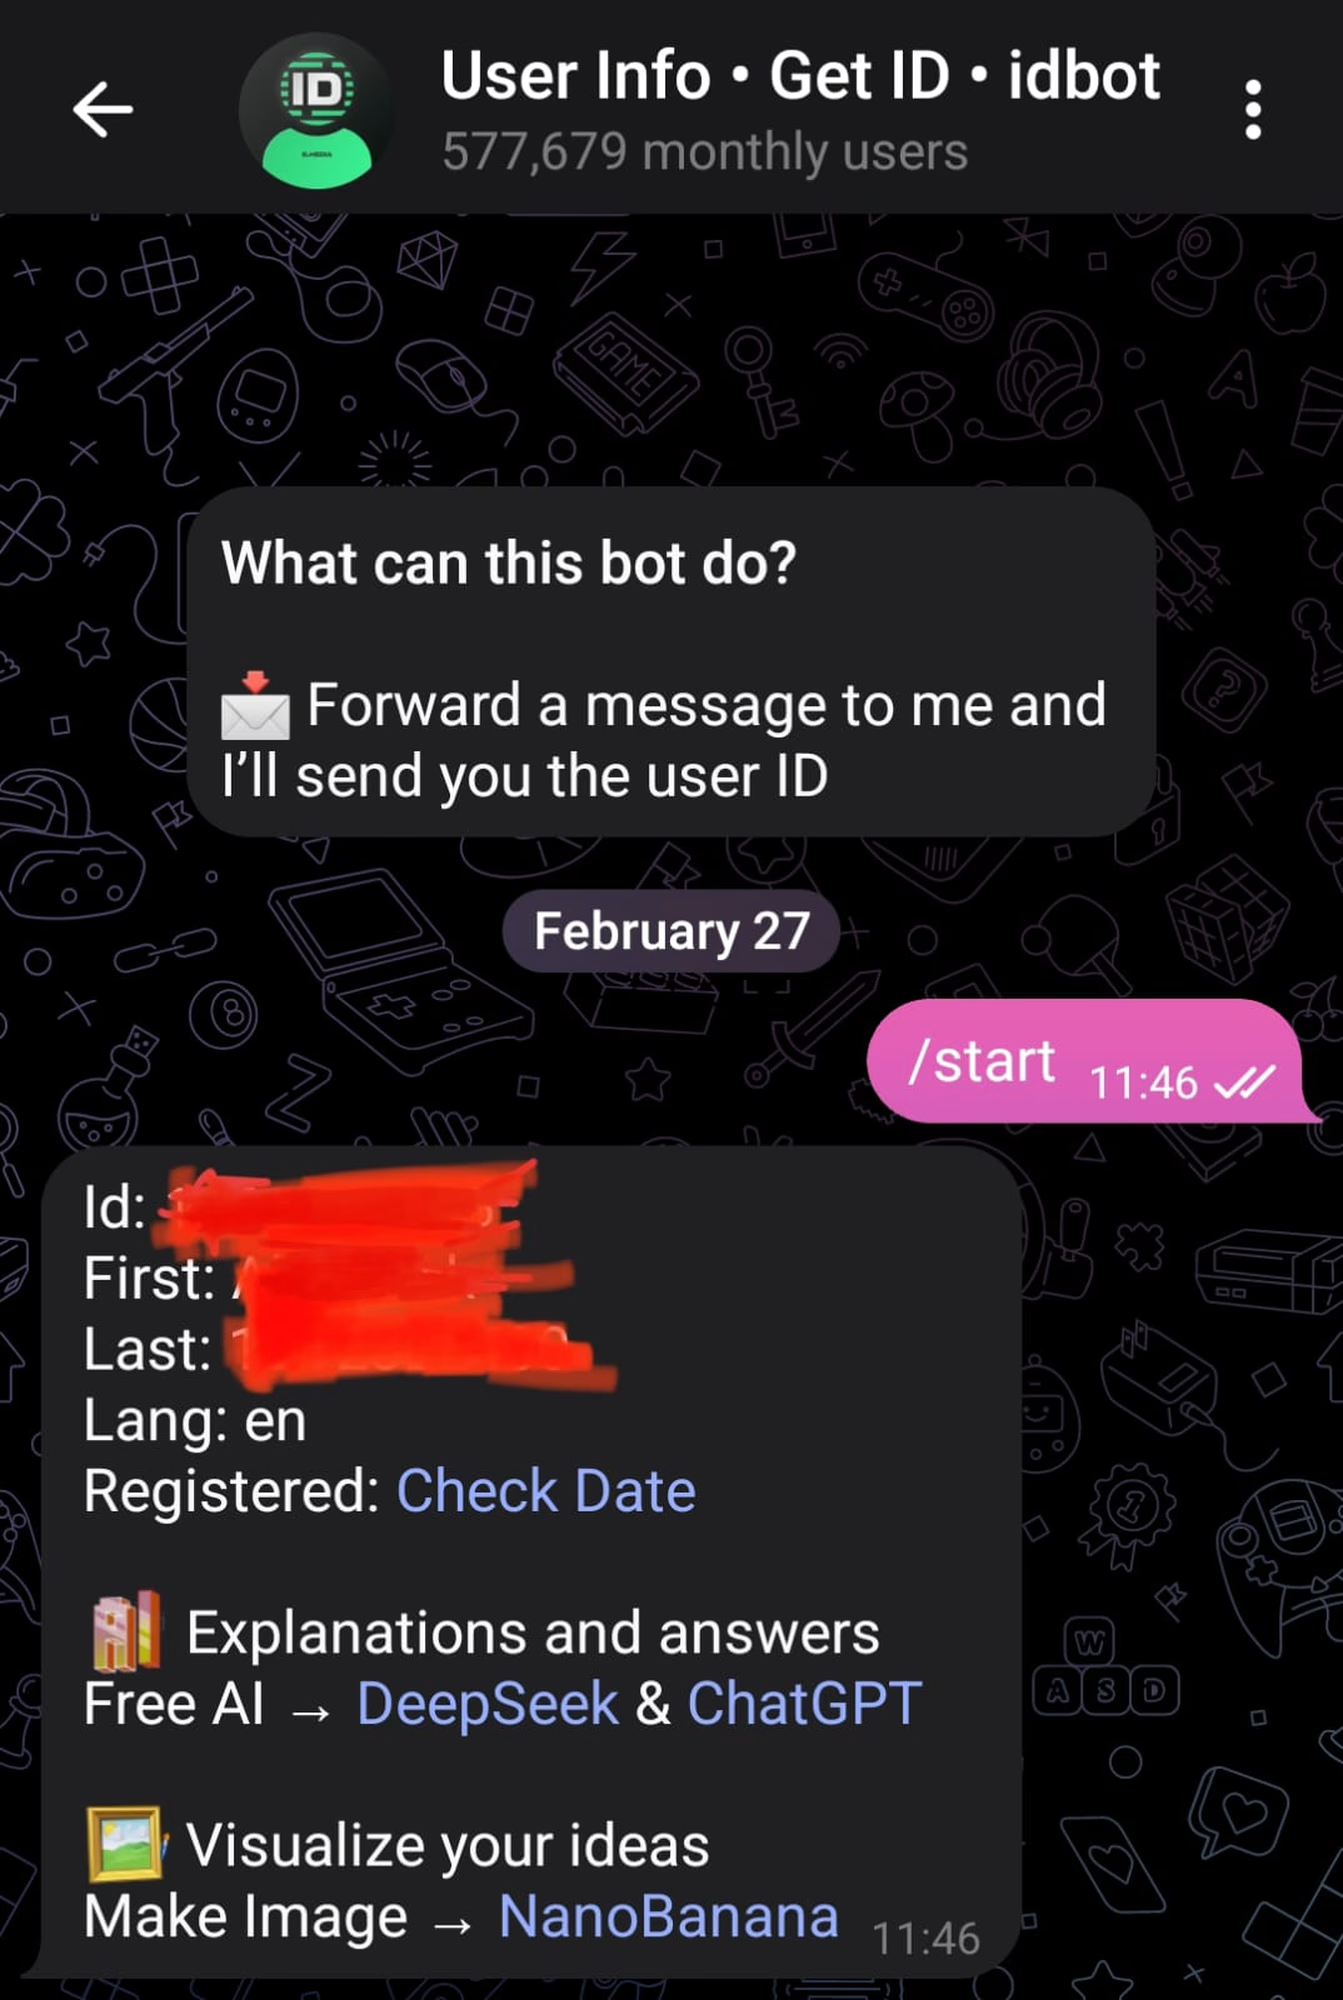
Save your **Bot Token** and **Chat ID**; you'll need them for the provisioning script in **Step 7**.
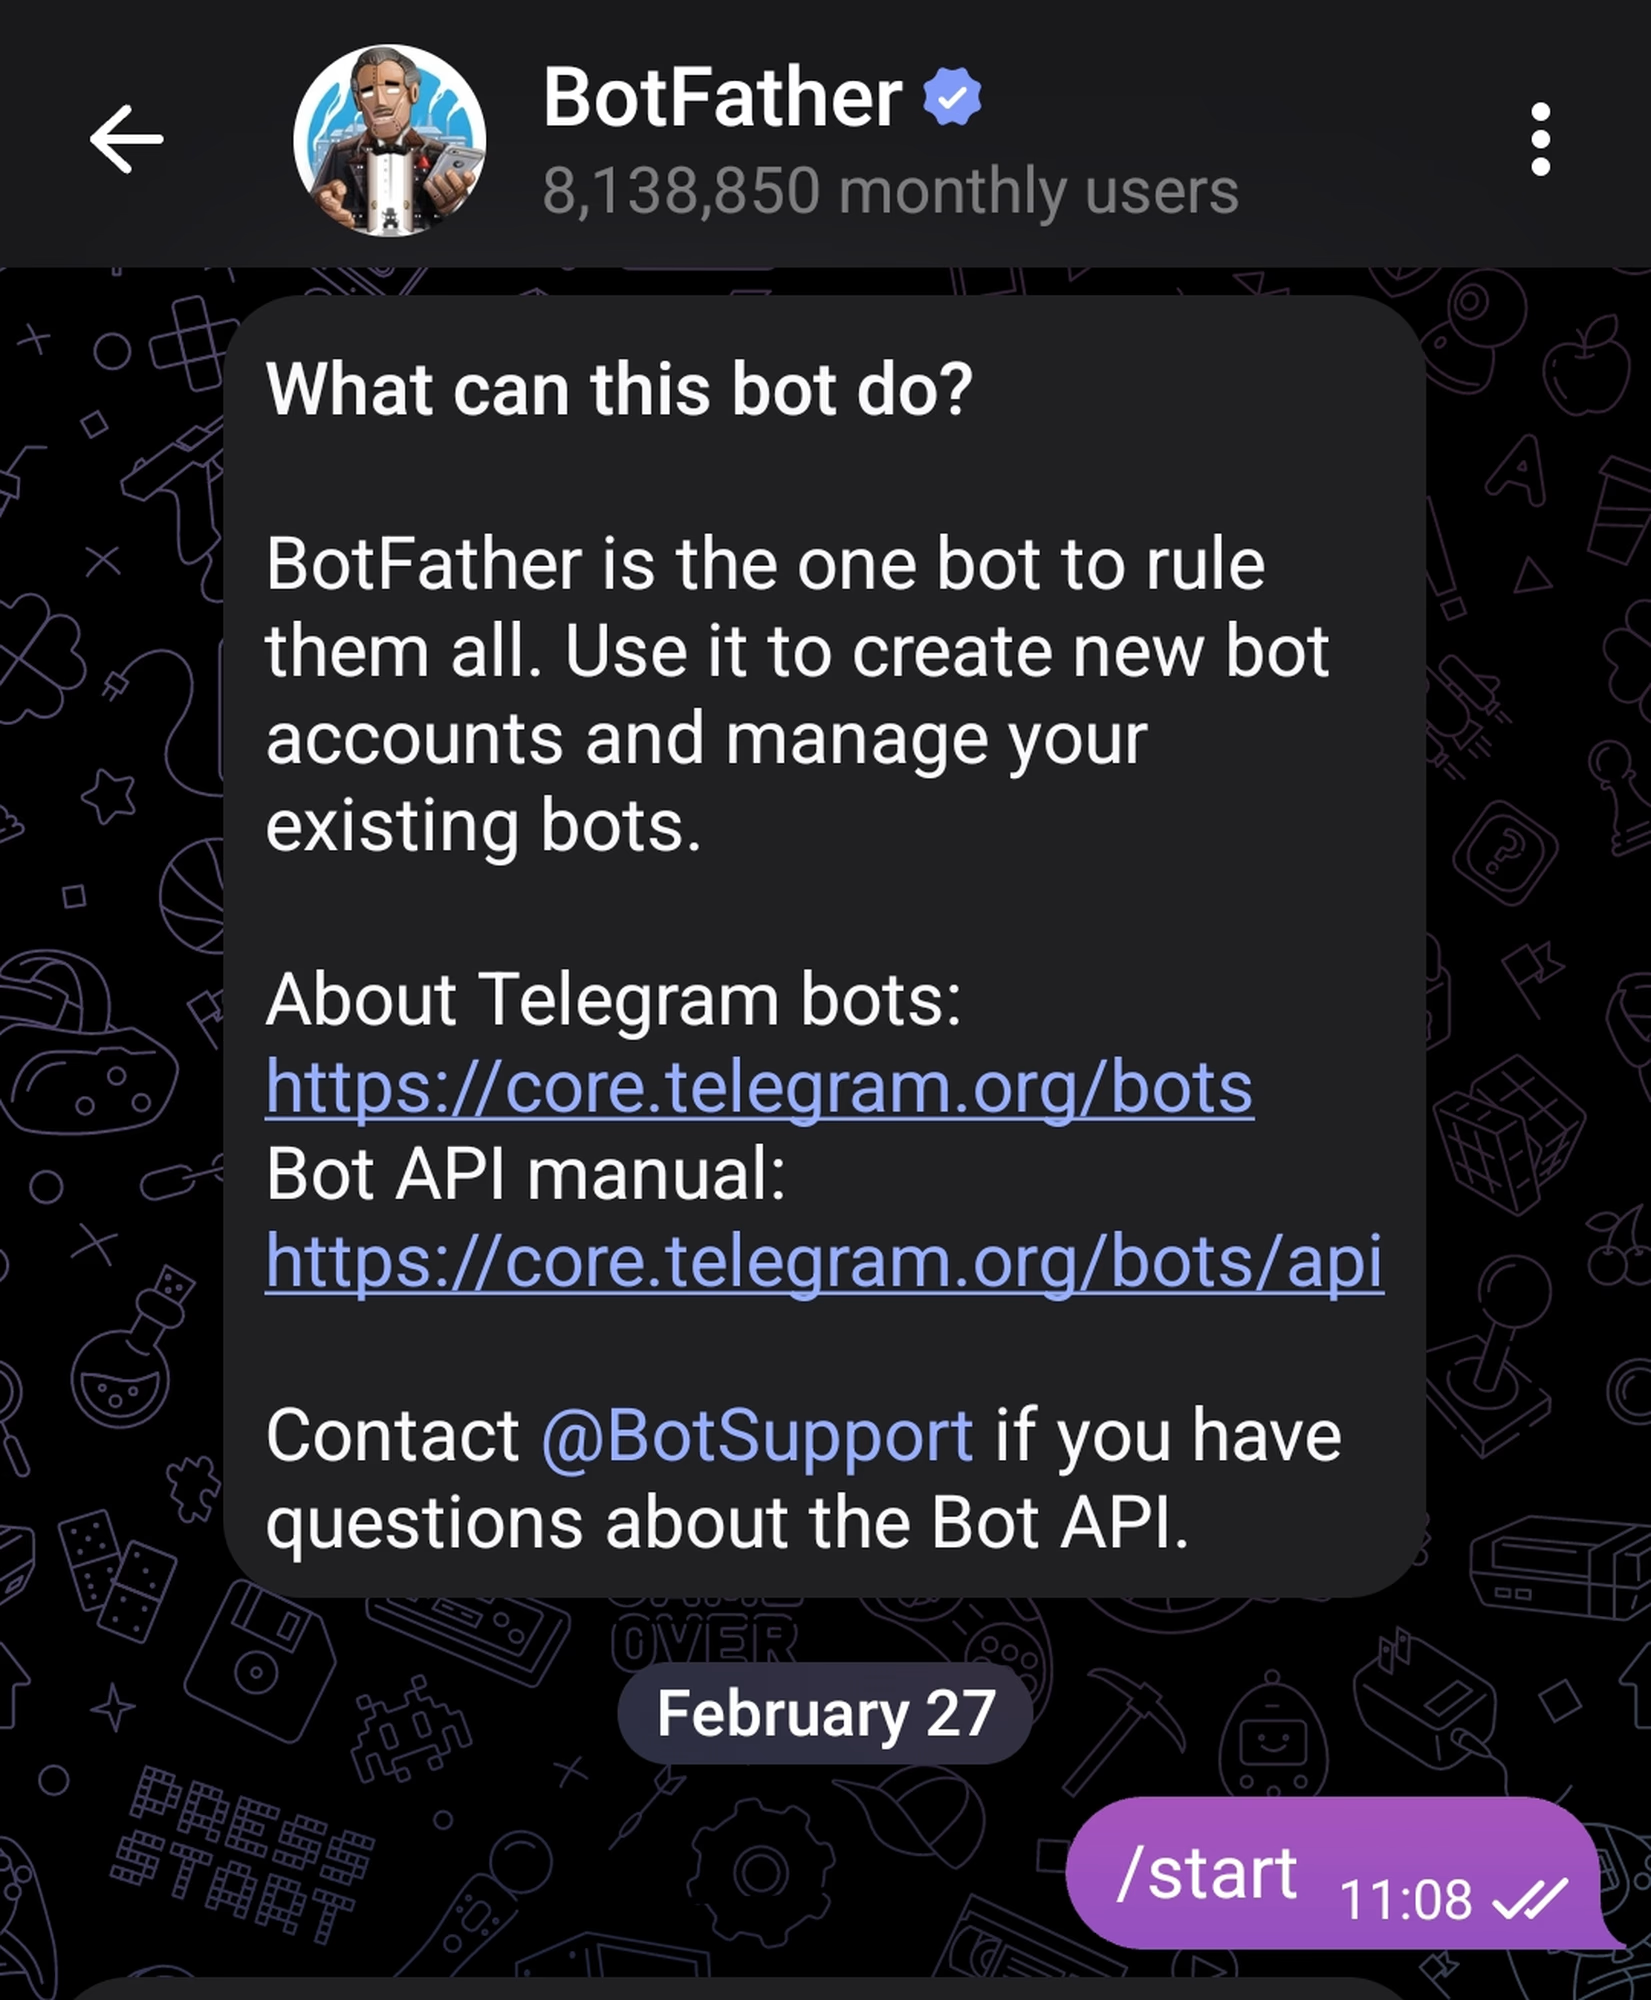
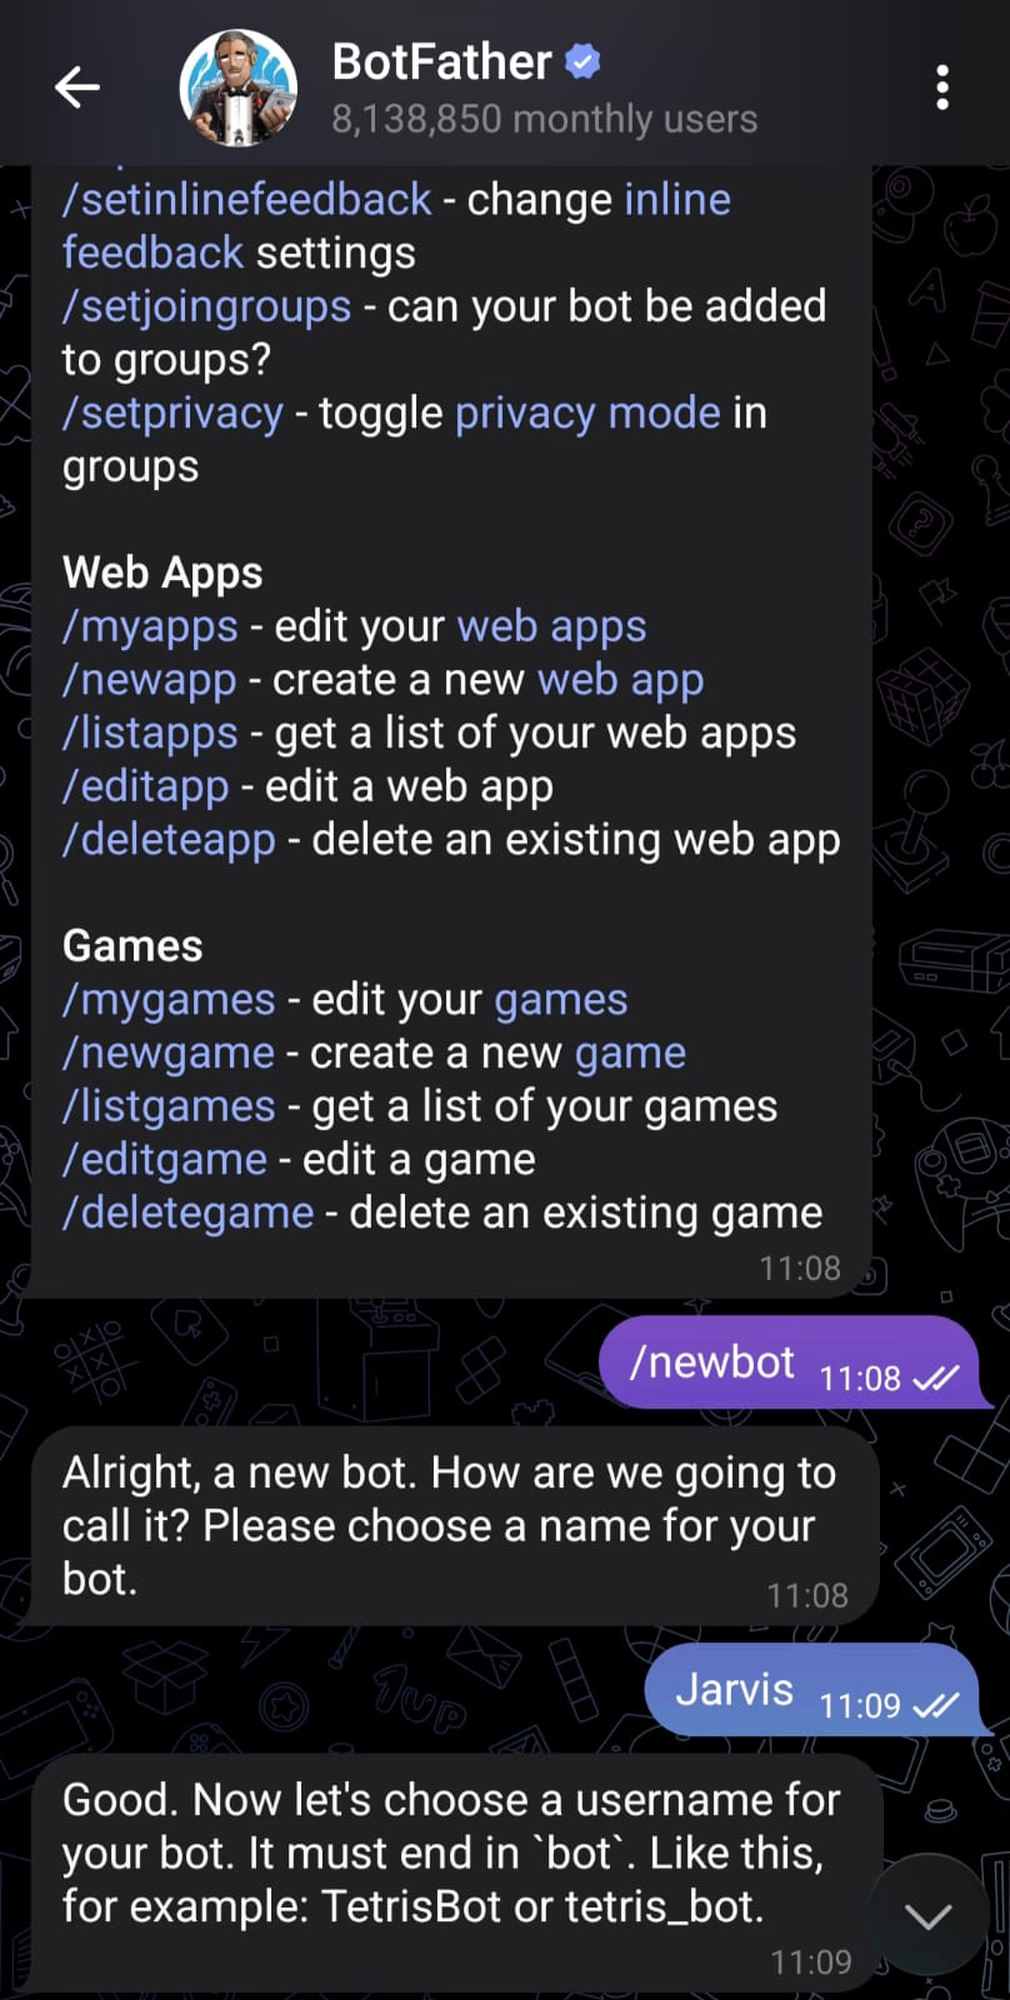
### 1. Message [@BotFather](https://t.me/botfather) and use `/newbot` to get a **Token**.
***
### Step 5: Add Telegram Bot
This allows you to message your assistant from your phone using the Telegram app.
Save your **Bot Token** and **Chat ID**; you'll need them for the provisioning script in **Step 7**.
### 1. Message [@BotFather](https://t.me/botfather) and use `/newbot` to get a **Token**.
 ### 2. Message [@userinfobot](https://t.me/userinfobot) to get your **Chat ID**.
 ***
### Step 6: Build and Flash the Firmware
This command compiles your C code and "burns" the logic onto the ESP32. Run this in your ESP-IDF terminal:
```bash theme={null}
idf.py build flash
```
Wait for the process to hit 100% and show "Done."

***
### Step 7: Provision Your Credentials
Now, save your WiFi, Telegram, and LLM details into the board's memory. Run this command in the same terminal:
```bash theme={null}
"C:\Program Files\Git\bin\bash.exe" scripts/provision.sh --port YOUR_PORT_HERE
```
*(Replace `YOUR_PORT_HERE` with your actual port number, e.g., `COM145`).*
Follow the prompts to enter:
* **WiFi SSID & Password**
* **LLM Provider**: (e.g., `openai` or `ollama`)
* **LLM Model**: (e.g., `qwen2.5:0.5b`)
* **Local Device URL**: (e.g., `http://192.168.1.50:11434`)
* **Telegram Bot Token & Chat ID**
***
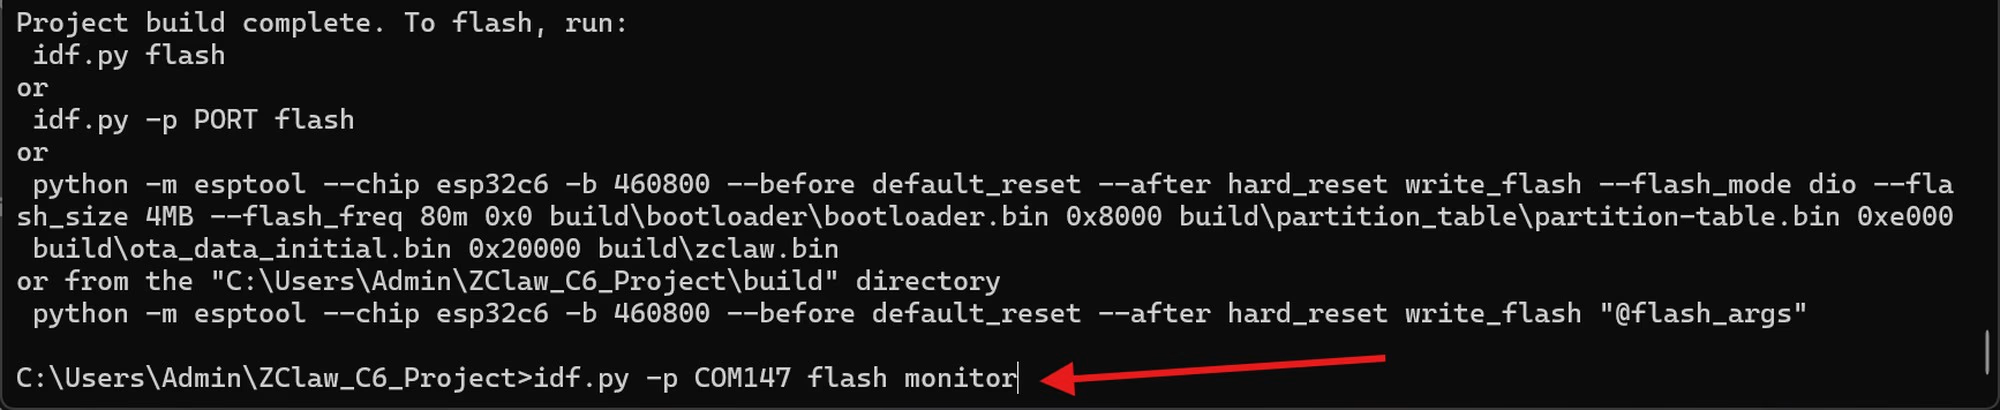
### Step 8: Start the Assistant (Monitor)
Finally, run this to start the assistant and see the output in real-time:
```bash theme={null}
idf.py -p YOUR_PORT_HERE monitor
```
***
## What can I say?
Try talking to your assistant:
* "Remind me to water the plants at 8am daily."
* "What is the temperature?"
* "Turn off the lights (GPIO 2)."
Have fun with your mini AI Assistant!
***
### Step 6: Build and Flash the Firmware
This command compiles your C code and "burns" the logic onto the ESP32. Run this in your ESP-IDF terminal:
```bash theme={null}
idf.py build flash
```
Wait for the process to hit 100% and show "Done."

***
### Step 7: Provision Your Credentials
Now, save your WiFi, Telegram, and LLM details into the board's memory. Run this command in the same terminal:
```bash theme={null}
"C:\Program Files\Git\bin\bash.exe" scripts/provision.sh --port YOUR_PORT_HERE
```
*(Replace `YOUR_PORT_HERE` with your actual port number, e.g., `COM145`).*
Follow the prompts to enter:
* **WiFi SSID & Password**
* **LLM Provider**: (e.g., `openai` or `ollama`)
* **LLM Model**: (e.g., `qwen2.5:0.5b`)
* **Local Device URL**: (e.g., `http://192.168.1.50:11434`)
* **Telegram Bot Token & Chat ID**
***
### Step 8: Start the Assistant (Monitor)
Finally, run this to start the assistant and see the output in real-time:
```bash theme={null}
idf.py -p YOUR_PORT_HERE monitor
```

***
## What can I say?
Try talking to your assistant:
* "Remind me to water the plants at 8am daily."
* "What is the temperature?"
* "Turn off the lights (GPIO 2)."
Have fun with your mini AI Assistant!