> ## Documentation Index
> Fetch the complete documentation index at: https://learn.pcbcupid.com/llms.txt
> Use this file to discover all available pages before exploring further.

> Interface the G-Mod micro SD card module with a Glyph ESP32 board over SPI to read and write files, log sensor data, and store project assets.

# Micro SD Card

export const ShopHeader = ({title, url}) => <div style={{
  display: 'flex',
  justifyContent: 'flex-end',
  alignItems: 'center',
  width: '100%',
  marginBottom: '1rem',
  gap: '20px'
}}>
    <a href={url} target="_blank" rel="noopener noreferrer" style={{
  display: 'inline-flex',
  alignItems: 'center',
  backgroundColor: '#00b894',
  color: '#fff',
  padding: '8px 18px',
  borderRadius: '8px',
  textDecoration: 'none',
  fontSize: '0.95rem',
  fontWeight: 600,
  whiteSpace: 'nowrap',
  flexShrink: 0
}}>
      Shop now
    </a>
  </div>;

export const ImgGallery = ({images, modelUrl}) => {
  var [active, setActive] = useState(0);
  var [show3D, setShow3D] = useState(false);
  useEffect(function () {
    if (show3D || images.length <= 1) return;
    var t = setTimeout(function () {
      setActive(function (p) {
        return (p + 1) % images.length;
      });
    }, 3500);
    return function () {
      clearTimeout(t);
    };
  });
  var img = images[active];
  return <div style={{
    position: 'relative',
    background: 'linear-gradient(to bottom, #fff 0%, #fff 80%, #f8f8f8 100%)',
    borderRadius: '32px',
    border: '1px solid rgba(0,0,0,0.08)',
    overflow: 'hidden',
    marginTop: '0.75rem',
    marginBottom: '1.5rem'
  }}>
      <div style={{
    position: 'relative',
    height: '450px',
    display: 'flex',
    alignItems: 'center',
    justifyContent: 'center',
    background: '#fff',
    padding: '1rem'
  }}>
        {show3D && modelUrl ? <div ref={function (el) {
    if (!el || el._mv) return;
    el._mv = true;
    var s = document.createElement('script');
    s.src = "https://ajax.googleapis.com/ajax/libs/model-viewer/4.2.0/model-viewer.min.js";
    s.type = "module";
    s.onload = function () {
      var mv = document.createElement('model-viewer');
      mv.setAttribute('src', modelUrl);
      mv.setAttribute('camera-controls', '');
      mv.setAttribute('auto-rotate', '');
      mv.style.width = "100%";
      mv.style.height = "100%";
      mv.style.backgroundColor = "#f8f8f8";
      el.innerHTML = "";
      el.appendChild(mv);
    };
    document.head.appendChild(s);
  }} style={{
    width: "100%",
    height: "100%"
  }} /> : <img src={img && img.url} alt={img && img.label} loading="lazy" style={{
    maxWidth: '100%',
    maxHeight: '100%',
    objectFit: 'contain',
    borderRadius: '8px'
  }} />}
      </div>
      <div style={{
    display: 'flex',
    justifyContent: 'center',
    gap: '12px',
    padding: '1rem',
    background: '#eee',
    borderTop: '1px solid rgba(0,0,0,0.08)'
  }}>
        {images.map(function (img, idx) {
    return <button key={img.id || idx} onClick={function () {
      setActive(idx);
      setShow3D(false);
    }} style={{
      padding: '0.6rem 1.5rem',
      borderRadius: '12px',
      border: !show3D && idx === active ? '1px solid #00b894' : '1px solid rgba(0,184,148,0.4)',
      background: !show3D && idx === active ? '#00b894' : '#fff',
      color: !show3D && idx === active ? '#fff' : '#000',
      cursor: 'pointer',
      fontSize: '0.75rem',
      fontWeight: 700,
      textTransform: 'uppercase',
      fontFamily: 'inherit'
    }}>
              {img.label}
            </button>;
  })}
        {modelUrl ? <button onClick={function () {
    setShow3D(true);
  }} style={{
    padding: '0.6rem 1.5rem',
    borderRadius: '12px',
    border: show3D ? '1px solid #00b894' : '1px solid rgba(0,184,148,0.4)',
    background: show3D ? '#00b894' : '#fff',
    color: show3D ? '#fff' : '#000',
    cursor: 'pointer',
    fontSize: '0.75rem',
    fontWeight: 700,
    textTransform: 'uppercase',
    fontFamily: 'inherit'
  }}>
            3D VIEW
          </button> : null}
      </div>
    </div>;
};

<ShopHeader title="MicroSD Card Module" url="https://shop.pcbcupid.com/product/gm003/" />

<ImgGallery modelUrl="https://raw.githubusercontent.com/pcbcupid/pcbcupid-hardware-libraries/main/pcbcupid_3dmodels/glb/gmod_microsdcard.glb" images={[{url: "https://files.pcbcupid.com/Documentation/Boards/g-mod/microsdcard/Asset%202.png", label: "ILLUSTRATION VIEW", id: "illustration"}, {url: "https://files.pcbcupid.com/Documentation/Boards/g-mod/microsdcard/pcbcupid-microSD-Boardview.avif", label: "BOARD VIEW", id: "board"}]} />

A **Micro SD Card Module** is a compact circuit designed to interface a microcontroller (e.g., Arduino, ESP32, Raspberry Pi) with a Micro SD card for data storage, retrieval, and management. This module can work both on SPI and SDIO mode, in this particular doc you will understand how to interface SD card with GLYPH in SPI mode.

## Pin Configuration

* 3V3: Power supply for the module (3.3V).
* D1 : data pin, used for data transfer
* SCK: Clock single for SPI communication
* MO : Master out slave in
* MI : Master in Slave out
* CS : chip select
* GND : ground
* D2 : data pin, used for data transfer

## Key Features

* Supports microSD Cards
* SPI & SDIO Interface Compatible
* Plug-and-Play Interface
* Compact and Lightweight Design
* File System Compatibility
* Low Power Consumption
* Push-push type socket

## Application

* Data Logging: Storing sensor data, logs, or measurements in projects like weather monitoring or IoT.
* Media Storage: Saving and retrieving images, videos, or audio files.
* Boot Media: Used in systems like Raspberry Pi for storing operating systems.
* Portable Data Transfer: Enabling easy data transport between devices.

## Step 1: Hardware Required

1. Glyph Boards
2. G-MOD Micro SDCard Module

## Step 2: Circuit Diagram

![pcbcupid\_microsdcard](https://files.pcbcupid.com/Documentation/Boards/g-mod/microsdcard/pcbcupid_sdcard1.avif)

## Step 3: Code Setup

1. **Open Arduino IDE.**
2. **Copy and paste the following code into the Arduino IDE:**

```cpp theme={null}
#include <SPI.h>
#include <SD.h>

#define SD_CS 17 // Change this to match your Glyph board's SD card CS pin
//GMOD-- GLYPH
//3v3-- 3v3
//sck-- sck
//MO -- MO
//MI-- MI
//GND-- GND

void listFiles(File dir, int numTabs = 0) {
    while (true) {
        File entry = dir.openNextFile();
        if (!entry) {
            break; // No more files
        }
        for (int i = 0; i < numTabs; i++) {
            Serial.print("\t");
        }
        Serial.print(entry.name());
        if (entry.isDirectory()) {
            Serial.println("/");
            listFiles(entry, numTabs + 1); // Recursively list directories
        } else {
            Serial.print("\t");
            Serial.println(entry.size(), DEC);
        }
        entry.close();
    }
}

void setup() {
    Serial.begin(115200);
    while (!Serial);
    
    Serial.println("Initializing SD card...");
    
    if (!SD.begin(SD_CS)) {
        Serial.println("SD card not detected!");
        return;
    }
    
    Serial.println("SD card detected successfully!");
    
    // Print card information
    uint32_t cardSize = SD.cardSize() / (1024 * 1024);
    Serial.print("Card Size: ");
    Serial.print(cardSize);
    Serial.println(" MB");
    
    // List files on SD card
    File root = SD.open("/");
    listFiles(root);
    root.close();
}

void loop() {
    // Nothing to do in the loop
}

```

## Step 4: Upload the Code

1. **Connect the Board**

* Connect your GLYPH board to your computer

2. **Select the Board and Port**

Do the following settings in your Arduino IDE,

* `Tools > Board > esp32 > Pcbcupid GLYPH C3`

<Warning>
  For the `Pcbcupid Glyph C3 ` to appear under `Tools > Board > esp32`, the esp32 board version installed in the Arduino IDE should be greater or equal to 3.1.0.
</Warning>

* `Tools > Port` and select the port connected to your GLYPH.
* `Tools > USB CDC on Boot >` ***Enabled***

<Warning>
  If `USB CDC on BOOT` not enabled, you won't be seeing any serial data on Arduino IDE.
</Warning>

3. **Upload the Code**

   * Click the upload button (➡️ icon) or use the shortcut `CRTL + U` in Arduino IDE to upload the code to the board.

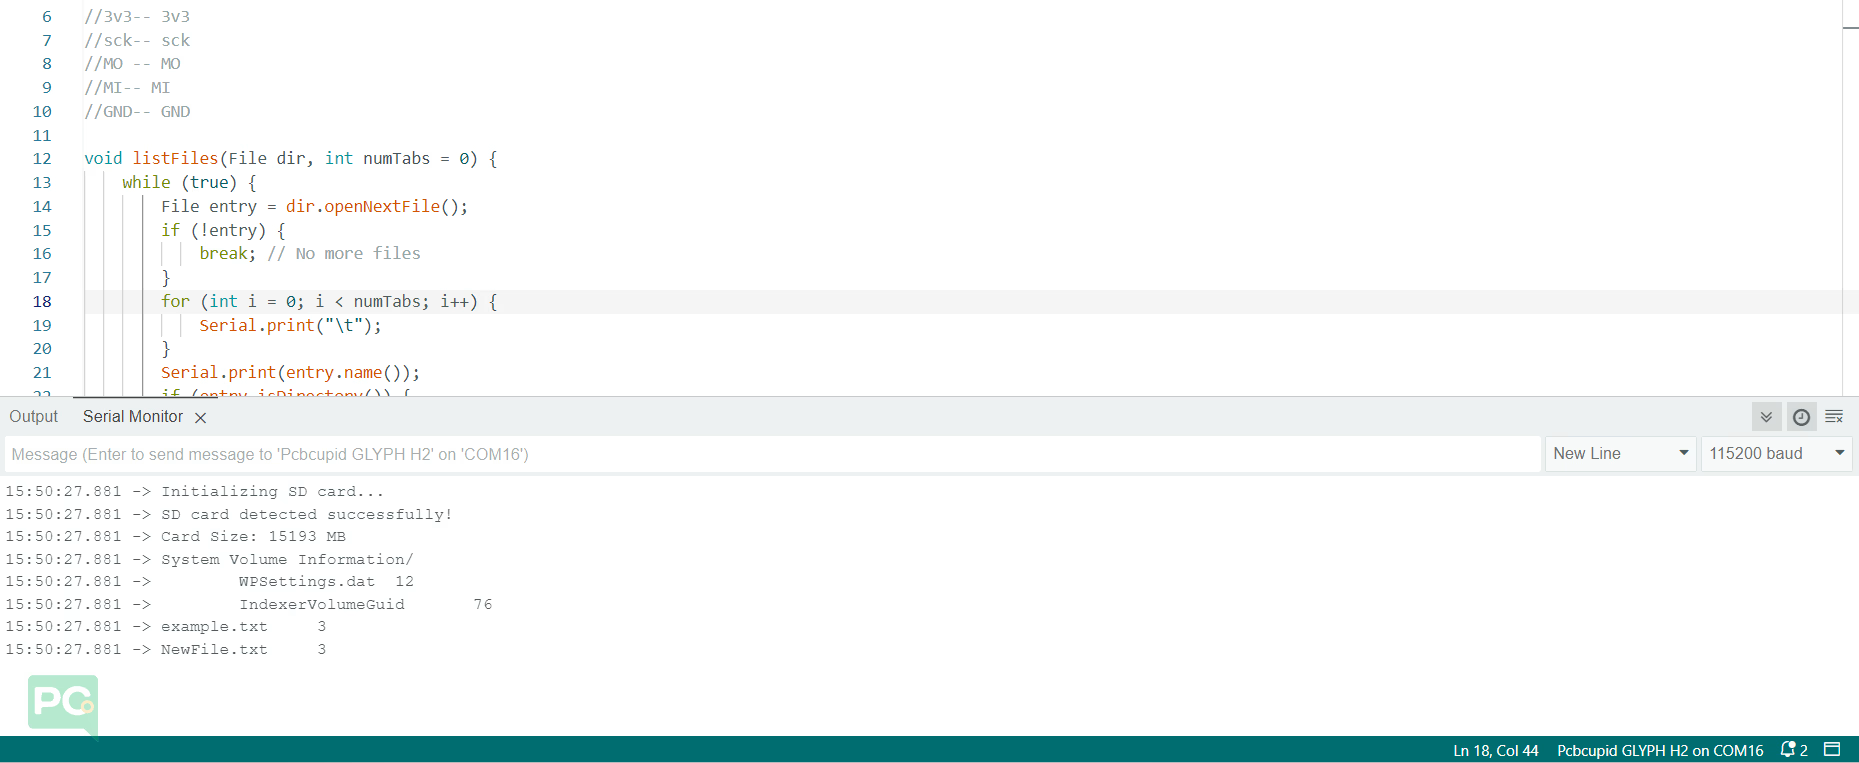
## Step 5: Observe Output on Serial Monitor
![pcbcupid-sd-card-module](https://files.pcbcupid.com/Documentation/Boards/g-mod/microsdcard/Sdcard-output_result.avif)
