> ## Documentation Index
> Fetch the complete documentation index at: https://learn.pcbcupid.com/llms.txt
> Use this file to discover all available pages before exploring further.

> PCF8563 RTC module with I2C interface for precise timekeeping. Ideal for Arduino, ESP32, and low-power embedded projects needing wake-up alarms.

# PCF8563 Real-Time Clock Module

export const ShopHeader = ({title, url}) => <div style={{
  display: 'flex',
  justifyContent: 'flex-end',
  alignItems: 'center',
  width: '100%',
  marginBottom: '1rem',
  gap: '20px'
}}>
    <a href={url} target="_blank" rel="noopener noreferrer" style={{
  display: 'inline-flex',
  alignItems: 'center',
  backgroundColor: '#00b894',
  color: '#fff',
  padding: '8px 18px',
  borderRadius: '8px',
  textDecoration: 'none',
  fontSize: '0.95rem',
  fontWeight: 600,
  whiteSpace: 'nowrap',
  flexShrink: 0
}}>
      Shop now
    </a>
  </div>;

export const ImgGallery = ({images, modelUrl}) => {
  var [active, setActive] = useState(0);
  var [show3D, setShow3D] = useState(false);
  useEffect(function () {
    if (show3D || images.length <= 1) return;
    var t = setTimeout(function () {
      setActive(function (p) {
        return (p + 1) % images.length;
      });
    }, 3500);
    return function () {
      clearTimeout(t);
    };
  });
  var img = images[active];
  return <div style={{
    position: 'relative',
    background: 'linear-gradient(to bottom, #fff 0%, #fff 80%, #f8f8f8 100%)',
    borderRadius: '32px',
    border: '1px solid rgba(0,0,0,0.08)',
    overflow: 'hidden',
    marginTop: '0.75rem',
    marginBottom: '1.5rem'
  }}>
      <div style={{
    position: 'relative',
    height: '450px',
    display: 'flex',
    alignItems: 'center',
    justifyContent: 'center',
    background: '#fff',
    padding: '1rem'
  }}>
        {show3D && modelUrl ? <div ref={function (el) {
    if (!el || el._mv) return;
    el._mv = true;
    var s = document.createElement('script');
    s.src = "https://ajax.googleapis.com/ajax/libs/model-viewer/4.2.0/model-viewer.min.js";
    s.type = "module";
    s.onload = function () {
      var mv = document.createElement('model-viewer');
      mv.setAttribute('src', modelUrl);
      mv.setAttribute('camera-controls', '');
      mv.setAttribute('auto-rotate', '');
      mv.style.width = "100%";
      mv.style.height = "100%";
      mv.style.backgroundColor = "#f8f8f8";
      el.innerHTML = "";
      el.appendChild(mv);
    };
    document.head.appendChild(s);
  }} style={{
    width: "100%",
    height: "100%"
  }} /> : <img src={img && img.url} alt={img && img.label} loading="lazy" style={{
    maxWidth: '100%',
    maxHeight: '100%',
    objectFit: 'contain',
    borderRadius: '8px'
  }} />}
      </div>
      <div style={{
    display: 'flex',
    justifyContent: 'center',
    gap: '12px',
    padding: '1rem',
    background: '#eee',
    borderTop: '1px solid rgba(0,0,0,0.08)'
  }}>
        {images.map(function (img, idx) {
    return <button key={img.id || idx} onClick={function () {
      setActive(idx);
      setShow3D(false);
    }} style={{
      padding: '0.6rem 1.5rem',
      borderRadius: '12px',
      border: !show3D && idx === active ? '1px solid #00b894' : '1px solid rgba(0,184,148,0.4)',
      background: !show3D && idx === active ? '#00b894' : '#fff',
      color: !show3D && idx === active ? '#fff' : '#000',
      cursor: 'pointer',
      fontSize: '0.75rem',
      fontWeight: 700,
      textTransform: 'uppercase',
      fontFamily: 'inherit'
    }}>
              {img.label}
            </button>;
  })}
        {modelUrl ? <button onClick={function () {
    setShow3D(true);
  }} style={{
    padding: '0.6rem 1.5rem',
    borderRadius: '12px',
    border: show3D ? '1px solid #00b894' : '1px solid rgba(0,184,148,0.4)',
    background: show3D ? '#00b894' : '#fff',
    color: show3D ? '#fff' : '#000',
    cursor: 'pointer',
    fontSize: '0.75rem',
    fontWeight: 700,
    textTransform: 'uppercase',
    fontFamily: 'inherit'
  }}>
            3D VIEW
          </button> : null}
      </div>
    </div>;
};

<ShopHeader title="PCF8563 RTC Module" url="https://shop.pcbcupid.com/product/gm009/" />

<ImgGallery images={[{url: "https://files.pcbcupid.com/Documentation/Boards/g-mod/pcf/pcbcupid-PCF-rtc.avif", label: "ILLUSTRATION VIEW", id: "illustration"}, {url: "https://files.pcbcupid.com/Documentation/Boards/g-mod/pcf/pcbcupid-pcf-rtc-boardview.avif", label: "BOARD VIEW", id: "board"}]} />

The **PCF8563** is a low-power CMOS real-time clock/calendar (RTC) IC with an I²C-bus interface from NXP. It keeps track of time and date, including seconds, minutes, hours, days, months, years, and has programmable alarms and timers.

<Info>
  Check the back of the RTC module: modules marked **“M”** use the ***MCP79412***, while those marked **“P”** use the ***PCF8563***.
</Info>

It is widely used in embedded systems, IoT devices, and portable electronics because of its ultra-low power consumption and accuracy.

The PCF8563 RTC is a low-power, I²C-based real-time clock with alarms and timers, ideal for keeping accurate time in embedded systems and low-power applications.

## Pin Configuration

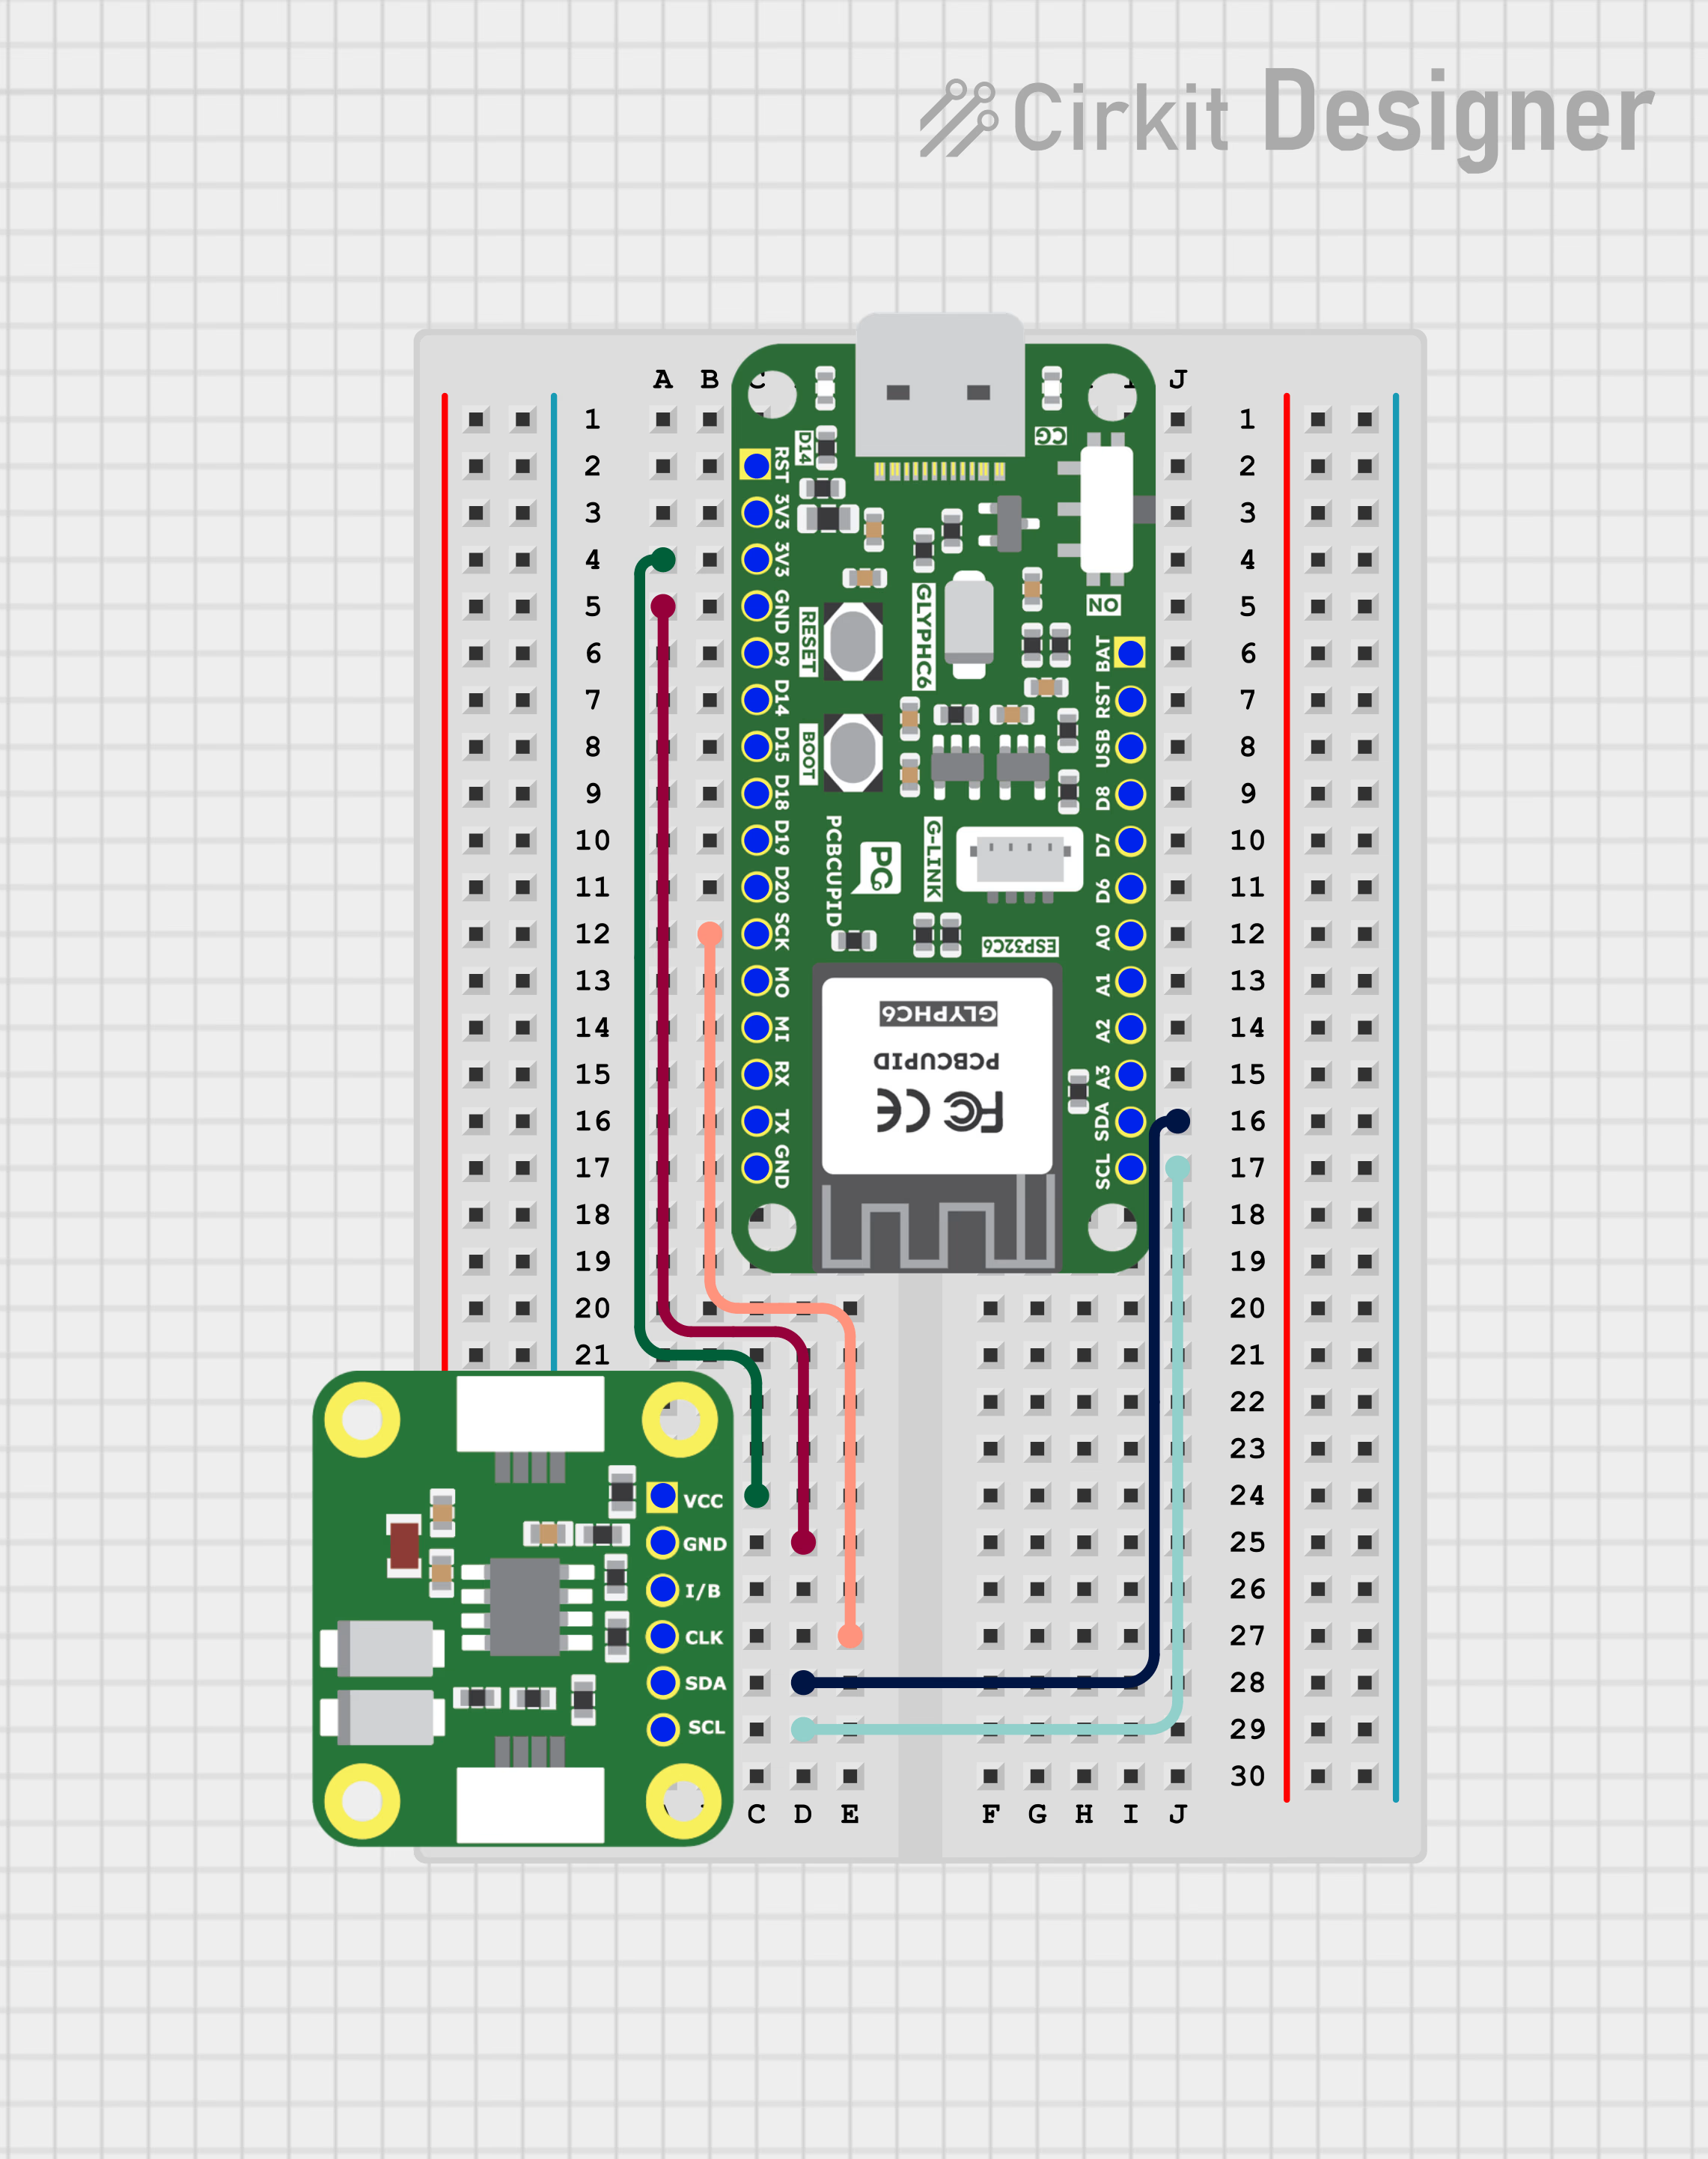
* VCC → VCC
* GND → GND
* CLK → SCK / Any GPIO
* SDA → SDA
* SCL → SCL
* I → Any GPIO / Can be used as interrupt

## Key Features

* I²C (2-wire) communication interface (up to 400 kHz Fast Mode).
* Additional RTC function:
  * Seconds, minutes, hours, days, weekdays, months, years.
  * Automatic leap year correction (up to year 2099).
* Programmable clock output (32.768 kHz, 1 Hz, etc.).
* Two independent alarms (daily/weekly programmable).
* Countdown timer with interrupt capability.
* Ultra-low operating current (typically \< 1 µA in time-keeping mode).
* Operating voltage: 1.0V – 5.5V (suitable for battery operation)

## Applications

* IoT devices (timestamping sensor data).
* Clocks, watches, and portable devices.
* Data loggers.
* Industrial control and automation.
* Energy meters.
* Battery-powered embedded systems.

## Step 1: Hardware Required

1. Glyph Boards
2. GMOD PCF8563-RTC

## Step 2: Circuit Diagram
![PCF8563-RTC-CIRCUIT-DIAGRAM](https://files.pcbcupid.com/Documentation/Boards/g-mod/pcf/pcbcupid_pcf_rtc.avif)

## Step 3: Code Setup

1. **Open Arduino IDE.**
2. **Make sure to install the library**
3. **Copy and paste the following code into the Arduino IDE:**

```cpp theme={null}
#include <PCF8563.h>

PCF8563 pcf;

void setup() {
  Serial.begin(9600);
  pcf.init();//initialize the clock

  pcf.stopClock();//stop the clock

  //set time to to 31/3/2018 17:33:0

  pcf.setYear(18);//set year
  pcf.setMonth(3);//set month
  pcf.setDay(31);//set dat
  pcf.setHour(17);//set hour
  pcf.setMinut(33);//set minut
  pcf.setSecond(0);//set second

  pcf.startClock();//start the clock
}

void loop() {
  Time nowTime = pcf.getTime();//get current time

  //print current time
  Serial.print(nowTime.day);
  Serial.print("/");
  Serial.print(nowTime.month);
  Serial.print("/");
  Serial.print(nowTime.year);
  Serial.print(" ");
  Serial.print(nowTime.hour);
  Serial.print(":");
  Serial.print(nowTime.minute);
  Serial.print(":");
  Serial.println(nowTime.second);
  delay(1000);
}
```

## Step 4: Upload the Code

1. **Connect the Board**

* Connect your GLYPH board to your computer

2. **Select the Board and Port**

Do the following settings in your Arduino IDE,

* `Tools > Board > esp32 > Pcbcupid GLYPH C3`

<Warning>
  For the `Pcbcupid Glyph C3 ` to appear under `Tools > Board > esp32`, the esp32 board version installed in the Arduino IDE should be greater or equal to 3.1.0.
</Warning>

* `Tools > Port` and select the port connected to your GLYPH.
* `Tools > USB CDC on Boot >` ***Enabled***

<Warning>
  If `USB CDC on BOOT` not enabled, you won't be seeing any serial data on Arduino IDE.
</Warning>

3. **Upload the Code**

   * Click the upload button (➡️ icon) or use the shortcut `CRTL + U` in Arduino IDE to upload the code to the board.

## Step 5: Observe the Output

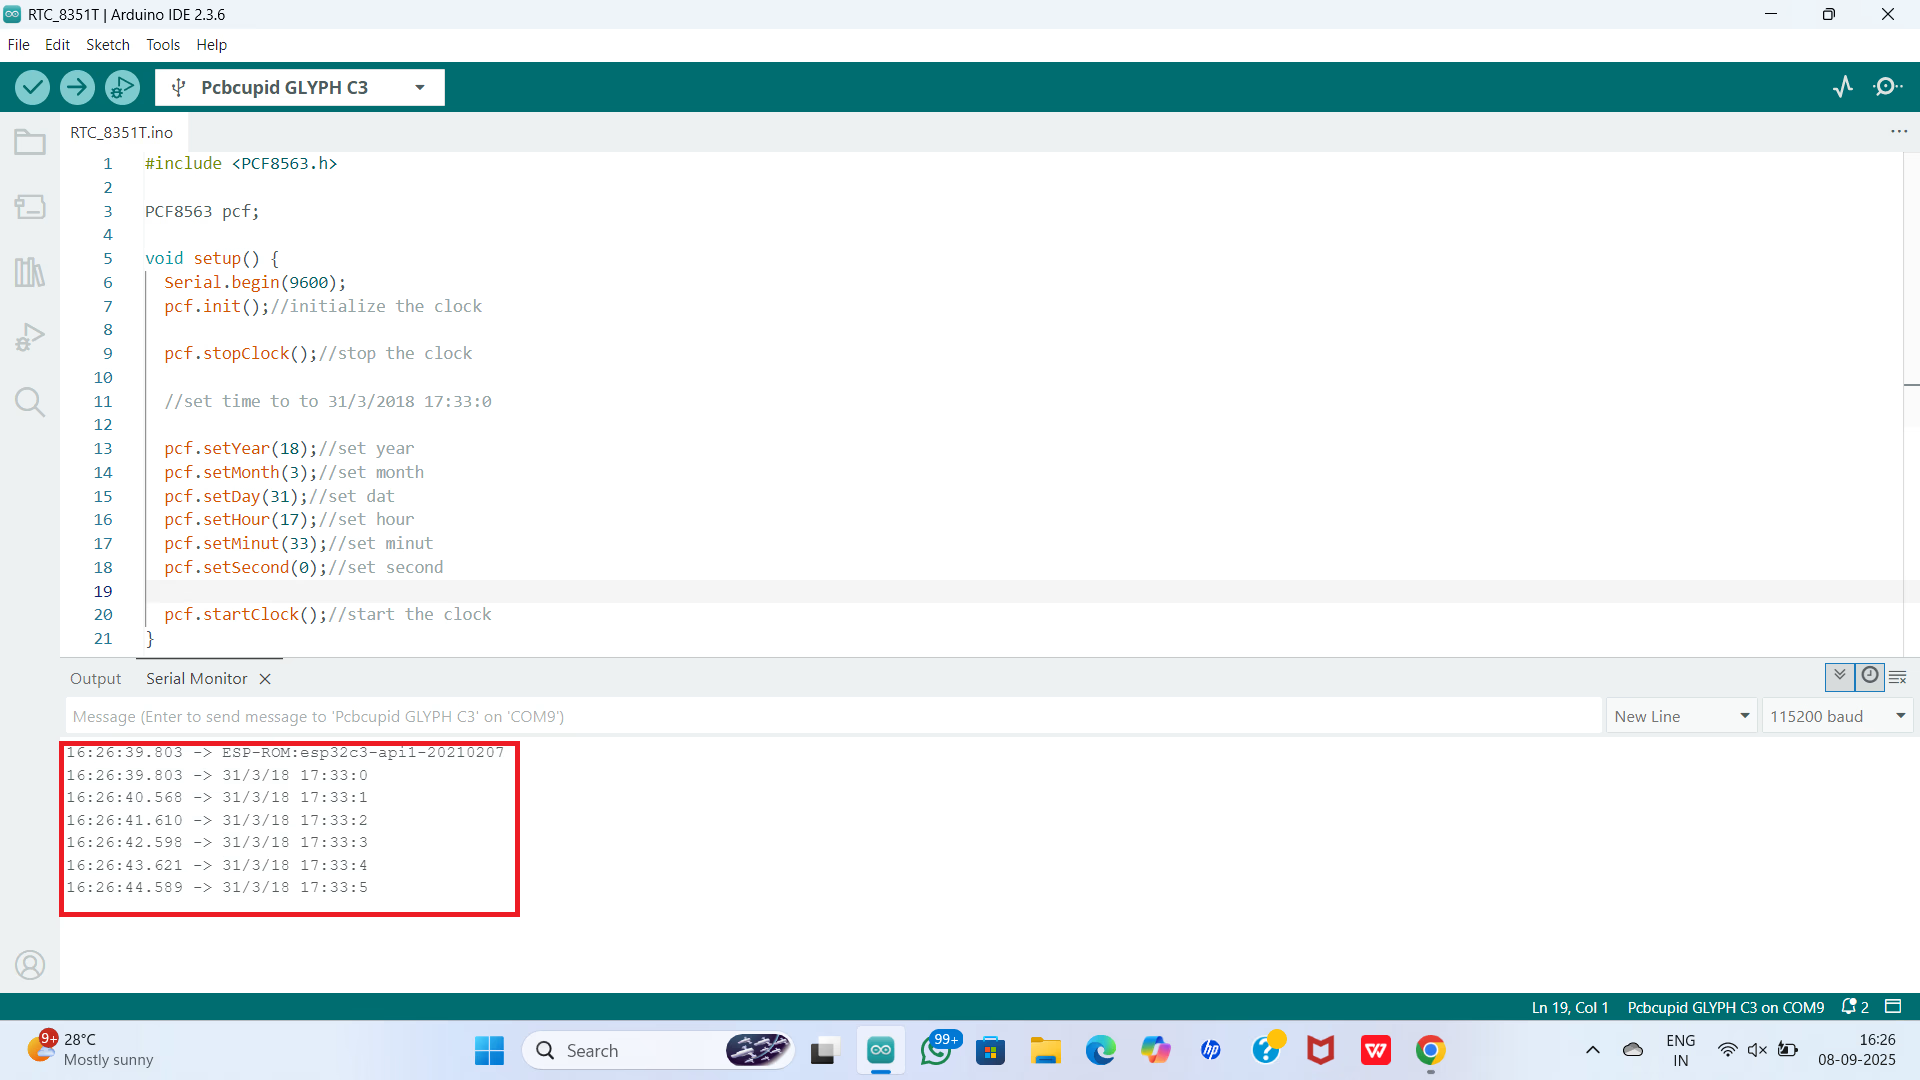
The RTC module tracks time independently. With the onboard 3V Lithium Cell (CR1220), it continues timekeeping even when the GLYPH is powered off.
![PCF8563-RTC-result](https://files.pcbcupid.com/Documentation/Boards/g-mod/pcf/pcbcupid_pcf1.avif)
