> ## Documentation Index
> Fetch the complete documentation index at: https://learn.pcbcupid.com/llms.txt
> Use this file to discover all available pages before exploring further.

> Use the G-Mod limit switch module to detect mechanical end-of-travel positions and trigger digital inputs on a Glyph ESP32 microcontroller board.

# Limit Switch Module

export const ShopHeader = ({title, url}) => <div style={{
  display: 'flex',
  justifyContent: 'flex-end',
  alignItems: 'center',
  width: '100%',
  marginBottom: '1rem',
  gap: '20px'
}}>
    <a href={url} target="_blank" rel="noopener noreferrer" style={{
  display: 'inline-flex',
  alignItems: 'center',
  backgroundColor: '#00b894',
  color: '#fff',
  padding: '8px 18px',
  borderRadius: '8px',
  textDecoration: 'none',
  fontSize: '0.95rem',
  fontWeight: 600,
  whiteSpace: 'nowrap',
  flexShrink: 0
}}>
      Shop now
    </a>
  </div>;

export const ImgGallery = ({images, modelUrl}) => {
  var [active, setActive] = useState(0);
  var [show3D, setShow3D] = useState(false);
  useEffect(function () {
    if (show3D || images.length <= 1) return;
    var t = setTimeout(function () {
      setActive(function (p) {
        return (p + 1) % images.length;
      });
    }, 3500);
    return function () {
      clearTimeout(t);
    };
  });
  var img = images[active];
  return <div style={{
    position: 'relative',
    background: 'linear-gradient(to bottom, #fff 0%, #fff 80%, #f8f8f8 100%)',
    borderRadius: '32px',
    border: '1px solid rgba(0,0,0,0.08)',
    overflow: 'hidden',
    marginTop: '0.75rem',
    marginBottom: '1.5rem'
  }}>
      <div style={{
    position: 'relative',
    height: '450px',
    display: 'flex',
    alignItems: 'center',
    justifyContent: 'center',
    background: '#fff',
    padding: '1rem'
  }}>
        {show3D && modelUrl ? <div ref={function (el) {
    if (!el || el._mv) return;
    el._mv = true;
    var s = document.createElement('script');
    s.src = "https://ajax.googleapis.com/ajax/libs/model-viewer/4.2.0/model-viewer.min.js";
    s.type = "module";
    s.onload = function () {
      var mv = document.createElement('model-viewer');
      mv.setAttribute('src', modelUrl);
      mv.setAttribute('camera-controls', '');
      mv.setAttribute('auto-rotate', '');
      mv.style.width = "100%";
      mv.style.height = "100%";
      mv.style.backgroundColor = "#f8f8f8";
      el.innerHTML = "";
      el.appendChild(mv);
    };
    document.head.appendChild(s);
  }} style={{
    width: "100%",
    height: "100%"
  }} /> : <img src={img && img.url} alt={img && img.label} loading="lazy" style={{
    maxWidth: '100%',
    maxHeight: '100%',
    objectFit: 'contain',
    borderRadius: '8px'
  }} />}
      </div>
      <div style={{
    display: 'flex',
    justifyContent: 'center',
    gap: '12px',
    padding: '1rem',
    background: '#eee',
    borderTop: '1px solid rgba(0,0,0,0.08)'
  }}>
        {images.map(function (img, idx) {
    return <button key={img.id || idx} onClick={function () {
      setActive(idx);
      setShow3D(false);
    }} style={{
      padding: '0.6rem 1.5rem',
      borderRadius: '12px',
      border: !show3D && idx === active ? '1px solid #00b894' : '1px solid rgba(0,184,148,0.4)',
      background: !show3D && idx === active ? '#00b894' : '#fff',
      color: !show3D && idx === active ? '#fff' : '#000',
      cursor: 'pointer',
      fontSize: '0.75rem',
      fontWeight: 700,
      textTransform: 'uppercase',
      fontFamily: 'inherit'
    }}>
              {img.label}
            </button>;
  })}
        {modelUrl ? <button onClick={function () {
    setShow3D(true);
  }} style={{
    padding: '0.6rem 1.5rem',
    borderRadius: '12px',
    border: show3D ? '1px solid #00b894' : '1px solid rgba(0,184,148,0.4)',
    background: show3D ? '#00b894' : '#fff',
    color: show3D ? '#fff' : '#000',
    cursor: 'pointer',
    fontSize: '0.75rem',
    fontWeight: 700,
    textTransform: 'uppercase',
    fontFamily: 'inherit'
  }}>
            3D VIEW
          </button> : null}
      </div>
    </div>;
};

<ShopHeader title="Limit Switch Module" url="https://shop.pcbcupid.com/product/gm005/" />

<ImgGallery images={[{url: "https://files.pcbcupid.com/Documentation/Boards/g-mod/limit_switch/pcbcupid-limit-switch-illustration.avif", label: "ILLUSTRATION VIEW", id: "illustration"}, {url: "https://files.pcbcupid.com/Documentation/Boards/g-mod/limit_switch/pcbcupid-sideview-limit-switch-boardview.avif", label: "BOARD VIEW", id: "board"}]} />

A **limit switch** is an electromechanical device used to detect the presence, absence, or position of an object. It operates by physical contact: when an object moves into a predefined position, it actuates the switch, opening or closing an electrical circuit. Limit switches are widely used in industrial machinery, automation systems, and safety devices to control movement, prevent over-travel, and provide position feedback.

## Pin Configuration

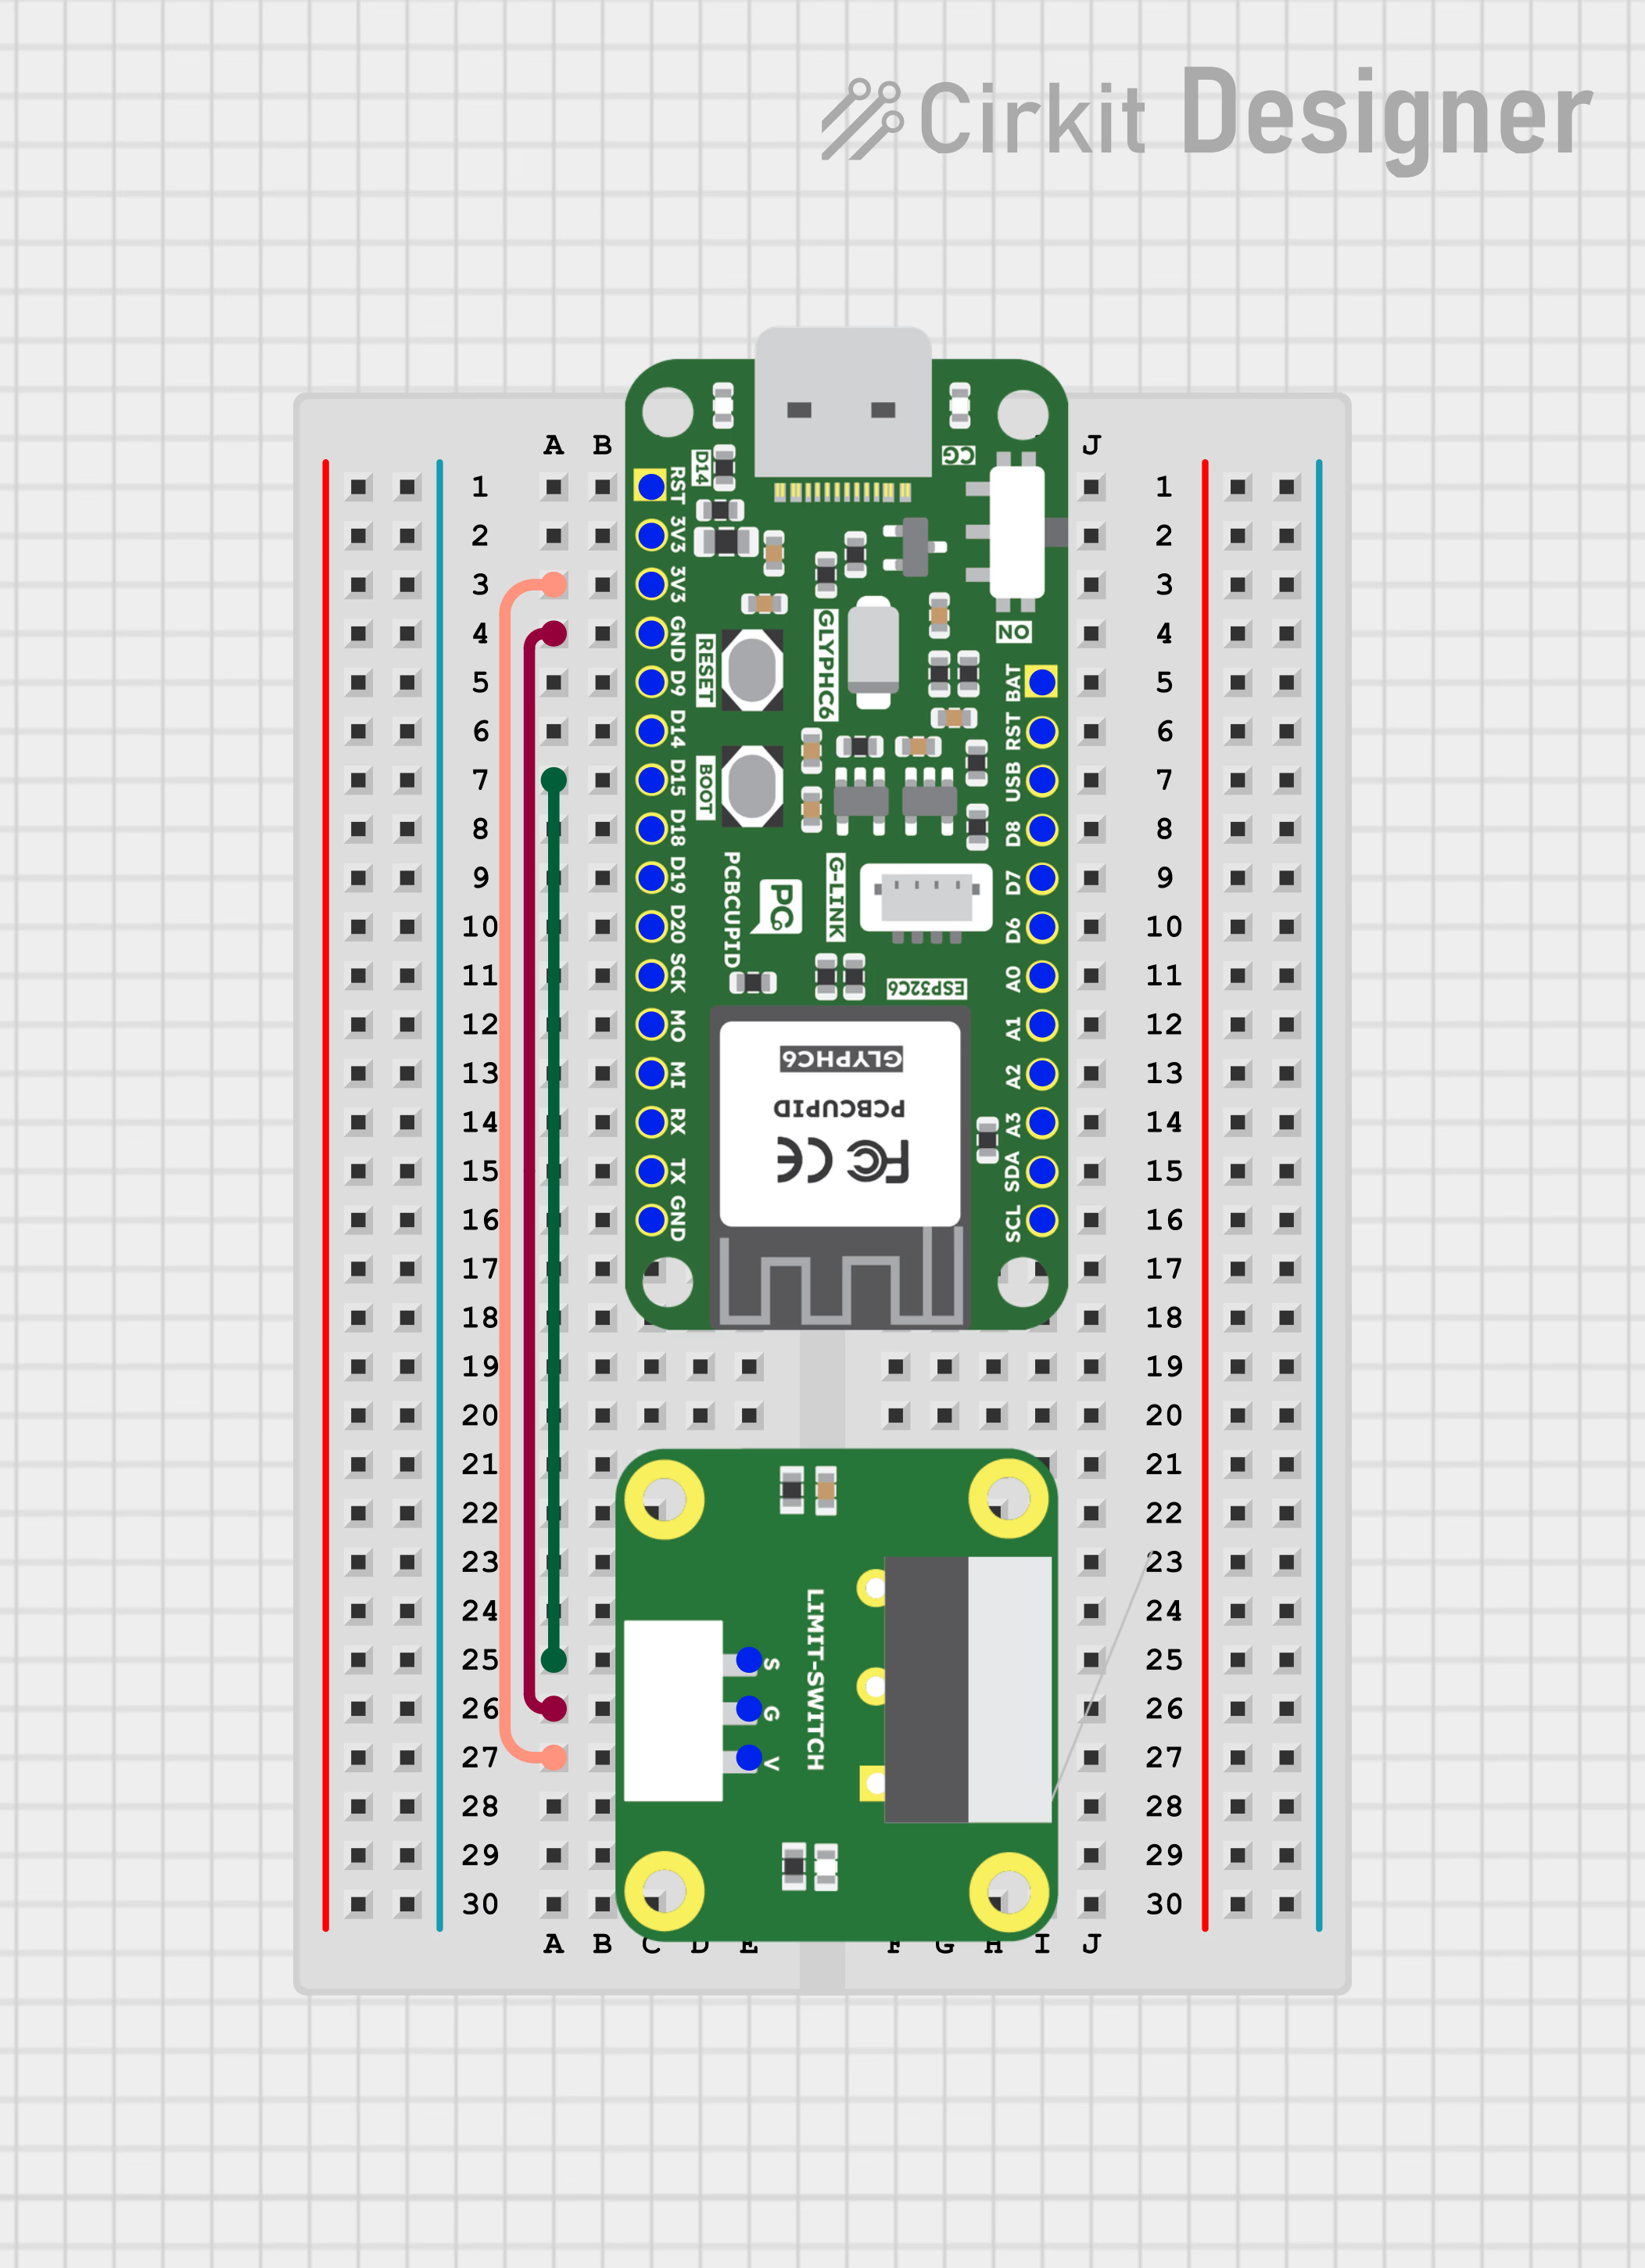
* S - SIGNAL
* G - GND
* V - VCC

## Key Features

* Mechanical or electromechanical operation for detecting position or motion
* Durable and reliable for repeated actuation
* Variety of actuator types: lever, roller, plunger, whisker, etc.
* Normally Open (NO) and Normally Closed (NC) contacts for flexible circuit design
* Wide voltage and current handling depending on model
* Compact and robust design suitable for industrial environments

## Applications

* Industrial Machinery – detects the end of travel of moving parts
* Conveyor Systems – position sensing and item detection
* Robotics & Automation – motion control and position feedback
* Safety Interlocks – prevents machine over-travel or unsafe operation
* Elevators & Lifts – detects door positions and travel limits
* CNC Machines – homing switches for axes

<Note>
  We have 2 variant's of the limit switch, one is GLYPH compatible (in terms of dimension) and the other one is generic. Please choose the variant based on the size and the direction fo the switch! otherwise both of them are electrically same.
</Note>

## Step 1: Hardware Required

1. Glyph Boards
2. Limit Switch

## Step 2: Circuit Diagram
![LIMIT\_SWITCH-CIRCUIT-DIAGRAM](https://files.pcbcupid.com/Documentation/Boards/g-mod/limit_switch/pcbcupid_limit_switch.avif)

## Step 3: Code Setup

1. **Open Arduino IDE.**
2. **Make sure to install the  library**
3. **Copy and paste the following code into the Arduino IDE:**

```cpp theme={null}
#define LIMIT_SWITCH_PIN  2  // Use the GPIO pin you're connecting the limit switch to

void setup() {
  Serial.begin(115200);
  pinMode(LIMIT_SWITCH_PIN, INPUT_PULLUP);  // Enable internal pull-up resistor
}

void loop() {
  int switchState = digitalRead(LIMIT_SWITCH_PIN);

  // When pressed, switchState will be LOW (0), otherwise HIGH (1)
  if (switchState == LOW) {
    Serial.println("1");  // Pressed
  } else {
    Serial.println("0");  // Not pressed
  }

  delay(100);  // Small delay to prevent flooding the serial monitor
}

```

## Step 4: Upload the Code

1. **Connect the Board**

* Connect your GLYPH board to your computer

2. **Select the Board and Port**

Do the following settings in your Arduino IDE,

* `Tools > Board > esp32 > Pcbcupid GLYPH C3`

<Warning>
  For the `Pcbcupid Glyph C3 ` to appear under `Tools > Board > esp32`, the esp32 board version installed in the Arduino IDE should be greater or equal to 3.1.0.
</Warning>

* `Tools > Port` and select the port connected to your GLYPH.
* `Tools > USB CDC on Boot >` ***Enabled***

<Warning>
  If `USB CDC on BOOT` not enabled, you won't be seeing any serial data on Arduino IDE.
</Warning>

3. **Upload the Code**

   * Click the upload button (➡️ icon) or use the shortcut `CRTL + U` in Arduino IDE to upload the code to the board.

## Step 5: Observe the Output

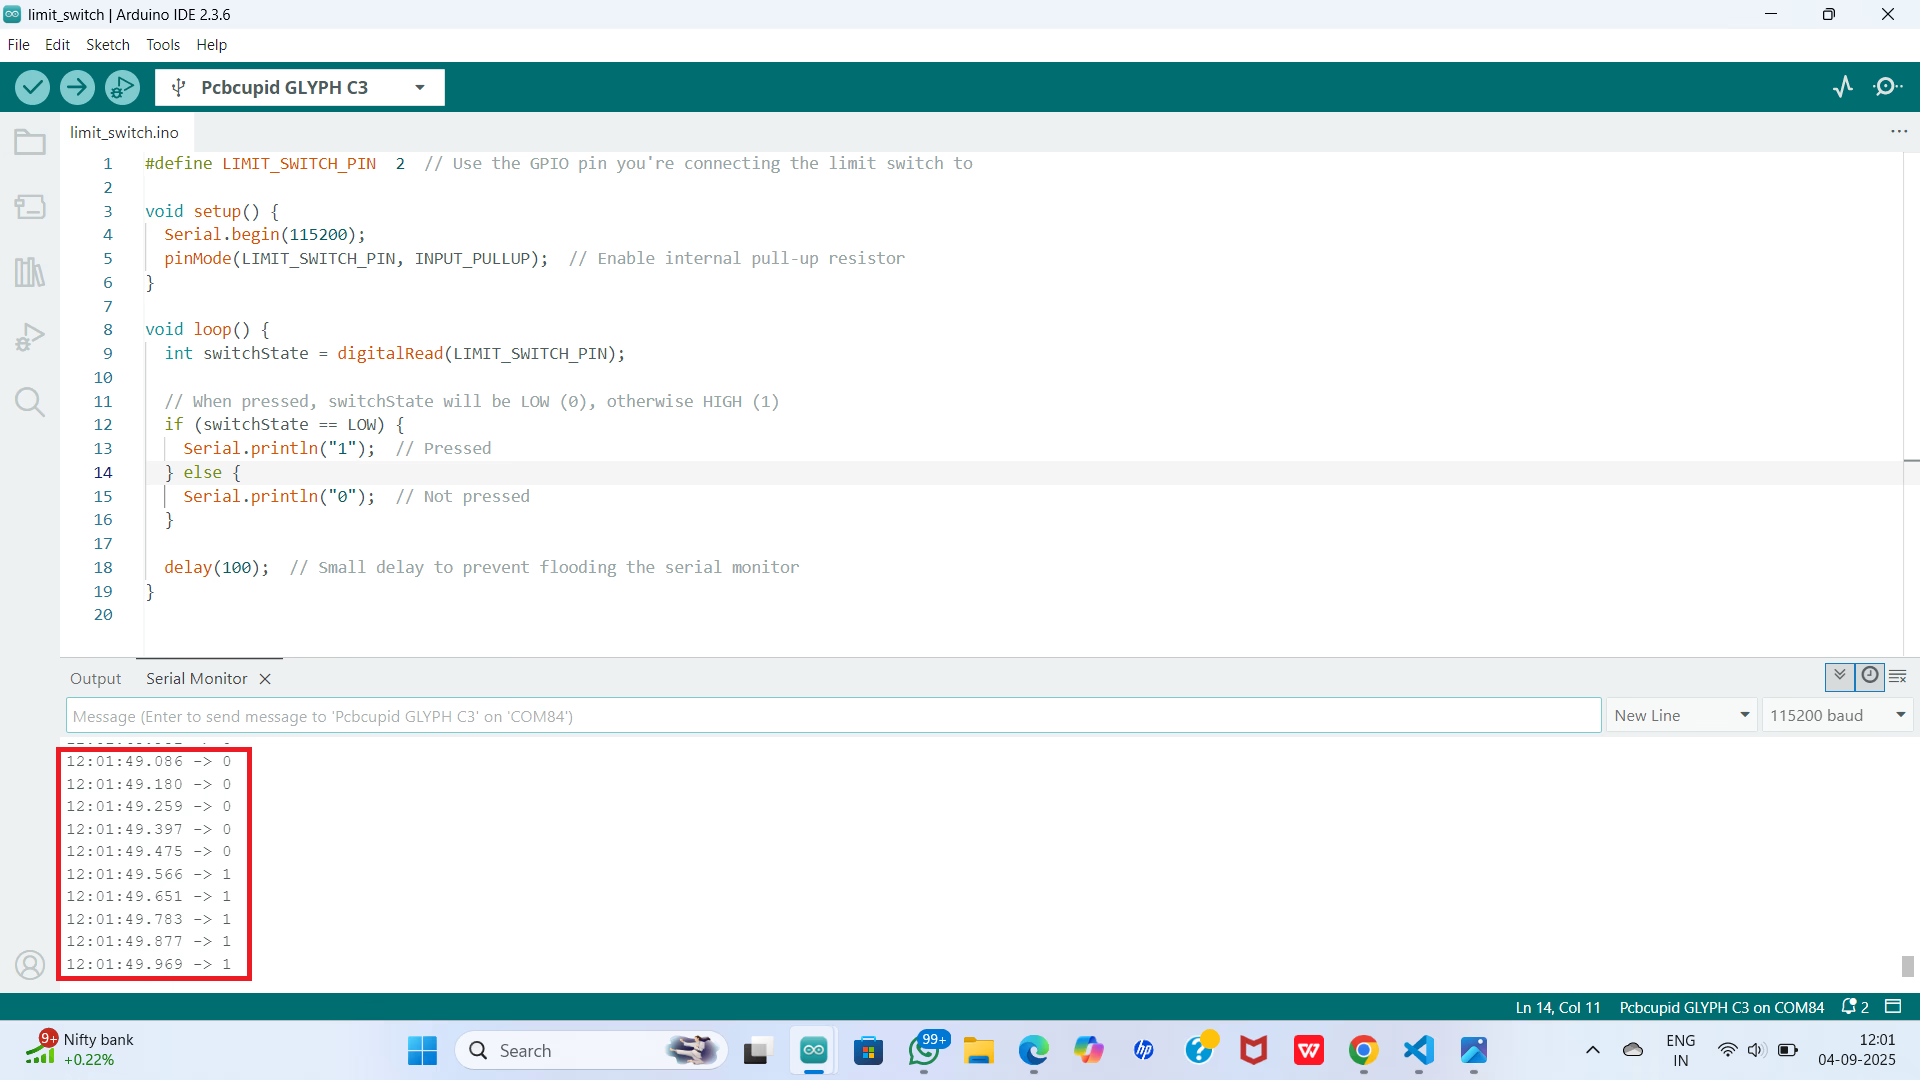
The Serial Monitor output will be a stream of 1s and 0s depending on the state of the limit switch:

* 1 → Limit switch is pressed/activated (circuit closed, GPIO reads LOW)
* 0 → Limit switch is not pressed (circuit open, GPIO reads HIGH)
![LIMIT\_SWITCH-result](https://files.pcbcupid.com/Documentation/Boards/g-mod/limit_switch/pcbcupid_limit_switch_result.avif)
