> ## Documentation Index
> Fetch the complete documentation index at: https://learn.pcbcupid.com/llms.txt
> Use this file to discover all available pages before exploring further.
> Interface the NAU8325 digital input Class-D audio amplifier and codec module with a Glyph ESP32 board over I²S to generate sine waves and stream SD card audio.
# Audio Codec
export const ShopHeader = ({title, url}) =>
;
};
The **NAU8325** is a highly efficient digital input Class-D audio amplifier designed by Nuvoton Technology Corporation. It is well-suited for compact and battery-powered devices, including portable speakers, IoT devices, tablets, and smart audio systems. It features integrated digital-to-analog conversion, eliminating the need for an external DAC and reducing system complexity.
## How it Works
The NAU8325 receives digital audio via the **I²S (Inter-IC Sound)** protocol, which transfers pulse-code modulated (PCM) data between the MCU and the amplifier.
**I²S Signals:**
* **BCLK (Bit Clock):** Synchronizes each individual bit of audio data.
* **LRCK / WS (Word Select):** Indicates whether the data is for the left or right channel.
* **SD (Serial Data):** The real-time, synchronized audio stream.
* **MCLK (Master Clock):** Optional high-frequency clock for advanced timing (not always required).
## Recommended Audio Format
To ensure compatibility with the NAU8325 and ESP32 hardware, use the following audio settings:
| Feature | Recommended Setting |
| :-------------- | :------------------- |
| **Format** | WAV or MP3 |
| **Sample Rate** | 44,100 Hz (Standard) |
| **Bit Depth** | 16-bit |
| **Channels** | Stereo or Mono |
Tools like [Audacity](https://www.audacityteam.org/) can be used to convert audio files to these formats before playback.
## Key Features & Applications
### Key Features
* **Efficiency**: High-efficiency Class-D output with digital volume control.
* **Simplicity**: Direct I²S input, reducing PCB space and system cost.
* **Streaming**: Supports real-time streaming, sine wave generation, and SD card playback.
* **Versatility**: Ideal for IoT audio, portable speakers, and digital amplifiers.
### Applications
* IoT audio notification and voice prompts
* Portable Bluetooth / Wi-Fi smart speakers
* Embedded audio playback and music players
* Educational kits and sound synthesizers
***
## Example 1: Sine Wave Generation
### Pin Configuration
| Pin (NAU8325) | Glyph Board | Description |
| :------------ | :---------- | :--------------------- |
| **WS** | GPIO 8 | I2S Word Select (LRCK) |
| **BCK** | GPIO 18 | I2S Bit Clock |
| **DATA** | GPIO 7 | I2S Serial Data |
| **MCK** | GPIO 19 | I2S Master Clock |
| **SCL** | GPIO 4 | I2C Clock |
| **SDA** | GPIO 5 | I2C Data |
### Step 1: Hardware Required
1. GLYPH Board
2. NAU8325 Module
3. Speaker
### Step 2: Circuit Diagram
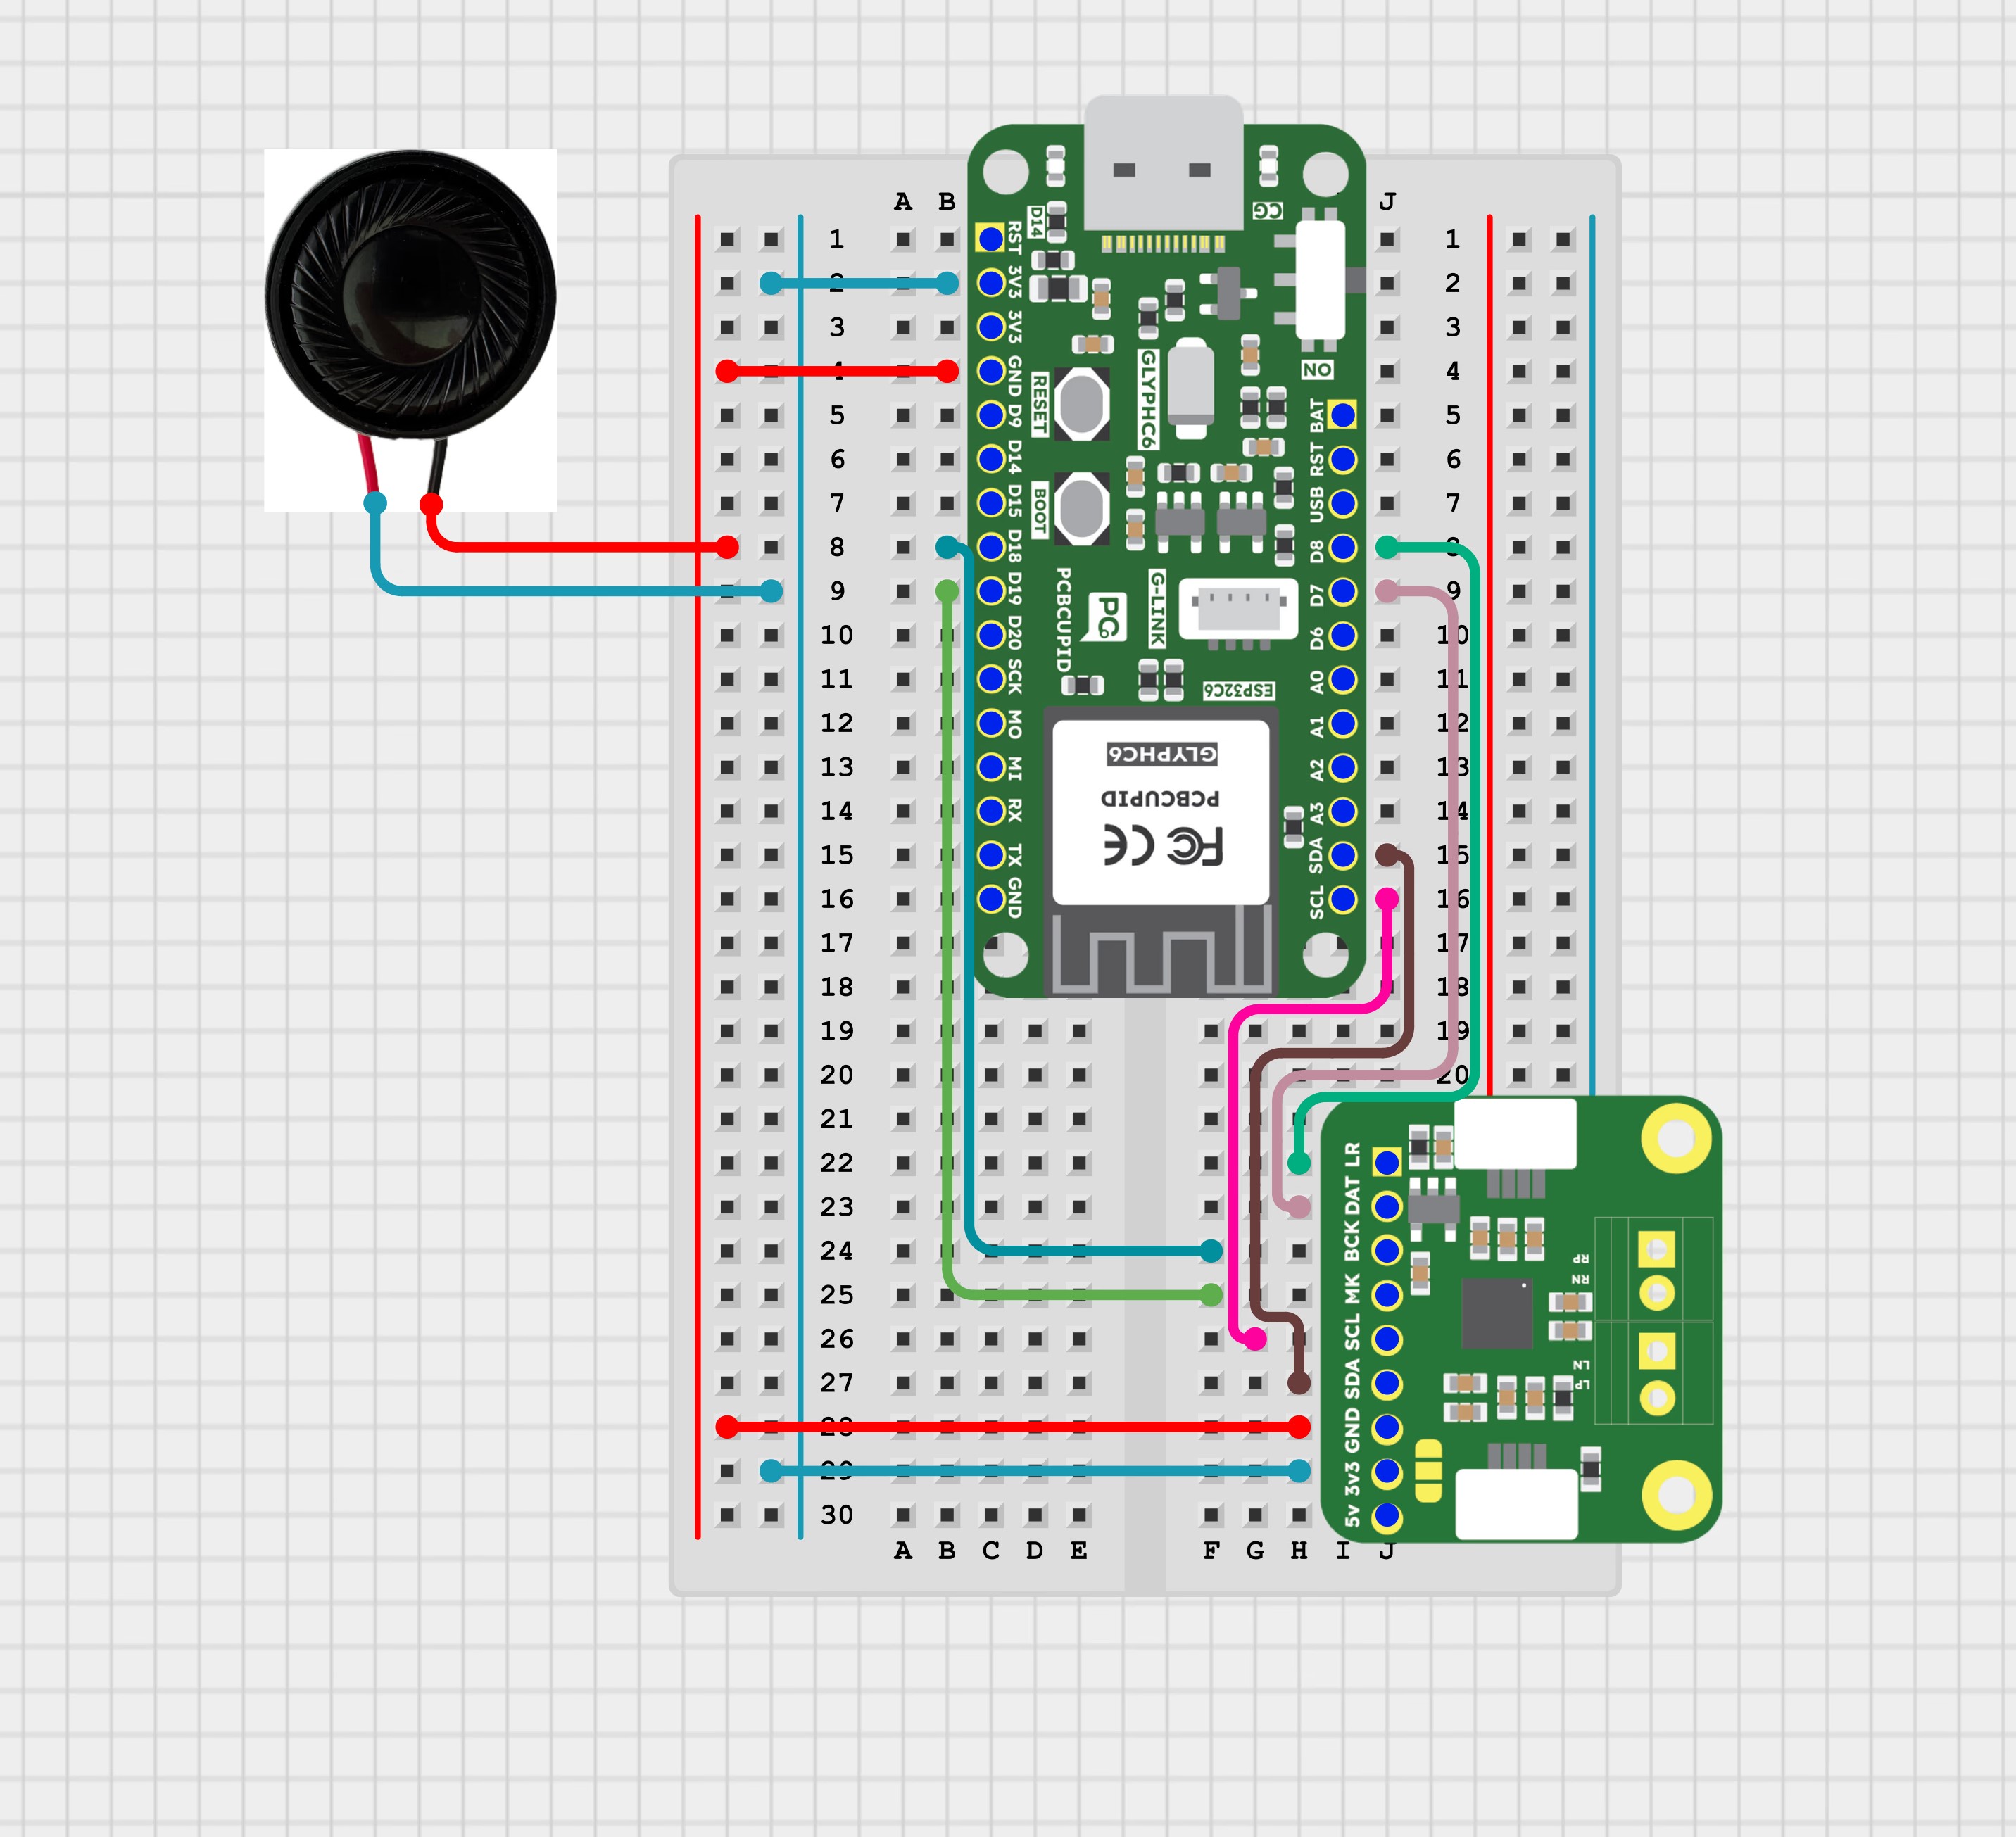
### Step 3: Code Setup
1. **Open Arduino IDE.**
2. **Install the required libraries:**
* Install **[AudioTools](https://github.com/pschatzmann/arduino-audio-tools)**
* Install **[PCBCUPID\_NAU8325](https://github.com/pcbcupid/PCBCUPID-NAU8325)**
3. **Copy and paste the following code into the Arduino IDE:**
```cpp theme={null}
/**
* @file streams-generator-i2s.ino
* @author Phil Schatzmann
* @modified by Karthik E
* @brief see https://github.com/pschatzmann/arduino-audio-tools/blob/main/examples/examples-stream/streams-generator-i2s/README.md
* @copyright GPLv3
*/
#include
#include "AudioTools.h"
#include "PCBCUPID_NAU8325.h" // install https://github.com/pcbcupid/PCBCUPID-NAU8325.git
AudioInfo info(44100, 2, 16);
SineWaveGenerator sineWave(32000); // subclass of SoundGenerator with max amplitude of 32000
GeneratedSoundStream sound(sineWave); // Stream generated from sine wave
I2SStream i2s;
StreamCopy copier(i2s, sound); // copies sound into i2s
// Use our NAU8325 codec configuration
TwoWire I2Cbus(0);
PCBCUPID_NAU8325 nau8325(I2Cbus);
void setup(void) {
// Open Serial
Serial.begin(115200);
while(!Serial);
AudioToolsLogger.begin(Serial, AudioToolsLogLevel::Info);
// Initialize I2C for NAU8325
Serial.println("Checking I2C...");
I2Cbus.begin(4, 5);
delay(10);
// Initialize NAU8325 codec
if (!nau8325.begin()) {
Serial.println("NAU8325 init failed");
while (1);
}
nau8325.setVolume(0xFF, 0xFF); // Set max volume
Serial.println("NAU8325 detected and configured!");
// Start I2S
Serial.println("starting I2S...");
auto config = i2s.defaultConfig(TX_MODE);
config.pin_ws = 8;
config.pin_bck = 18;
config.pin_data = 7;
config.pin_mck = 19;
config.is_master = true;
config.use_apll = false;
config.i2s_format = I2S_STD_FORMAT;
config.copyFrom(info);
i2s.begin(config);
// Setup sine wave
sineWave.begin(info, N_B4);
Serial.println("started...");
}
// Arduino loop - copy sound to out
void loop() {
copier.copy();
}
```
### Step 4: Upload the Code
1. **Connect the Board**
* Connect your GLYPH board to your computer.
2. **Select the Board and Port**
Do the following settings in your Arduino IDE:
* `Tools > Board > esp32 > Pcbcupid GLYPH`
* `Tools > Port` and select the port connected to your GLYPH.
* `Tools > USB CDC on Boot >` ***Enabled***
If `USB CDC on Boot` is not enabled, you won't see any serial output in the Serial Monitor.
3. **Upload the Code**
* Click the upload button (➡️ icon) or use the shortcut `Ctrl + U` in Arduino IDE to upload the code to the board.
### Step 5: Observe the Output
* You should hear a continuous sine wave tone from the speaker connected to the NAU8325 module.
***
## Example 2: SD Card Audio Playback
### Pin Configuration
| Peripheral | Signal | ESP32 GPIO Pin | Description |
| :------------ | :----- | :------------- | :--------------- |
| **SD Card** | SCK | GPIO 21 | SPI Clock |
| | MISO | GPIO 23 | SPI MISO |
| | MOSI | GPIO 22 | SPI MOSI |
| | CS | GPIO 19 | SPI Chip Select |
| **NAU8325** | SDA | GPIO 4 | I2C Data |
| | SCL | GPIO 5 | I2C Clock |
| **I2S Audio** | BCK | GPIO 6 | I2S Bit Clock |
| | WS | GPIO 8 | I2S Word Select |
| | DATA | GPIO 7 | I2S Serial Data |
| | MCLK | GPIO 20 | I2S Master Clock |
### Step 1: Hardware Required
1. GLYPH Board
2. NAU8325 Module
3. Speaker
4. SD Card Module
### Step 2: Circuit Diagram
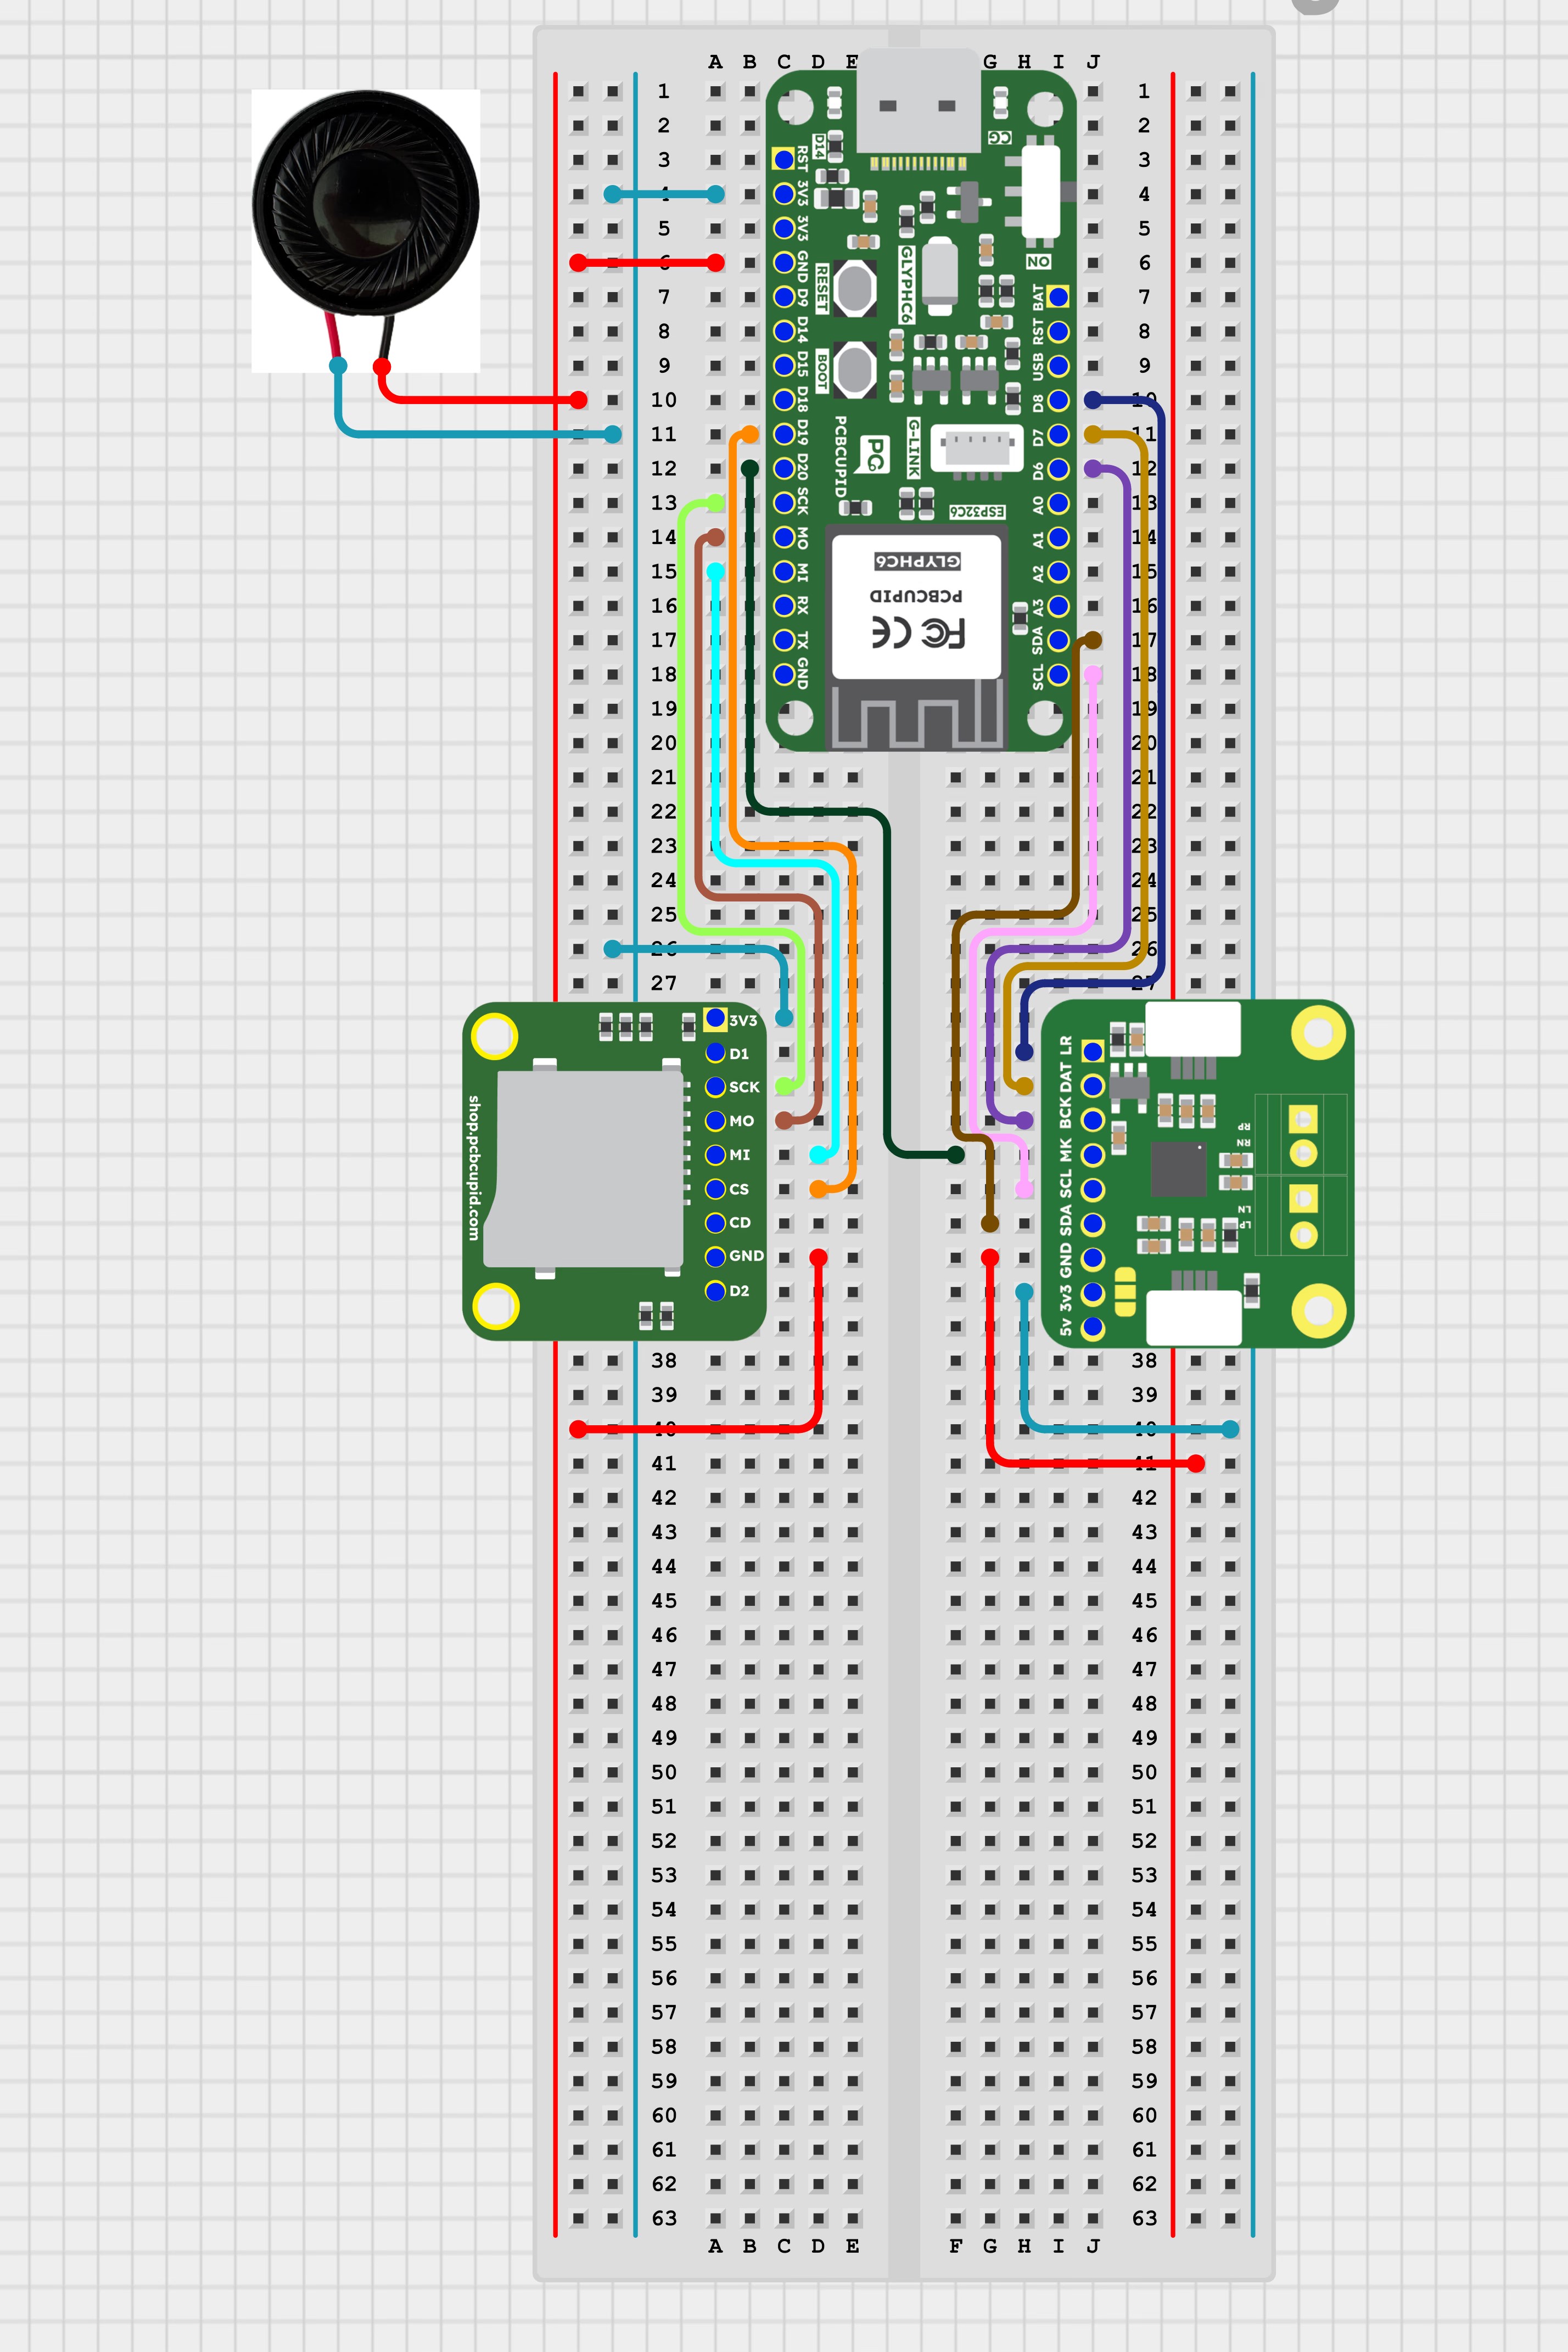
### Step 3: Code Setup
1. **Open Arduino IDE.**
2. **Install the required libraries:**
* Install **[AudioTools](https://github.com/pschatzmann/arduino-audio-tools)**
* Install **[PCBCUPID\_NAU8325](https://github.com/pcbcupid/PCBCUPID-NAU8325)**
3. **Copy and paste the following code into the Arduino IDE:**
```cpp theme={null}
#include
#include
#include
#include "AudioTools.h"
#include "AudioTools/AudioCodecs/CodecMP3Helix.h"
#include "PCBCUPID_NAU8325.h" // install https://github.com/pcbcupid/PCBCUPID-NAU8325.git
/* === Pin configuration === */
// SD Card configuration
#define MY_SCK 11
#define MY_MISO 3
#define MY_MOSI 2
#define MY_CS 1
// I2S (NAU8325) configuration
#define I2S_WS 24
#define I2S_BCK 25
#define I2S_DATA 23
#define I2S_MCLK 22
// === Audio settings ===
const uint32_t sample_rate = 44100; // sample_rate can be changed as per the song frequency (e.g. 48000, 32000, 16000, 8000, 96000, 12000, 64000)
const uint16_t ratio = 256; // ratio supported by NAU8325 (e.g. 256, 400, 500)
const uint8_t bits = 16; // bit depth (e.g. 16, 24, 32)
// === Objects ===
TwoWire I2Cbus(0);
PCBCUPID_NAU8325 nau8325(I2Cbus);
// Audio Stream Configuration
I2SStream i2s;
MP3DecoderHelix decoder;
EncodedAudioStream encodedStream(&i2s, &decoder);
StreamCopy copier;
File audioFile;
void setup() {
Serial.begin(115200);
delay(10);
Serial.println("=== NAU8325 SD EXAMPLE ===");
I2Cbus.begin(4, 5);
if (!nau8325.begin()) {
Serial.println("NAU8325 init failed");
while (1)
;
}
nau8325.setVolume(0xFF, 0xFF); // Setting NAU8325 at maximum volume
Serial.println("NAU8325 Turned ON");
// SD card initialization
SPI.begin(MY_SCK, MY_MISO, MY_MOSI, MY_CS);
if (!SD.begin(MY_CS)) {
Serial.println("SD card init failed");
while (1)
;
}
audioFile = SD.open("/Dwapara.mp3"); // Enter the MP3 song name from your SD card followed by "/" e.g.: "/music.mp3"
if (!audioFile || audioFile.isDirectory()) {
Serial.println("MP3 file not found");
while (1)
;
}
// I2S Config
auto config = i2s.defaultConfig(TX_MODE);
config.sample_rate = sample_rate;
config.bits_per_sample = bits;
config.channels = 2;
config.pin_bck = I2S_BCK;
config.pin_ws = I2S_WS;
config.pin_data = I2S_DATA;
config.pin_mck = I2S_MCLK;
config.i2s_format = I2S_STD_FORMAT;
config.use_apll = false;
i2s.begin(config);
AudioToolsLogger.begin(Serial, AudioToolsLogLevel::Info);
decoder.begin();
copier.begin(encodedStream, audioFile);
Serial.println("Playback started!");
}
void loop() {
if (!copier.copy()) {
// Sending empty values to auto turn off NAU8325
Serial.println("Playback done. Sending silence...");
int16_t zero = 0;
for (int i = 0; i < 2048 * 2; i++) {
i2s.write((uint8_t *)&zero, sizeof(zero));
}
while (1)
;
}
}
// ========== SD Card File Listing ==========
void listDir(fs::FS &fs, const char *dirname, uint8_t levels) {
Serial.printf("Listing directory: %s\n", dirname);
File root = fs.open(dirname);
if (!root || !root.isDirectory()) {
Serial.println("Failed to open directory");
return;
}
File file = root.openNextFile();
while (file) {
if (file.isDirectory()) {
Serial.print(" DIR : ");
Serial.println(file.name());
if (levels) listDir(fs, file.path(), levels - 1);
} else {
Serial.print(" FILE: ");
Serial.print(file.name());
Serial.print(" SIZE: ");
Serial.println(file.size());
}
file = root.openNextFile();
}
}
```
### Step 4: Upload the Code
1. **Prepare SD Card**
* Format the microSD card (FAT32 recommended).
* Save your MP3 file as `/Dwapara.mp3` on the SD card root directory.
* Insert the SD card into the SD card module.
2. **Connect the Board**
* Connect your GLYPH board to your computer.
3. **Select the Board and Port**
Do the following settings in your Arduino IDE:
* `Tools > Board > esp32 > Pcbcupid GLYPH`
* `Tools > Port` and select the port connected to your GLYPH.
* `Tools > USB CDC on Boot >` ***Enabled***
If `USB CDC on Boot` is not enabled, you won't see any serial output in the Serial Monitor.
4. **Upload the Code**
* Click the upload button (➡️ icon) or use the shortcut `Ctrl + U` in Arduino IDE to upload the code to the board.
### Step 5: Observe the Output
* Open the Serial Monitor at **115200 baud**.
* The MP3 file stored on the SD card will play through the speaker connected to the NAU8325 module.
 }
}